When you create reports, dashboards, or data in Excel, you can print all of these to share with others on paper. Like any other application, Excel has many options and customizations you can use while printing.
In this guide, we will learn all these printing options in detail. So, let’s get started.
Steps to Print a Page in Excel
- Click on the File tab.

- Go to the Print Option to open all the print options.

- Select the printer which you want to use for the print.

- Use the Print button to give the print command.
When you click the Print button, Excel sends the print request to the printer, and then the printer prints it on the page. There are three places to access the printing option in Excel:
- Print Section
- Page Layout Dialog Tab
- Page Setup Dialog Box
Further in the tutorial, we will learn to use all the major options related to Excel printing.
Using Print Preview Before Printing
When you go to the backstage view (Click File Tab) and go to the print, you can see the print preview there. You can also open the print preview using the keyboard shortcut Ctrl + P.

It shows the exact look of the page you will print – margins, header, footer, number of pages, etc.
Fitting Print into a Single Page (Scaling)
Sometimes, when you have data that takes more than a single page, you want to fit that data into a single page. For this, you can use the scaling option.

When you open the drop-down, there are three options to select, or you can click on the Custom Scaling Options… change the scaling manually. It is a quick guide that helps you to learn more to fit print into one page.
Using Page Set Dialog Box to Change Print Settings
You can use the page setup dialog box, which allows you to change many print settings. Go to the File Tab > Print > Page Setup to open it. You can also use the keyboard shortcut Alt > P > S > P.

In the page setup dialog box, as I said, there are multiple settings that you can change and apply.

Changing Page Margins Before You Print
In Excel (even in other Microsoft Applications), there is page margin on the paper when you print from a sheet. Margin means the space around the page.

And before taking a print, Excel allows you to adjust these margins. You can increase and decrease the margins to adjust the space on the page to print the data. Go to the File > Print > Margin Drop Down.

In the margin drop-down, you can select the type of margin you want to use for the print. There are three pre-defined margins which you can use:
- Normal
- Wide
- Narrow
And if you want to specify a margin, click on the Custom Margin to open the Page Setup.
Changing Orientation for Printing
You can also change the page orientation before you print from your worksheet. When you click on the File Tab and then go to the Print section, you have the drop-down to change the orientation.
Here, you can edit the values to increase and decrease the margins. You can even change the margin for one or two sides only. Or you can go to Page Layout > Margin.
You can also use the keyboard shortcut Alt ⇢ P ⇢ M ⇢ A. It will open the page setup, and you can change the margins from there.

You can also access the same option from the Page Layout tab and then click on the Orientation drop-down, and from there, select the orientation.

Changing Paper Size
There are multiple types of pages that you can use to print your data. When you go to the “Print Section” from the File Tab, there are different sizes you can select from there.

This option depends more on the type of printer you have and the pages you have for the print. But when you select a size, Excel will show you the print preview based on that.
Like all the other applications, Excel allows you to define a header and footer for the page you want to print. When you open the page setup dialog box in the Header/Footer tab, you can define it there.

When you click the drop-down, you can select the header and footer you want to print on each page.

There are multiple options to use for header and footer.
Using Different Page Views
Excel also allows you to change the view of the page within the sheet to make changes to the actual page you want to print. Go to the View Tab > Workbook View. From here, you can select the view that you wish to show.

There are three major three types of views that you can use. By default, you are on the Normal view.
1. Page Break Preview
With this view, you can see the breakage of the pages. It shows you from which column and row the next page starts.

You can see the dashed line between the page 1 and the page 2. This line is adjustable. You can use the mouse cursor to adjust it.

2. Page Layout
The Page Layout changes the view into an actual page view, which means you can see how your page will look when printed.

You can directly add and remove the header and footer when you activate this view. And when you make any changes to your print settings (like changing margins), you can see those changes instantly.
Print Selection Only
Excel also allows you to print the selected cells only. Let’s see if you want to print the range A1:C10 instead of the entire sheet. For this, click on the first drop-down in the print section and select “Print Selection” to print the selected range.

Define a Print Area
Sometimes, you are required to print a specific part of the worksheet instead of the complete sheet. For this:
- Select the range of cells you want to set as the print area.
- Go to the Page Layout > Page Setup > Print Area > Set Print Area.

Once you finish printing, you can clear the print area from the option in the same “Print Area” drop-down.
There is one more way to specify the print area, and that is from the page setup. Once you open the page set up a dialog box (Alt > P > S >P) in the sheet tab; you have the selection box to specify the print area.

Changing Page Order in the Print
When you have multiple pages to print, Excel must follow an order for printing. And it gives you an option to change the order. You can specify the page order in the page setup dialog box in the sheet tab in two ways.

- Going Down and then Over – It will first print pages from the downwards and then go to the next line of the pages.
- Going Over, and then Down – It will print pages from the horizontal direction and then go downwards to the next line.
Printing Multiple Copies of a Single Report
Sometimes, when you are printing reports, you might need to get multiple copies. Excel allows you to give a single print command for multiple copies to take care of that. In the print section, you have an input box to enter the number of copies you want to print.

And when you print multiple copies, make sure to have the Collated selected from the drop-down below. With this option, Excel ensures to print one copy of the report from the first to the last page, then print the next copy from the first to the last page, and so on.
Print Column and Row Heading
Each row and column has a heading (Address), but when you take a printout of the sheet, Excel doesn’t print those headings until you activate the setting. In the Page Layout Tab > Sheets Options > Headings > Tick mark Print.

From there, you can also tick mark the option to print the gridlines on the page. Both options are worksheet-level options, so you need to change them in each worksheet before printing.
Print to PDF
Using Excel in Windows also allows you to print your spreadsheet as a PDF file. Yes, that’s true. When you go to the print section (Ctrl + P), you can select “Microsoft Print to PDF” in the printer drop down list.

After selecting it, you need to click on the “Print” button, and it will open the Save As dialog box to save the PDF file.

Print a Header Row at the Top of Each Page
Let’s say you are printing multiple pages, and there is a header row that you want to print on top of each page; there is an option for this. This option is called print titles. When you open the Page Setup dialog box > Sheet Tab, you can define the print titles.

There are two options: one is to repeat a row on each page at the top, and the second is to repeat a column at the right of each page.
Add a Watermark in a Printout
You can add a watermark to a sheet to print with the data on a page. You must change the page view (View Tab > Page Layout) for this.

Once you switch to the Page Layout view, click in the centre header box and click on the Picture button on the Header & Footer tab.
When you click on it, it lets you locate an image to specify. And when you do that, it inserts a picture tag, meaning the image is in the watermark.

Now, you need to click before the picture tag and hit the enter key a few times to move the watermark picture to the center of the page.

Here’s a quick guide to know more about adding watermark in Excel.
Print a Chart
When you insert a chart in Excel, you can print that chart as well, along with the data. But there are two ways of printing charts (Or objects).
- You can print a chart when you print the rest of the data from a worksheet.
- Or you can print a chart alone on a separate sheet.
To use the second method, click on a chart to select it and then use the shortcut Ctrl + P to go to the print section.

There, you can see in the print preview that it only shows you the chart you can select.
Add a New Printer
You can directly open the “Add a Printer” option from the Excel print section. When you click on the printer drop-down, at the end, there’s an option to “Add Printer”, which opens Windows option to add a printer.

You can scan for a new printer or manually add a printer.
Excel Print Titles: Set Row 1 to Print on Every Page
In Excel, you can use the Print Titles option if you want to print multiple pages but create a header or title from the first row to print at the top of each page.

Above we have the data, and we need to set the first row as the title to print on every page. This table has more than 1000 rows of data. When I try to print it, it has 23 pages to print.
Use Print Titles to Set 1 Row as a Header in Print Outs
- First, go to the Page Layout Tab ⇢ Page Set Group ⇢ Print Titles.

- After that, click on the “Print Title” button to open the “Page Setup” dialog box.

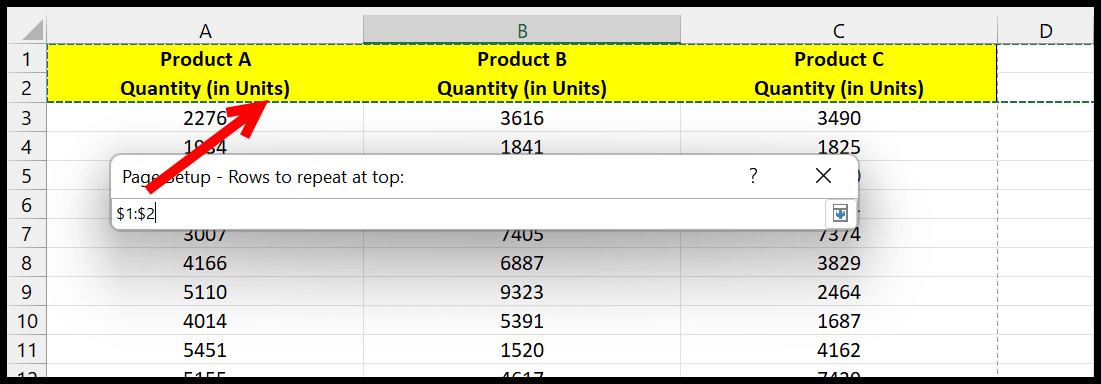
- Now from this dialog box, you need to use the option “Rows to repeat at top:”. So, click on the upward arrow that you have on the right side.

- At this point, you have a range selection input bar and you need to select the first row to specify it.

- Next, click on the down arrow from the right side to go back to the page setup.

- In the end, click OK to save the settings.

Now, when printing this data, Excel will print the first row on each page.
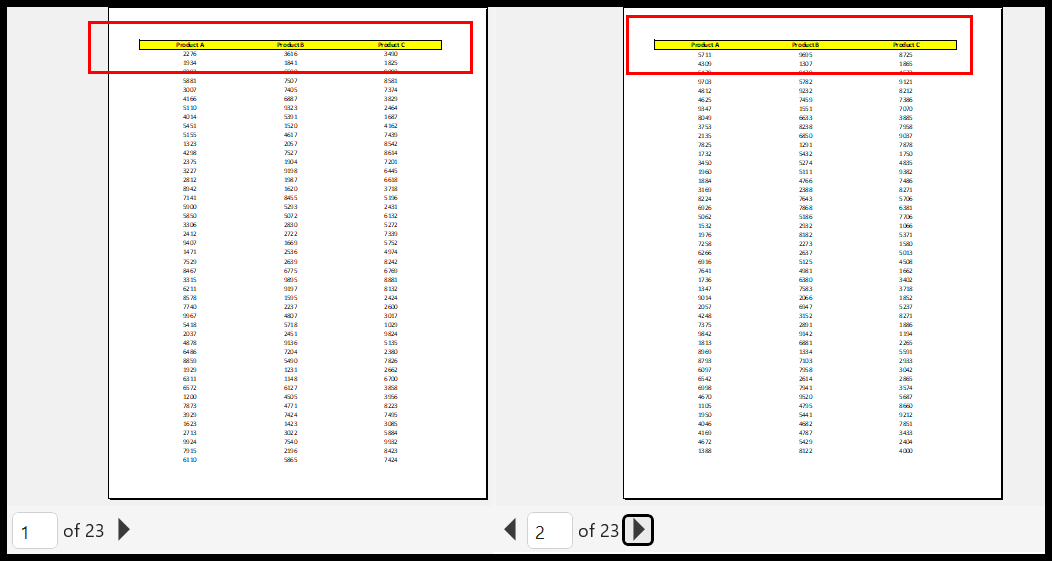
As you can see in the above snapshot, we have a total of 23 pages in the print preview, and it shows the page titles that we have specified from the first row.
Using Multiple Rows as Print Titles (Headers)
In the same way, where you have specified the first row, you can also specify multiple rows to set as a print title.
You just need to select those rows and specify their address in the input bar, and after that, click OK.

But you can only specify the continuous rows; if you try to refer to the non-continuous rows, it will show an error.

Other Printing Options
- From Page Setup Dialog Box > Sheet > Comment and Notes, you can activate the option to print comments along with the data.
- From Page Setup Dialog Box > Sheet > Cell error, you can change the error values in the data while printing.
- From Page Setup Dialog Box > Margin > Center on page, you can make data horizontally and vertically at the center of the sheet.
- From Page Setup Dialog Box > Header/Footer > Different Odd and Even pages, you can specify a different header and footer for even and odd pages.