I’m sure this has happened to you many times: you’re working on some data in Excel, and suddenly you notice a few dashed lines appearing in your worksheet.
While working, these lines can feel distracting, and if you’re preparing the file to present to your boss, you probably don’t want them showing up either.
These dashed lines are page breaks that Excel displays to give you a preview of how your worksheet will be divided when printed.
In this tutorial, I’m going to show you how to remove or deactivate those page breaks whenever you need to.
We’ll focus on removing page breaks in Excel, and along the way, we’ll also look at the two different types of page breaks you’ll come across and how to handle both while working with your data.
Automatic Vs. Manual Page Breaks
Apart from the automatic page breaks that Excel adds, you can also create page breaks manually.
The key difference lies in their appearance: manual page breaks are by solid lines, while automatic page breaks inserted by Excel are displayed as dashed lines. In the snapshot below, you can see two different types of page breaks. You can see in the below snapshot:

Manual breaks give you control to decide exactly where a new page should begin, whereas automatic breaks are based on Excel’s default page layout settings.
And that is why the method to remove both the page breaks are different.
Why do I Get Page Breaks in Excel?
You might wonder why I’m seeing the page breaks in the first place. Well, there can be several reasons for this. One primary reason is when you open the print options in Excel.
For example, if you press the shortcut key Ctrl + P or go to File > Print, the moment you return, Excel instantly shows you page breaks.
This happens because Excel assumes you want to print your worksheet, so it displays the page breaks to give you a clear idea of how your data will be divided across printed pages.
In other words, it shows you the boundary between one page and the next, helping you understand how your worksheet will look when printed.
Quick Way to Remove the Page Break lines from Normal View (Dashed Automatic Page breaks)
To use this option, you need to activate the normal view in your worksheet. If you have page break view activated, you can not untick the option.
The dashed and bold gray page break lines start reflecting in your data. To remove these lines from the “Normal View”, follow the steps outlined below.
- First, click on the “File” tab and then click on “options” from the pop-up menu.


- After that click on the “Advanced” and scroll down to “Display options for this worksheet” from the scroll bar.
- Now, uncheck the “Show page breaks” and click “OK.

When you use this option and untick page breaks, you’re not actually removing them, you’re just disabling them.
This means Excel won’t show the automatic page breaks anymore, even when you go to Print Preview and return to Normal view.
As a result, you won’t see page breaks in your current workbook, or in any other workbook you open.
Close and Reopen the Workbook to Remove the Page breaks
Apart from this, another easy way to remove page breaks in Excel is to simply close the workbook and reopen it. When you do this, Excel automatically clears the page breaks it had added on its own.
Remove the Manual Inserted Page Break
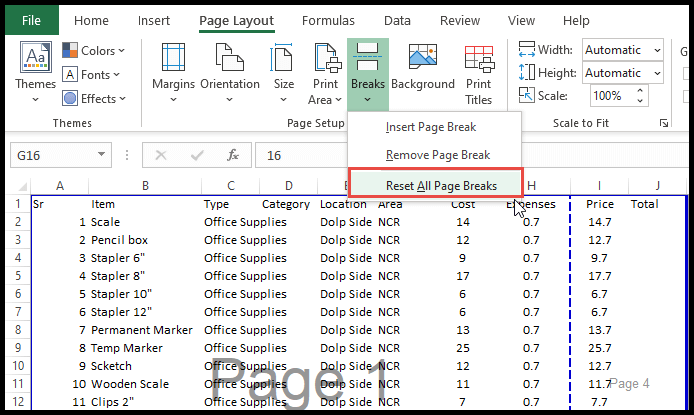
If you’ve manually inserted page breaks in your Excel worksheet, you can easily remove them using the option available on the Page Layout tab.
First, you need to go to the page layout tab and then find the option page breaks there and this option is basically a drop down where you need to click.
In this drop-down, you’ll find three options: Insert Page Break, Remove Page Break, and Reset All Page Breaks.
If you want to remove just one page break, simply select the cell that’s right next or before or top or below the page break line and then choose the Remove Page Break option.
In the example above, when I select the cell just below a horizontal page break and then go to Page Layout > Page Break > Remove Page Break, it removes the page break directly above that cell.
In the second example, you can see that if I use the Remove Page Break option again, it removes the page break that’s on the right side of the selected cell.
And if you want to remove both page breaks at once, just select the cell that’s right below where the two page breaks intersect, and then use the Remove Page Break option.
VBA Code to Remove Manual Page Breaks in Excel
If you’d like to automate the process of removing page breaks, you can use a simple VBA code.
With it, you can reset all manually added page breaks in your current worksheet, remove them from every sheet in your current workbook, or even clear them from all worksheets across every workbook you have open.
Below, I’ve shared three VBA codes you can use depending on your needs.
Sub RemoveAllPageBreaks_CurrentWorksheet()
    Dim ws As Worksheet
    Set ws = ActiveSheet
    ' Remove all horizontal page breaks
    ws.ResetAllPageBreaks
End Sub
Sub RemoveAllPageBreaks_AllWorksheet()
Dim ws As Worksheet
For Each ws In ActiveWorkbook.Worksheets
ws.ResetAllPageBreaks
Next ws
End SubSub RemovePageBreaks_AllWorkbooks()
Dim wb As Workbook
Dim ws As Worksheet
' Loop through all open workbooks
For Each wb In Application.Workbooks
' Skip personal macro workbook if open
If wb.Name <> "PERSONAL.XLSB" Then
For Each ws In wb.Worksheets
ws.ResetAllPageBreaks
Next ws
End If
Next wb
End SubTo use these codes, go to the Developer tab and open the Visual Basic Editor. Once it’s open, insert a new module by clicking Insert > Module.
Now, paste any (or all) of the codes into that module.
You can run them directly by clicking the Run button in the editor, or simply close the editor, return to Excel, and click on Macros from the Developer tab (right next to the Visual Basic button).
There, you’ll see the codes listed by name. Select the code and click Run it to remove page breaks.
And below we have a PAGE BREAK APPLICATION CODE that allows you to manage all the page breaks in the active worksheet.
The code below is a complete tool to help you manage page breaks in Excel. When you run it, the macro first identifies the active worksheet and then shows an input box with six options.
These options let you: remove all page breaks, remove only manual breaks, add a horizontal or vertical page break, reset to automatic page breaks, or switch to Page Break Preview.
To use it, just type a number from 1 to 6 for the option you want and click OK. The code will then carry out that action for you.
Sub PageBreakManager()
    Dim userChoice As String
    Dim ws As Worksheet

    Set ws = ActiveSheet

    ' Show options to user
    userChoice = InputBox("Choose an option:" & vbCrLf & vbCrLf & _
                         "1 - Remove ALL page breaks" & vbCrLf & _
                         "2 - Remove MANUAL page breaks only" & vbCrLf & _
                         "3 - Add horizontal page break" & vbCrLf & _
                         "4 - Add vertical page break" & vbCrLf & _
                         "5 - Reset to automatic page breaks" & vbCrLf & _
                         "6 - View page break preview" & vbCrLf & vbCrLf & _
                         "Enter your choice (1-6):", "Page Break Manager", "1")

    ' Process user choice
    Select Case userChoice
        Case "1"
            RemoveAllPageBreaks ws
        Case "2"
            RemoveManualPageBreaks ws
        Case "3"
            AddHorizontalPageBreak ws
        Case "4"
            AddVerticalPageBreak ws
        Case "5"
            ResetToAutomaticPageBreaks ws
        Case "6"
            ShowPageBreakPreview ws
        Case ""
            ' User cancelled
            Exit Sub
        Case Else
            MsgBox "Invalid choice. Please run the macro again and enter 1-6.", vbExclamation
    End Select
End Sub

' Remove all page breaks (manual and automatic)
Sub RemoveAllPageBreaks(ws As Worksheet)
    On Error GoTo ErrorHandler

    Application.ScreenUpdating = False

    With ws
        ' Remove all horizontal page breaks
        .HPageBreaks.Clear
        ' Remove all vertical page breaks
        .VPageBreaks.Clear
        ' Reset print area (this also removes automatic breaks)
        .PageSetup.PrintArea = ""
    End With

    Application.ScreenUpdating = True
    MsgBox "All page breaks removed from '" & ws.Name & "'", vbInformation
    Exit Sub

ErrorHandler:
    Application.ScreenUpdating = True
    MsgBox "Error removing page breaks: " & Err.Description, vbCritical
End Sub

' Remove only manual page breaks (keep automatic ones)
Sub RemoveManualPageBreaks(ws As Worksheet)
    Dim i As Integer

    On Error GoTo ErrorHandler
    Application.ScreenUpdating = False

    With ws
        ' Remove manual horizontal page breaks
        For i = .HPageBreaks.Count To 1 Step -1
            If .HPageBreaks(i).Type = xlPageBreakManual Then
                .HPageBreaks(i).Delete
            End If
        Next i

        ' Remove manual vertical page breaks
        For i = .VPageBreaks.Count To 1 Step -1
            If .VPageBreaks(i).Type = xlPageBreakManual Then
                .VPageBreaks(i).Delete
            End If
        Next i
    End With

    Application.ScreenUpdating = True
    MsgBox "Manual page breaks removed from '" & ws.Name & "'", vbInformation
    Exit Sub

ErrorHandler:
    Application.ScreenUpdating = True
    MsgBox "Error removing manual page breaks: " & Err.Description, vbCritical
End Sub

' Add horizontal page break above selected cell
Sub AddHorizontalPageBreak(ws As Worksheet)
    Dim selectedRange As Range
    Dim rowNumber As String

    On Error GoTo ErrorHandler

    ' Get row number from user
    rowNumber = InputBox("Enter row number where you want to add horizontal page break:" & vbCrLf & _
                        "(Page break will be added ABOVE this row)", "Add Horizontal Page Break", ActiveCell.Row)

    If rowNumber = "" Then Exit Sub ' User cancelled

    If IsNumeric(rowNumber) And Val(rowNumber) > 1 And Val(rowNumber) <= ws.Rows.Count Then
        ws.HPageBreaks.Add Before:=ws.Rows(Val(rowNumber))
        MsgBox "Horizontal page break added above row " & rowNumber, vbInformation
    Else
        MsgBox "Invalid row number. Please enter a number between 2 and " & ws.Rows.Count, vbExclamation
    End If
    Exit Sub

ErrorHandler:
    MsgBox "Error adding horizontal page break: " & Err.Description, vbCritical
End Sub

' Add vertical page break to the left of selected cell
Sub AddVerticalPageBreak(ws As Worksheet)
    Dim columnLetter As String
    Dim columnNumber As Integer

    On Error GoTo ErrorHandler

   ' Get column from user
     columnLetter = InputBox("Enter column letter where you want to add vertical page break:" & vbCrLf & _
                       "(Page break will be added to the LEFT of this column)", _
                       "Add Vertical Page Break", _
                       Split(ActiveCell.Address, "$")(1))

    If columnLetter = "" Then Exit Sub ' User cancelled

    ' Convert column letter to number
    columnNumber = Range(columnLetter & "1").Column

    If columnNumber > 1 And columnNumber <= ws.Columns.Count Then
        ws.VPageBreaks.Add Before:=ws.Columns(columnNumber)
        MsgBox "Vertical page break added to the left of column " & columnLetter, vbInformation
    Else
        MsgBox "Invalid column. Please enter a valid column letter.", vbExclamation
    End If
    Exit Sub

ErrorHandler:
    MsgBox "Error adding vertical page break: " & Err.Description, vbCritical
End Sub

' Reset to automatic page breaks only
Sub ResetToAutomaticPageBreaks(ws As Worksheet)
    On Error GoTo ErrorHandler
    Application.ScreenUpdating = False

    With ws
        ' Remove all manual page breaks
        .HPageBreaks.Clear
        .VPageBreaks.Clear
        ' Reset page setup to allow automatic breaks
        .PageSetup.PrintArea = ""
        ' Refresh automatic page breaks
        .ResetAllPageBreaks
    End With

    Application.ScreenUpdating = True
    MsgBox "Page breaks reset to automatic for '" & ws.Name & "'", vbInformation
    Exit Sub

ErrorHandler:
    Application.ScreenUpdating = True
    MsgBox "Error resetting page breaks: " & Err.Description, vbCritical
End Sub

' Show page break preview
Sub ShowPageBreakPreview(ws As Worksheet)
    ws.Activate
    ActiveWindow.View = xlPageBreakPreview
    MsgBox "Switched to Page Break Preview. You can:" & vbCrLf & vbCrLf & _
           "• Drag blue lines to move page breaks" & vbCrLf & _
           "• Right-click lines to remove breaks" & vbCrLf & _
           "• Use View > Normal to return to normal view", vbInformation
End Sub

' Quick functions for toolbar/ribbon
Sub QuickRemoveAllPageBreaks()
    RemoveAllPageBreaks ActiveSheet
End Sub

Sub QuickRemoveManualPageBreaks()
    RemoveManualPageBreaks ActiveSheet
End Sub

Sub QuickAddHorizontalPageBreak()
    AddHorizontalPageBreak ActiveSheet
End Sub

Sub QuickAddVerticalPageBreak()
    AddVerticalPageBreak ActiveSheet
End Sub

' Advanced: Add page breaks based on data
Sub AddPageBreaksBasedOnData()
    Dim ws As Worksheet
    Dim lastRow As Long
    Dim rowsPerPage As String
    Dim i As Long

    Set ws = ActiveSheet

    ' Get rows per page from user
    rowsPerPage = InputBox("How many rows of data per page?", "Auto Page Breaks", "25")

    If rowsPerPage = "" Or Not IsNumeric(rowsPerPage) Then Exit Sub

    On Error GoTo ErrorHandler
    Application.ScreenUpdating = False

    ' Find last row with data
    lastRow = ws.Cells(ws.Rows.Count, 1).End(xlUp).Row

    ' Remove existing manual page breaks
    ws.HPageBreaks.Clear

    ' Add page breaks every X rows
    For i = Val(rowsPerPage) + 1 To lastRow Step Val(rowsPerPage)
        ws.HPageBreaks.Add Before:=ws.Rows(i)
    Next i

    Application.ScreenUpdating = True
    MsgBox "Page breaks added every " & rowsPerPage & " rows", vbInformation
    Exit Sub

ErrorHandler:
    Application.ScreenUpdating = True
    MsgBox "Error adding automatic page breaks: " & Err.Description, vbCritical
End SubImportant Point to Understand
One thing you should know is that when you insert manual page breaks and then use the Reset All Page Breaks option from the Page Layout tab, Excel doesn’t completely forget them, it still remembers the manual breaks you added earlier.
Later on, if you change your print area, Excel might unexpectedly bring back those manual page breaks you thought you had already removed.
To completely clear them from Excel’s memory, the best approach is to use the Reset All Page Breaks option from the Page Layout tab.
Removing Page breaks Vs Resetting Page Breaks
Removing page breaks and resetting page breaks are two different activities in Excel.
The method we discussed earlier is the only way to remove page breaks from view in Normal mode. Next, we’ll go through the different methods you can use to reset your page breaks.
But, keep in mind that if you want to hide all page breaks altogether, you need to use the first method of unticking the option in Excel settings. Once this option is disabled, page breaks will no longer appear, even when you open Print Preview.
The only way to bring it back is by re‑enabling the option from Excel Options.
Remove and Adjust Page Breaks from Page Break View
In the same way, you can also open the Page Break option from the View tab, where you’ll be able to remove and adjust page breaks as well.
- First, go to the “View” tab, and under the “Workbook Views” group click on the “Page Break Preview” icon.

- Once you click on “Page Break Preview”, Excel converts the normal view into page break view.

- Here, you can see how your workbook data gets split on each page when you print.
Once you are in page break view and have identified the page break you want to remove, simply select the cell directly connected to the page break.
If you want to remove the horizontal page break, select the cell below the page break. And if you’re going to remove a vertical page break, you need to select any cell that is after that page break.
Then, you need to right-click and select the option to remove the page break, and it will remove the page break.

To remove all page breaks, select the cell that is diagonally positioned at the intersection of both page breaks, right-click, and then remove the page break.
Adjust the Page Breaks in Excel
Once you switch to the Page Break Preview, you’ll see the page breaks shown as blue dashed lines. You can easily adjust them with your mouse. Below are the steps to follow:
- Click on the vertical dashed page break line, hold the mouse button, and drag to the left or right place up to which column you want the data headers to be split for printing on each page.
- Click on the horizontal dashed page break line(s) and hold the mouse button and drag to the upside or downside place up to which you want the data to be printed on each page.

- If you want all the header columns of your data to be printed on each page, just drag the vertical dotted line to the end of the header columns.

In the above image, we have dragged the vertical dashed line to the end of the header columns to print all the header columns (A-J) on each page.
Insert Manual Inserted Page Break
You can also insert the manual page breaks within the page break view by doing the following steps.
- First switch to the page break view and click on the cell to the left and upside of which you want to insert the page break.

- After that go to the “Page Layout” tab and then click on the “Breaks” icon under the “Page Setup” group and then click on the “Insert Page Break” option.

- Once you click on “Insert Page Break”, Excel divided and creates the manual page break to the left and upside of your selected cell.

- Now, to remove the manually inserted page break you need to click on the cell to the left and upside of which you want to remove the manually inserted page break and click on the “Remove Page Break” option.

- At this point, the manually inserted page break has been removed.

Thank you very much, same as for the previous comment. It helped me a lot!
Thanks! I somehow clicked or shortcutted into my page breaks showing. It was ugly and distracting. I doubt I ever would’ve figured out how to get rid of the lines without this perfect instruction.