

Select the cells the heading should span, with the text in the leftmost cell, press Ctrl + 1, open the Alignment tab, set Horizontal to Center Across Selection and click OK. The text sits centred over the whole range, but every cell stays separate.
The text must be in the first cell and the cells to its right must be empty. Centring stops at the first cell in the range that holds a value, so anything typed into one of those cells later cuts the heading short.
Use it instead of Merge & Center on any sheet that will be sorted, filtered or edited. Merged cells block sorting with “To do this, all the merged cells need to be the same size”, select every merged column when you click one, and get in the way of copy and paste; centred-across cells do none of that.
To convert a merged heading, select it, click Home → Merge & Center to unmerge it, then select the full width again and apply Center Across Selection.
It works across columns only. There is no vertical version, so to centre a label down several rows you still need to merge those cells and set Vertical to Center, or keep the label in a single cell.
In Excel, many of us still use the “Merge Cells” feature to center the text across multiple columns by merging the cells. But there is one more feature called “Center Across Selection” that also allows users to center the text horizontally across multiple columns but without merging the cells.
This feature of centering the text without merging the selection makes it preferable to merging cells because merged cells can break your data structure (sorting, copying, and filling), and if you select any column that is a part of merged cells, the other columns that are part of the merged cells also get selected.
This tutorial will show you how to center the text across multiple cell selections.
Steps to Center Across Selection in Excel
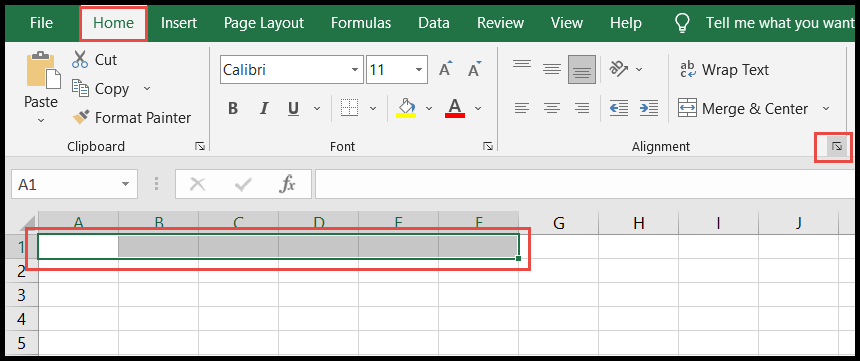
- First, select the cell range across which you want to center the text.
- After that, right-click and then click on the “Format Cells” option from the menu.

- Or, select the range of cells, go to the “Home” tab, and then click on the small arrow (dialog box launcher) at the bottom-right corner of the “Alignment” group.
- At this point, the “Format Cells” dialog box opens.
- Here, go to the “Alignment” tab and then click on the “Horizontal” field drop-down arrow and choose “Center Across Selection” and click OK.

- Now, when you enter the text in the first cell of the selection, Excel will make it “Center across the selection”.

In the above image, you can see we have entered the text in column A, and Excel centered it across the selection. It looks like the cells are merged, but they are not.
Even if you enter the text in a cell other than the first cell of the selection, Excel still centers it, but only across that cell and the empty cells to its right, so it won’t be the exact center of the whole selection.
Quick Read – How to Print Selected Cells in Excel
Center Across Selection Using Keyboard Shortcut
There is no direct keyboard shortcut to center the text across the selection, but you can do it with a combination of keys.
Ctrl + 1 → A → Tab → C → C → Enter → Enter
- First, select the cell range and press the “Ctrl + 1” shortcut to open the “Format Cells” dialog box.
- Once opened, just press “A” to go to the “Alignment” tab within the “Format Cells” dialog box.
- After that, press the “Tab” key to highlight the “Horizontal” field.
- Now press the “C” key twice to select the “Center Across Selection” option, and then press the “Enter” key twice.
Center Across Selection VS Merging Cells
I believe you have already noticed that the difference between these two is “merging or not merging the cells” while centering the text.
There’s one limitation, though: Center Across Selection works only horizontally. Excel has no matching option to center text vertically across several rows, so for that you still need Merge & Center (or a single tall row).
Here’s a quick comparison of the two:
- Selecting cells: with Center Across Selection, you can still select, copy, and sort each cell on its own.
- Data in other cells: Merge keeps only the value of the top-left cell. Center Across Selection doesn’t delete anything, but the text only spreads over cells that are empty.
- Direction: Merge works across rows and columns; Center Across Selection only across columns.
Replace Merged Cells with Center Across Selection
If your sheet already has merged cells, select them, click Home ➜ Merge & Center to unmerge them, and then apply Center Across Selection to the same range. Or use the following code, which does both for the selected cells:
Sub center_across_selection()
    With Selection
        .UnMerge
        .HorizontalAlignment = xlCenterAcrossSelection
    End With
End Sub
Frequently Asked Questions
Why is my text not centered across the selection?
The other cells in the range aren’t empty (even a space stops the text), or the format was applied only to the first cell. Select the whole range, clear the other cells, and apply the format again.
Can I add Center Across Selection to the Quick Access Toolbar?
There’s no built-in button for it, but you can add a macro like the one above to the Quick Access Toolbar and use it with one click.
Is Center Across Selection available on Mac?
Yes. On a Mac, press Command + 1 to open Format Cells, go to the Alignment tab, and choose Center Across Selection from the Horizontal list.
Written by
Puneet Gogia
Microsoft MVP — Excel · Founder, Excel Champs
Twelve years of teaching Excel, and a decade before that using it as a data analyst. Every tutorial here is written from a file I actually built.