

Let’s say you’re working in an office and need to prepare an Excel report to present at a meeting. Your report includes data about monthly sales figures, and you want it to look neat and professional when printed.
To ensure it looks right on the page, you center the worksheet content horizontally and vertically. This way, when your colleagues or boss see the printed sheets, the information is visually balanced and easily read.
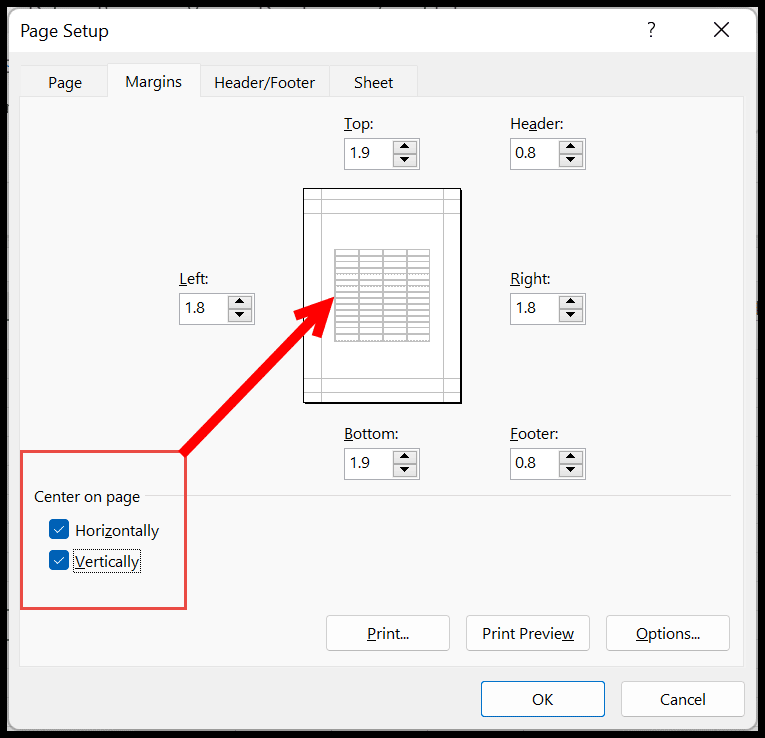
When you open a worksheet in Excel, you enter data from left to right, and when you print it, the data is aligned to the left and the top of the page. But you can align the worksheet data at the center horizontally and in the middle vertically on the printed page.
Steps to Make a Worksheet Horizontally at the Center
- First, go to the Page Layout tab and click on the Margins drop-down.

- Now, from the margins, click on the Custom Margins option. This opens the Page Setup dialog box (on the Margins tab).

- After that, in the Page Setup dialog box, tick the “Center on page” options (Horizontally and Vertically). The moment you do this, the small preview in the dialog box shows that the data is now horizontally at the center and vertically in the middle.

- In the end, click OK to save these settings.
Note: If you set the print area and then change the settings to Horizontally and Vertically at Center, Excel will print using both settings, so the print area is centered on the page.
This will not change the data you have in the worksheet, but when you make a printout (you can see it in the print preview section), it will be horizontally at the center and vertically in the middle.
And if you are using Excel for Mac:
- Go to the Page Layout tab, click on Margins, and choose Custom Margins from the drop-down.
- In the Page Setup window, go to the Center on page options under the Margins tab.
- Check the box for Horizontally to center your worksheet content on the page horizontally (and Vertically, if you also want it in the middle). Press OK to save.
Quick Read – Print Row 1 on Every Page / Print a Graph Paper / Remove Pagebreak in Excel
Using the Print Preview Option to Make a Worksheet Horizontally at the Center
The same option can be changed from the print preview section.
- Go to the File Tab and click on the Print option.
- After that, click on the “Page Setup” link at the bottom of the settings.
- Now, click on the Margins tab.
- Next, tick the Horizontally and Vertically checkboxes.
- In the end, click OK to save settings.

It’s the same option we used in the first method, but this is a different way to open it.
Quick Read: Print Selected Cells in Excel / Print Excel Gridlines / Print Preview Shortcut
Keyboard Shortcut
If you want to center a worksheet horizontally, you can use a keyboard shortcut to open the page setup and then apply the settings:
Alt ⇢ P ⇢ S ⇢ P ⇢ M
When you press this shortcut key, it opens the Page Setup dialog box and the Margins tab (if it opens on another tab, press Ctrl + Tab to move to Margins). From there, you can apply the setting to make your worksheet horizontally at the center and vertically in the middle.
As I said earlier, when you apply these settings, it will not change the data in the worksheet, only the alignment of the data when you print it. You can see this setting in the print preview as well.
Quick Read: Center Across Selection in Excel / Page Margin in Excel / Change Page Orientation in Excel
VBA to Print Worksheet Horizontally at the Center
Use the following code to center a worksheet horizontally and vertically in Excel. This code adjusts the page setup settings for the active worksheet to center the sheet when it is printed.
Sub CenterWorksheet()
    With ActiveSheet.PageSetup
        ' Set horizontal and vertical centering
        .CenterHorizontally = True
        .CenterVertically = True
    End With
End Sub
You can run this macro by pressing ALT + F8, selecting CenterWorksheet, and clicking Run. This will adjust the settings for whichever sheet is active in your workbook. Let’s say you want to apply this setting to multiple sheets or a different specific sheet.
In that case, you can modify the ActiveSheet reference to another sheet like Worksheets(“SheetName”) where “SheetName” is the name of your target sheet.
And if you want a code that automatically applies these settings to every worksheet in a workbook, you can use this code:
Sub CenterAllWorksheets()
    Dim ws As Worksheet
    ' Loop through each worksheet in the workbook
    For Each ws In ThisWorkbook.Worksheets
        With ws.PageSetup
            .CenterHorizontally = True
            .CenterVertically = True
        End With
    Next ws
End Sub
Center Several Worksheets at Once
Page setup settings are saved for each worksheet separately. To center more than one sheet without VBA, first select all the sheets (click the first sheet tab, hold Ctrl and click the others), and then apply the settings from the Page Setup dialog box. They apply to all the selected sheets. In the end, right-click a sheet tab and click Ungroup Sheets, so your next edits don’t go to all the sheets.
Frequently Asked Questions
Does centering change the data in my worksheet?
No. It only changes where the data sits on the printed page (and in the print preview). The cells and their alignment in the sheet stay the same.
Why is my data still not centered when I print?
Check that the print area doesn’t include extra empty columns or rows, and that the scaling isn’t set to a size that already fills the page. Excel centers the whole print area, including empty cells inside it.
Can I center the data only vertically?
Yes. Tick only the Vertically checkbox in the Margins tab of the Page Setup dialog box, or set .CenterVertically = True in the VBA code.

Written by
Puneet Gogia
Microsoft MVP — Excel · Founder, Excel Champs
Twelve years of teaching Excel, and a decade before that using it as a data analyst. Every tutorial here is written from a file I actually built.