Calibri is the default font style in Excel with a font size of 11 and black font color. And if you are using Mac, it’s Calibri with a font size of 11 also.
But there’s an option in Excel, to change the default font style if you want. You can change it for the current workbook, or you can change the default font for the entire application.

In this tutorial, you will learn to change the default font.
Change Default Font from Excel Options
- First, click on the “File” tab.

- After that, click on “Excel Options.

- Now, from the ‘general” options, go to “When creating new workbooks”.

- From there, select the font from the “Use this as a default font”.

- Next, change the size from the “Font size”.

- In the end, click OK to save the settings and Excel will tell you to close and restart your Excel application.

And once you restart the Excel application, you will get the new default font with each new workbook you create.

This change in settings will not make any changes to the existing file which are already saved.
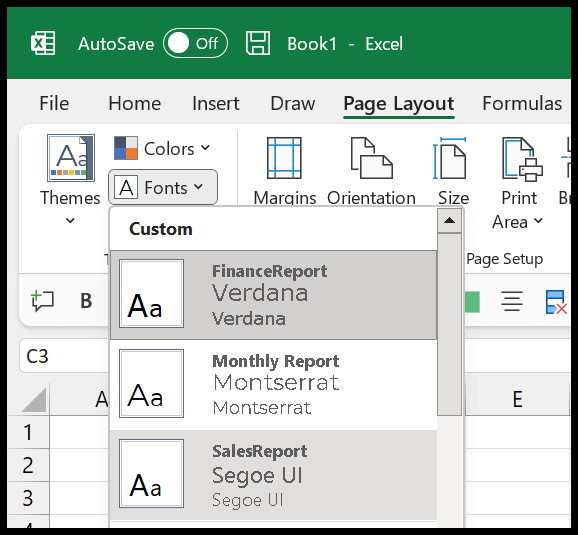
Use Font Themes for Multiple Default Fonts
If you want to have multiple default fonts, you can create a font theme that can help you to change the default font whenever you want.
- First, go to the Page Layout ⇢ Theme ⇢ Fonts.

- Now, click on the Fonts drop-down and click on “Customize Fonts”.

- From the “Create New Theme Fonts”, specify the body font that you want to use.

- In the end, enter a name for the theme and click on the “Save” button to save the font theme.
You can create multiple themes and change the default font with a single click.
Create a Template with the Default Font
If you need to change the default font while creating some specific workbooks, you can change the font and save it as a template. And, whenever you need to have that one specific font as default, you can create a new workbook using that template.
- First, change the default font by using the steps we have discussed above.
- Next, go to the “File” tab and use the Save As option.

- After that, from the “Save as type”, select “Template”.

- Now, when you select “Excel Template” it will take to you to the location where you can save the Custom Office Templates.

- In the end, give a name to the template and click on the save button.

Now, whenever you need to use it, simply open it, and save it again as a new file. You don’t need to make changes to the font style and size at all.