

Go to File → Open → Browse, switch the file-type list beside the file name box to Text Files or All Files, select the .txt file and click Open. Excel starts the Text Import Wizard.
In the wizard, choose Delimited, tick My data has headers if row 1 holds headings and click Next. Tick the delimiter your file uses (Tab for most exports, or Comma, Semicolon, or Other with a character such as |), click Next, then Finish.
Before you click Finish, select any column of IDs, phone numbers or codes in the Data preview and set it to Text, or Excel turns 00123 into 123 and long numbers into scientific notation. If accented or non-English characters come through garbled, set File origin to 65001 : Unicode (UTF-8) on the first screen.
For a file you’ll update and reimport, go to Data → Get Data → From File → From Text/CSV (Excel 2019 and later, including Microsoft 365), select the file, click Import and then Load. When the text file changes, Data → Refresh All pulls in the new rows. Power Query also strips leading zeros at its automatic type step, so click Transform Data and set those columns to Text first.
For a quick one-off, open the file in Notepad, press Ctrl + A then Ctrl + C, click a cell in Excel and press Ctrl + V. Tab-separated text splits into columns by itself; anything else lands in column A, which you can split with Data → Text to Columns.
Sometimes, when you are working with data, you need to get data from multiple sources. And text files are one of the most popular sources of data. Sometimes, when you download data from a web portal or export it from inventory software, it comes in a .txt file.

To use that data further in Excel, you need to open that file in Excel. And the good news is that Excel is pretty good at handling files like .txt and .csv. In this tutorial, we will look at three different ways to open a text file in Excel, plus a VBA macro that does it for you.
Steps to Open a Text File in Excel
To open a text file in Excel, you can simply open it using the Open dialog box. Once you open it, Excel will show you the Text Import Wizard (it looks just like the Text to Columns wizard) to import data into the worksheet. If the data is in tabular form, you need a few clicks to add it to Excel.
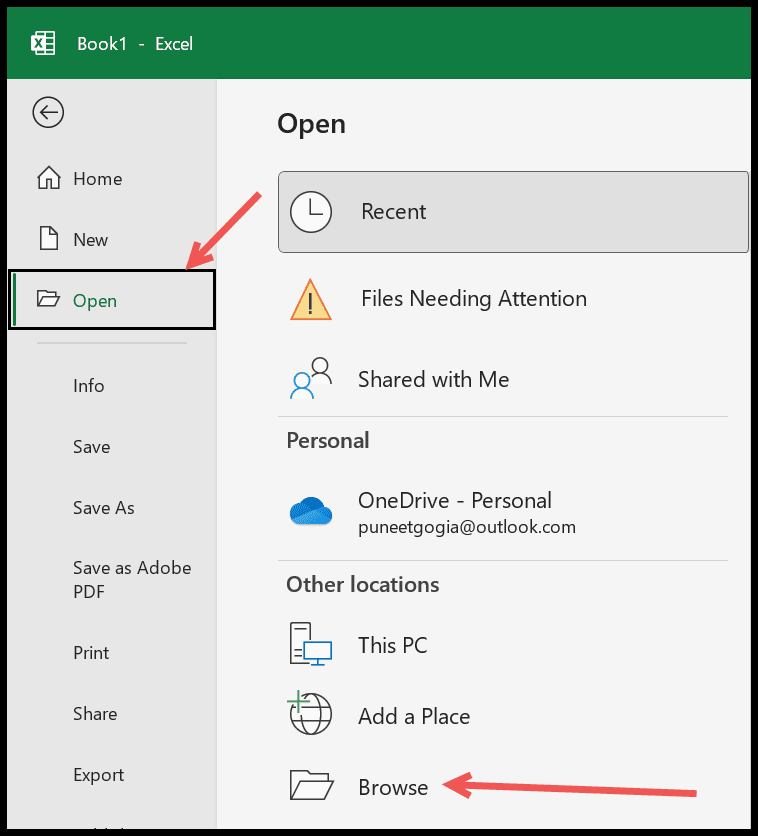
- First, you need to go to the File tab; in the File tab, you have the Open option. In the Open option, click on Browse to open the Open dialog box. You can also press Ctrl + O to get here.
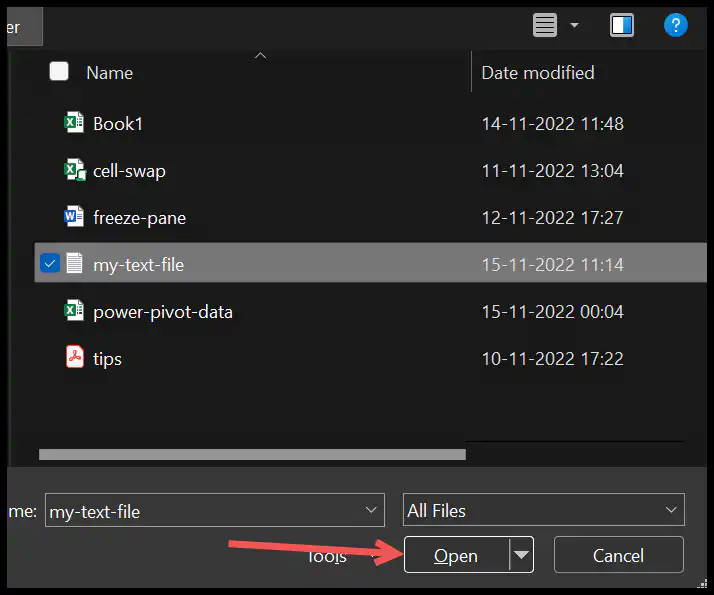
- After that, in the bottom-right corner of the dialog box, there is a drop-down. From that drop-down, make sure to have “All Files” (or “Text Files”) selected. By default, the dialog box only shows Excel files, so this lets you see the .txt files in the folder.

- Next, you need to locate the folder where you have the file that you want to open. Then, select the file and click the Open button (or double-click the file).
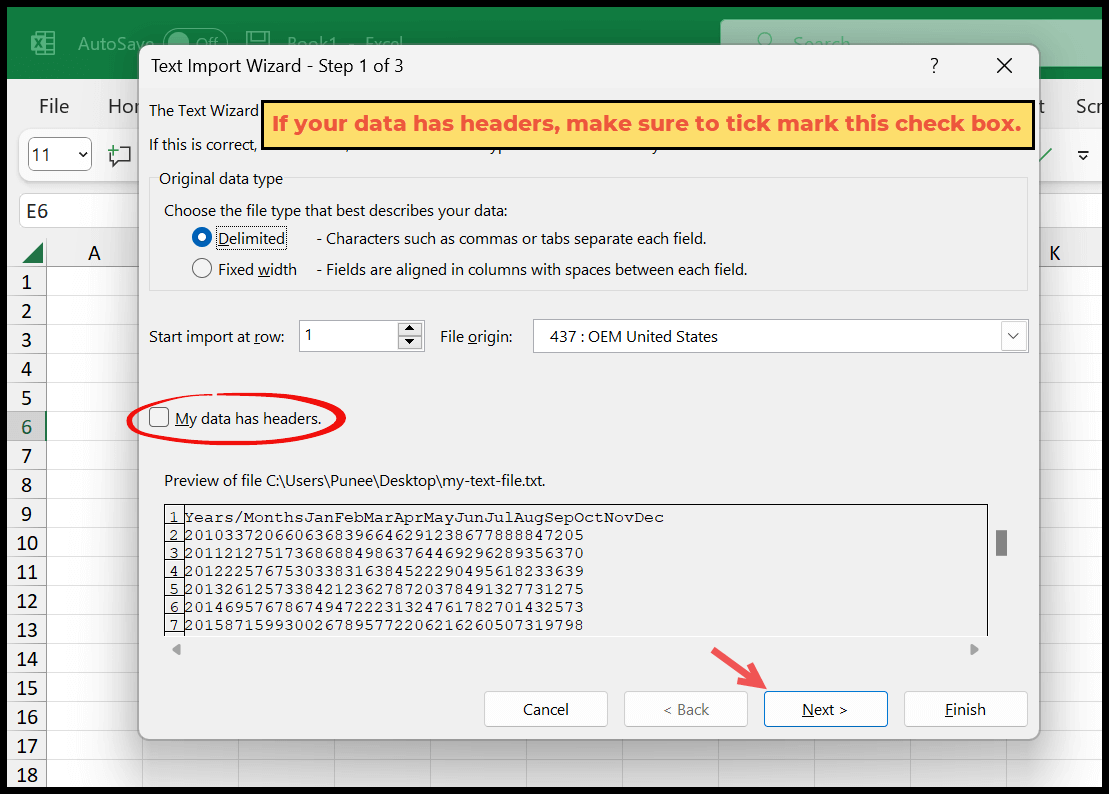
- Now you have the Text Import Wizard. In step 1, select “Delimited”, checkmark “My data has headers” if your data already has headers, and then click on the Next button to go to the next step.
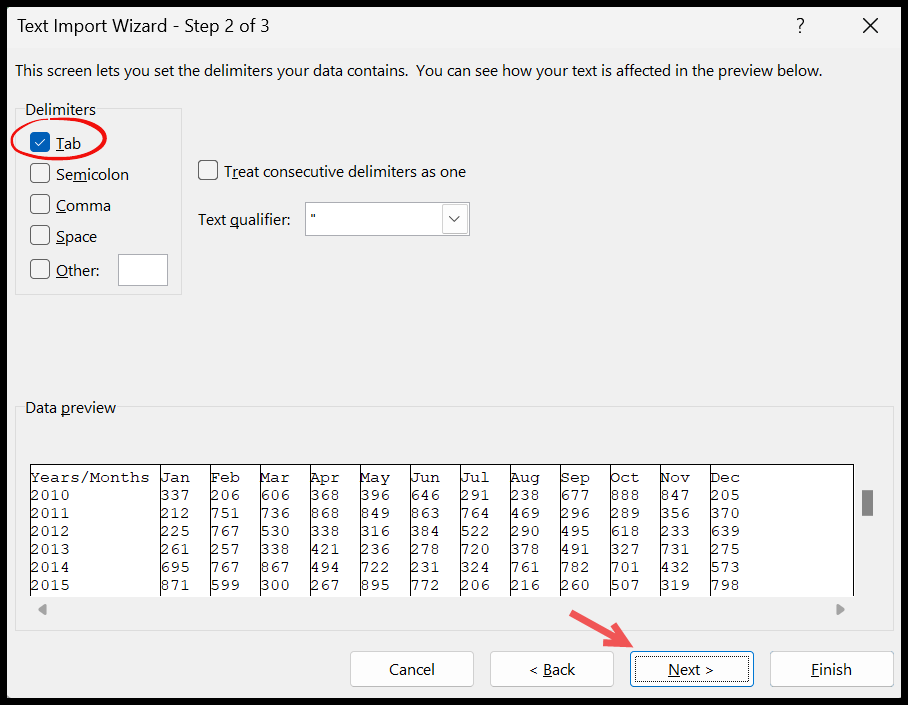
- In the next step, checkmark the “Tab”, and click Next. This tells Excel to separate data using the tab into columns. As soon as you checkmark the tab, it shows you a snapshot of the data in the Data preview. If the values in your file are separated by commas or semicolons, checkmark that delimiter instead.
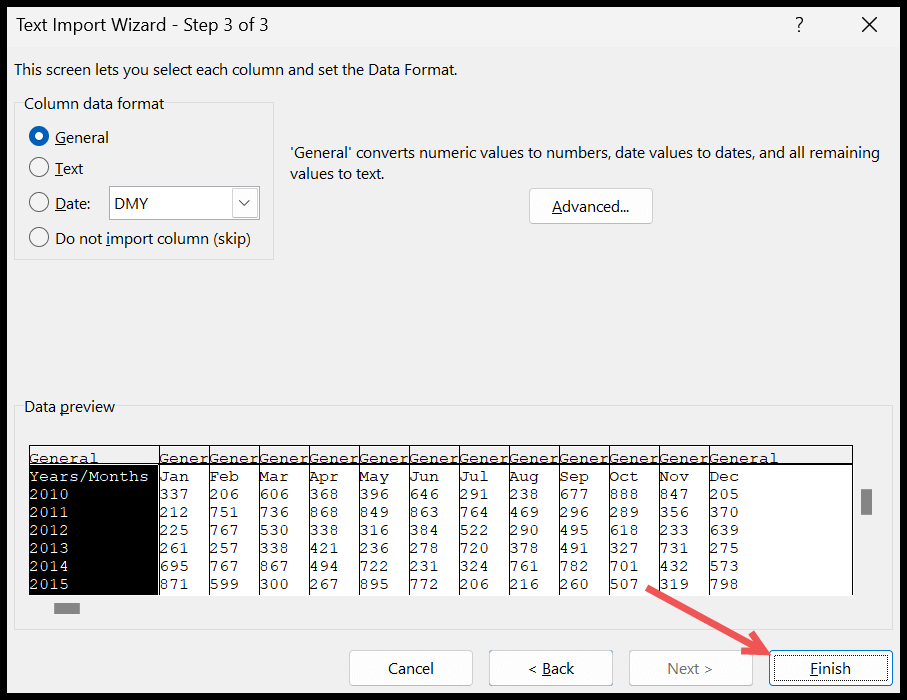
- In the end, in step 3, click on the Finish button to get the data into the worksheet. Once you click, it will open the text file in Excel and get the data in the worksheet.
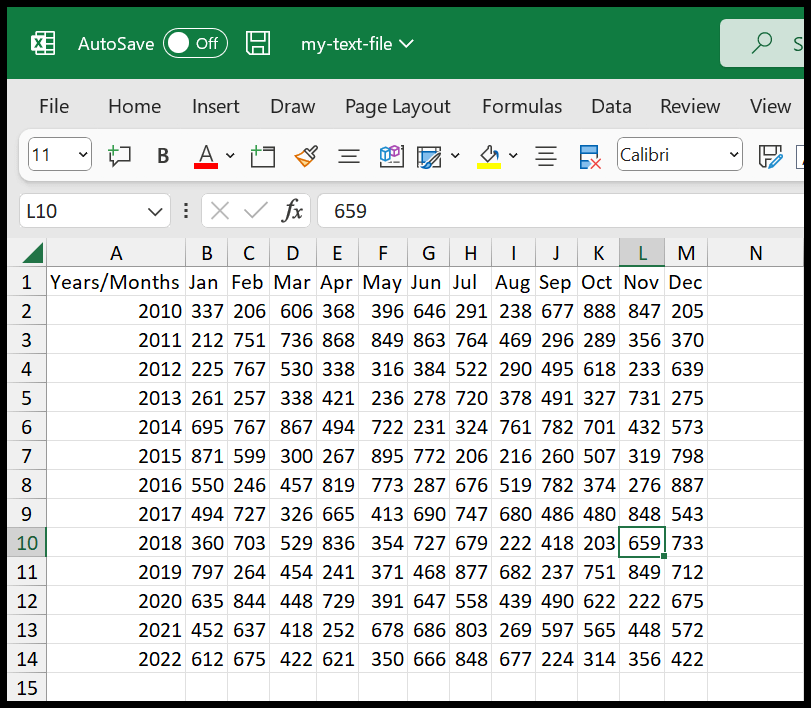
Below is the data that you get in the end when you open it in Excel. Once you open a text file in Excel, you’ll get the data, but it won’t save that text file as an Excel file. To save it as an Excel workbook, go to File ⇢ Save As and select “Excel Workbook (*.xlsx)” in the Save as type drop-down.
Benefits of this Method:When you open a text file (txt) in Excel, you open the file itself within Excel, not a copy. And when you make changes and click Save, Excel saves those changes back into the text file, in the same text format (it warns you that some features, like formatting and formulas, can’t be kept in a text file). So when you want to make changes to the text file itself after opening it, this is the best way to do it.
One thing to know here: the wizard only starts for a .txt file. When you open a .csv file with File ⇢ Open (or double-click it), Excel opens it straight away in a new workbook with its default settings, without the wizard. If you want to control how a .csv file is split, use Power Query (below) or the legacy Text Import Wizard.
Options in the Import Wizard to Know When You Are Opening a Text File
There are a few options in the import wizard that you can use to get better control when you open a text file in Excel.
- My Data Has Headers: When you tick-mark this option, you tell Excel that the first row of the data has headers and that you want to treat that header row as it is in the Excel file.
- Start Import at Row:When you open a .txt file, Excel takes it as tabular form, and you can choose the row from which you want to import the data. This helps when the file has a few title or blank lines at the top.
- File Origin:This is the character set (encoding) of the file. If you see odd characters in the preview (like é in place of é), change it to “65001 : Unicode (UTF-8)”.
- Delimited or Fixed Width:Choose Delimited when a character (tab, comma, semicolon or space) separates the values, and Fixed width when the columns are lined up with spaces. With Fixed width, you set the column breaks in the Data preview in step 2.
- Delimiters:If your data has a delimiter in between the values, you can specify that delimiter in step 2 to split data into columns. Use “Other” for a character that’s not in the list, like a pipe (|).
- Text Qualifier and Consecutive Delimiters:The text qualifier (usually a double quote) keeps a value like “3,392” in one cell even when the comma is the delimiter. And “Treat consecutive delimiters as one” stops two delimiters in a row from creating an empty column.
- Column Data Format:You can specify the format of each column in step 3, before opening the data from the text file. Select each column in the “Data Preview” and then specify the data format. Choose Text for a column with leading zeros (like 00125) or long ID numbers so Excel keeps them as they are, Date (with the right order, like DMY or YMD) for dates, or “Do not import column (skip)” to leave a column out.
- Settings for Numeric Data:There are specific settings that you can use for numeric data with the Advanced button in step 3. For example, identifying the decimal separator and the thousands separator, and treating a trailing minus (like 25-) as a negative number.
Open a Text File in Excel with Power Query
Using Power Query is a game changer when you want to open the text file but don’t want to make changes to the file itself. Power Query connects to the text file as a data source, and then you can get all the data from it. Let’s do this with the steps below.
- To open Power Query, you need to go to the “Data” tab, and from there, click on the “Get Data” drop-down. From there, in “From File”, go to “From Text/CSV”. This option helps you to connect a text file with Power Query as a source. In Microsoft 365, you can also click “From Text/CSV” right in the “Get & Transform Data” group.

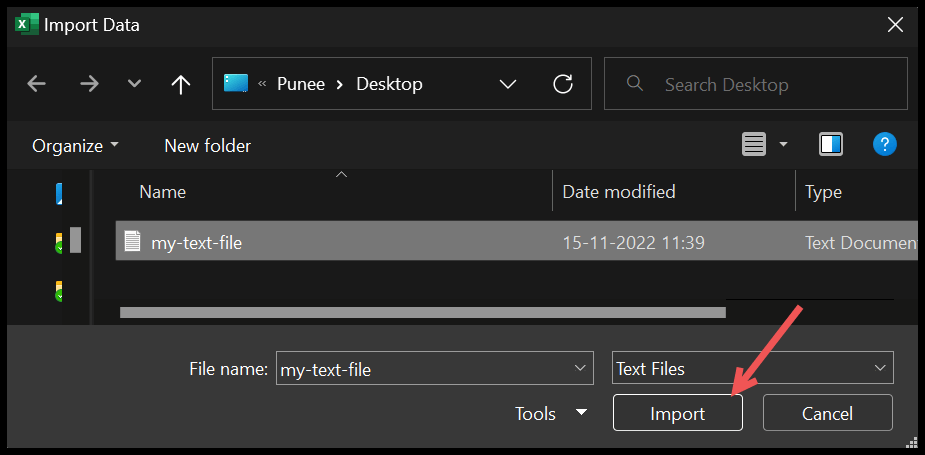
- Now, once you get the “Import Data” dialog box, you need to locate the text file that you want to open (connect). Click on it and then click on the “Import” button.
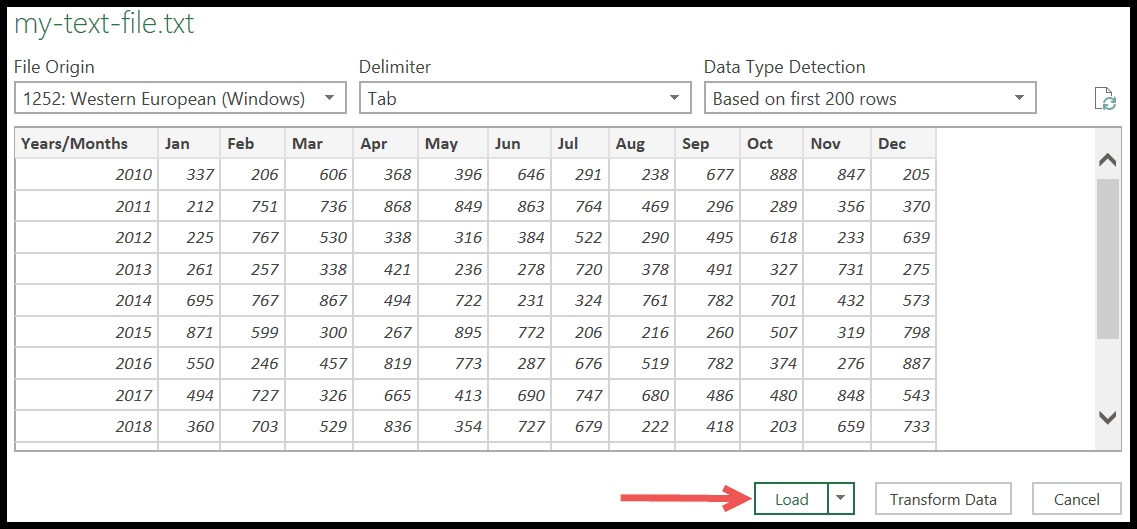
- After that, it will show you a preview of the data in the .txt file that you have loaded into Power Query. Excel detects the delimiter on its own, and you can change it (and the File Origin) at the top of the preview. Here you have two options: one is to load the data, and the second is to open the Power Query Editor and transform the data (“Transform Data”). For now, click on “Load”.
- In the end, you have the data in the worksheet from the text file. This data comes in as a table that stays linked to the text file (the text file itself doesn’t change), and you need to save this Excel file separately.
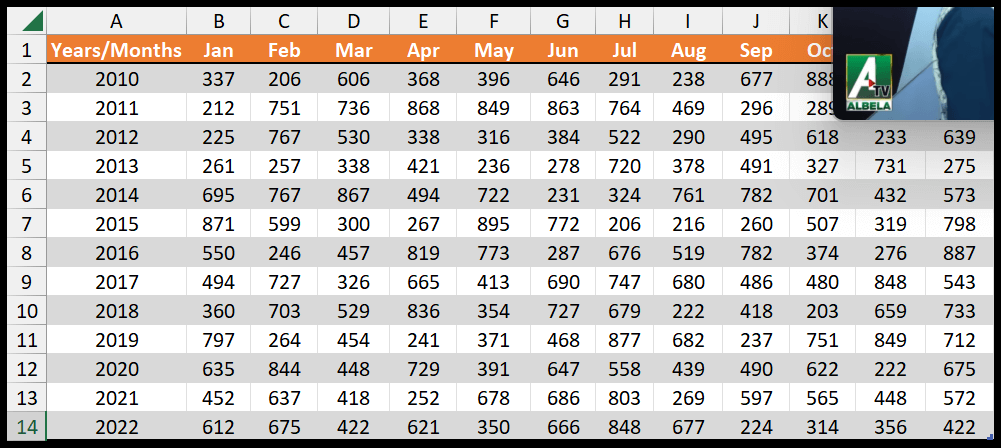
The best part of using the Power Query for importing data from the text file is that it’s dynamic. When you update data in the text file, you can update it in Excel by clicking on the refresh button (Data ⇢ Refresh All, or Ctrl + Alt + F5).
If you want to clean the data before it lands in the worksheet (remove columns, change data types, keep leading zeros by setting a column to Text), click “Transform Data” instead of “Load”. This opens the Power Query Editor, and when you’re done, click Home ⇢ Close & Load. And if you want to place the data in a specific cell or an existing sheet, click the small arrow on the Load button and use “Load To”.
If you don’t want the link anymore, select a cell in the table and go to Table Design ⇢ Unlink, and the data stays in the sheet as a normal table. Power Query (Get & Transform) is built into Excel 2016 and later versions, including Microsoft 365. In Excel 2010 and 2013, it comes as a free add-in. On a Mac, you need Microsoft 365, where you can use Data ⇢ Get Data (Power Query) and pick Text/CSV.
Power Query also allows you to open and get data from multiple files; you can check out this tutorial to learn more on this.
Copy-Paste Data from Text File to Excel Worksheet
You can also use the simple copy-and-paste method to get the data from a text file. A plain text file doesn’t hold any formatting at all (the Font Size and Font Style you see in Notepad are only display settings of Notepad). So when you copy and paste data from it, no formatting gets pasted there in the Excel file, and the data takes the formatting of the cells you paste it into.
Once you open the text file, use the keyboard shortcut Ctrl + A to select all the data from the text file, and then Ctrl + C to copy it.
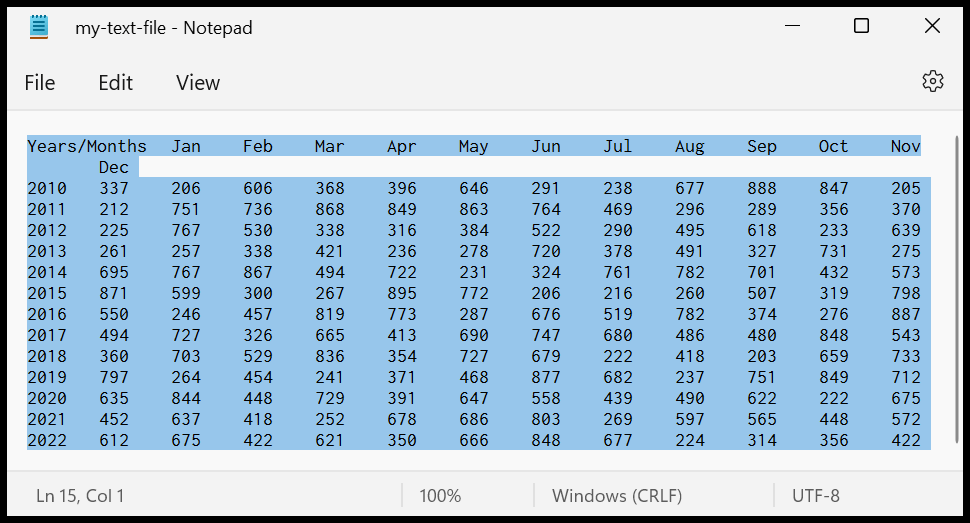
Go to the worksheet, and then select the cell where you want to paste the data. After that, use the keyboard shortcut Ctrl + V to paste the data.
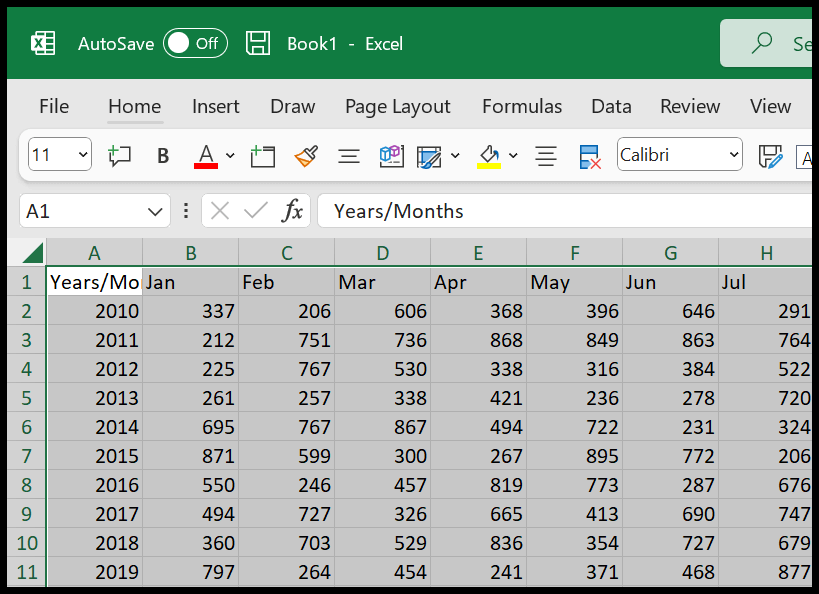
When the values in the text file are separated by tabs, Excel splits them into columns as you paste. But if they’re separated by commas or any other character, all the data lands in one column. In that case, select that column, go to Data ⇢ Text to Columns, choose Delimited, and pick the delimiter. Excel remembers that delimiter for the rest of the session, so the next text you paste may get split by it too.
Use the Legacy Text Import Wizard in Microsoft 365
In Microsoft 365 (and Excel 2016 and later), From Text/CSV on the Data tab uses Power Query and not the old Text Import Wizard. If you prefer the wizard, for example, to open a .csv file with full control over each column, you can turn it back on.
- First of all, go to File ⇢ Options ⇢ Data.
- After that, under “Show legacy data import wizards”, tick “Text (Legacy)” and click OK. If the option doesn’t show up on the ribbon yet, close and reopen the workbook.
- Next, go to Data ⇢ Get Data ⇢ Legacy Wizards ⇢ From Text (Legacy), and select your file.
- In the end, follow the same three steps of the wizard that you saw above and click Finish.
Unlike File ⇢ Open, this method places the data in the workbook that you already have open, starting from the cell you choose.
Open a Text File in Excel with VBA
If you open the same kind of text file again and again, you can use a macro. The code below asks you to pick a .txt file and then opens it in a new workbook with the Workbooks.OpenText method, splitting the data by tabs.
Sub OpenTextFile()
    ' Ask for a text file and open it in a new workbook
    Dim filePath As Variant
    filePath = Application.GetOpenFilename("Text Files (*.txt), *.txt")
    If VarType(filePath) = vbBoolean Then Exit Sub    ' you clicked Cancel
    Workbooks.OpenText Filename:=filePath, Origin:=65001, _
        DataType:=xlDelimited, TextQualifier:=xlTextQualifierDoubleQuote, _
        Tab:=True
End Sub
Put this code in a standard module (Insert ⇢ Module in the Visual Basic Editor). Origin:=65001 reads the file as UTF-8. If your file uses commas, change Tab:=True to Comma:=True, and to keep a column as text (like IDs with leading zeros), add the FieldInfo argument, for example, FieldInfo:=Array(Array(1, 2)) to import column 1 as text.
Fix Common Problems When You Open a Text File
Here are the problems that you are most likely to face when you open a text file in Excel, and how to fix each one.
- All the Data Is in One Column: The delimiter is wrong. Open the file again and pick the right delimiter in step 2 of the wizard, or use Data ⇢ Text to Columns on that column.
- Leading Zeros Are Gone: Excel turns 00125 into 125 when it treats the column as a number. Set that column to Text in step 3 of the wizard (or in the Power Query Editor). If the data is already in the sheet, the TEXT function can add the zeros back (formula below this list).
- Long Numbers Change: Excel keeps only 15 digits of a number, so a 16-digit card or ID number loses its last digits and shows up in the E+ format. Import that column as Text.
- Dates Are Wrong: When the file has dates in an order that’s different from your system (like DMY in place of MDY), set the column to Date with the right order in step 3 of the wizard.
- Strange Characters: Accented letters or symbols show up as odd characters when the encoding is wrong. Change File Origin to “65001 : Unicode (UTF-8)”.
- The File Is Too Big: A worksheet can hold 1,048,576 rows and 16,384 columns. For a bigger file, use Power Query, click Load To, choose “Only Create Connection” and tick “Add this data to the Data Model”, so you can use the data in a pivot table.
Here’s the formula to add the leading zeros back for a 5-digit code in cell A2 (it leaves blank cells blank). It returns the code as text.
=IF(A2="","",TEXT(A2,"00000"))
Which Method to Use
- File ⇢ Open: When you want to open the text file itself and make changes to it.
- Power Query: When you get an updated version of the same file again and again, and want to refresh the data with one click without changing the file.
- Copy and Paste: When it’s a small, one-time piece of data, mostly separated by tabs.
- Legacy Text Import Wizard: When you want the wizard’s control over each column for a .csv file, or want the data in the workbook you already have open.
- VBA: When you open the same kind of file often and want to do it with one click.
Frequently Asked Questions
Why Does My Text File Open in One Column in Excel?
Because Excel didn’t split the data with the right delimiter. Open the file again and, in step 2 of the Text Import Wizard, tick the delimiter your file uses (tab, comma, semicolon or Other). If the data is already in the sheet, select the column and use Data ⇢ Text to Columns.
How Do I Keep Leading Zeros When I Open a Text File?
In step 3 of the Text Import Wizard, select the column in the Data preview and set its Column data format to Text. With Power Query, click Transform Data and change the column’s data type to Text before you load it.
Why Does a CSV File Open Without the Text Import Wizard?
Excel opens a .csv file directly with its default settings. To choose how it’s split, use Data ⇢ From Text/CSV (Power Query) or the legacy From Text (Legacy) wizard, or change the file extension to .txt and open it with File ⇢ Open.
Can Excel Open a Text File with More Than 1,048,576 Rows?
Not in a worksheet, since that’s the row limit of a sheet. But you can connect to the file with Power Query, use Load To ⇢ Only Create Connection, and tick “Add this data to the Data Model”. Then you can analyze all the rows with a pivot table.

Written by
Puneet Gogia
Microsoft MVP — Excel · Founder, Excel Champs
Twelve years of teaching Excel, and a decade before that using it as a data analyst. Every tutorial here is written from a file I actually built.