What is Google Sheets?
Google Sheets is an online (Web-only) spreadsheet application that is part of Google’s suite of online productivity tools, Google Workspace. Like Microsoft Excel, it allows users to create, format, and work on spreadsheets. It supports complex formulas, pivot tables, conditional formatting, and charting.

One of its significant benefits is its seamless integration with other Google services, real-time collaboration, and the ability to access the files across all devices.
Google Sheets Components and Terms
Google Sheets interface has various components, each with a specific one that enables users to create, manage, and analyze data effectively.
Below are some of the most important:
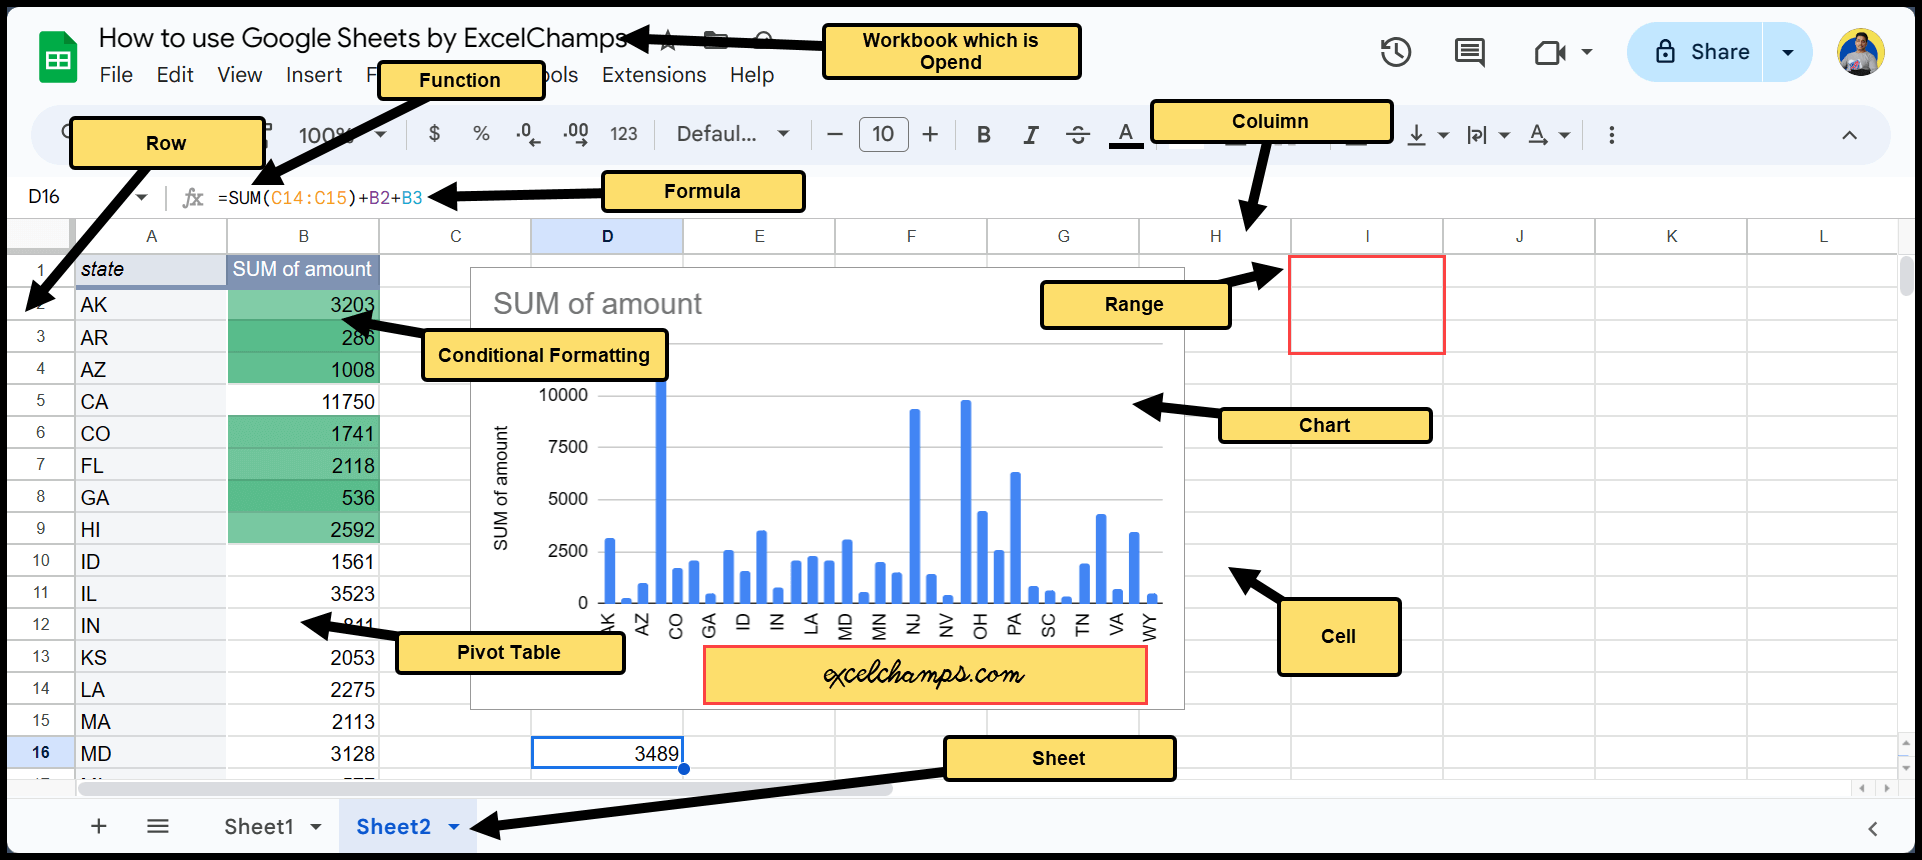
- Cell: A small box in which you have every spreadsheet application to store a single data value. Each cell is identified by its unique address, a combination of the column letter and row number.
- Rows and Columns: A row is a horizontal set of cells identified by numbers, while columns run vertically and are identified by letters. Together, rows and columns create a grid, and their intersections create cells where data can be entered.
- Range: A range refers to a group of cells that have been highlighted or selected. Ranges are useful when performing operations on multiple cells at once, such as summarizing a list of numbers or applying a format to a group of cells.
- Sheet: A sheet is a single page or tab within a Google Sheets file. Each sheet can contain its data, charts, and other elements. A single Google Sheets file can contain multiple sheets, allowing you to organize related data within a single file.
- Workbook (File): A workbook is a Google Sheets file that contains one or more sheets. Each workbook can be saved to your Google Drive and shared with others for collaborative editing.
- Formulas: Formulas are mathematical expressions that perform calculations, extract values, or test conditions. They always start with an equals sign (=). For example, to add numbers in cells A1 and B1, you would write the formula =A1+B1.
- Functions: Functions are predefined formulas in Google Sheets. They perform specific calculations, which can range from simple operations like addition (SUM) and average (AVERAGE) to more complex tasks like finding the length of a text string (LEN) or extracting a specific day from a date (DAY).
- Pivot Tables: Pivot Tables are a powerful data summarization tool. They allow you to analyze large data sets by automatically sorting, counting, totaling, or averaging the data stored in one table or spreadsheet. It lets you extract meaningful information from large, detailed data sets.
- Conditional Formatting: This feature allows you to format cells based on specific conditions. For example, you can use conditional formatting to automatically change the background color of cells that contain values above a certain threshold, or to highlight rows that contain specific text.
- Charts: Charts create graphical representations of data. Google Sheets provides various chart types, including line, bar, and pie charts, which can help you visualize patterns, trends, and relationships in your data.
Google Sheets Vs. Excel (Which One is Better)
Google Sheets and Excel, developed by Google and Microsoft, respectively, are powerful spreadsheet programs widely used for data management, analysis, and visualization.
Each has its strengths, and the choice between the two primarily depends on the specific needs and circumstances.

Difference |
Google Sheets |
Microsoft Excel |
|---|---|---|
Accessibility and Collaboration |
Google Sheets is cloud-based and allows real-time collaboration. Multiple users can view and edit a workbook simultaneously from any device with an internet connection. |
Excel is primarily a desktop-based application. Collaboration is possible via OneDrive or SharePoint, but it’s not as seamless as Google Sheets. |
Complexity and Power |
There are numerous categories of functions in Google Sheets, such as math and trigonometry, statistical, text, date and time, financial, and logical. |
Excel is known for its advanced features and functions, such as PivotTables, Power Query, and VBA macros. It is often the tool for heavy-duty data analysis and complex financial modeling. |
Integration |
Google Sheets integrates seamlessly with other Google applications, such as Docs, Slides, and Drive, making it convenient for users who are already using these tools. |
Excel integrates well with other Microsoft Office products like Word and PowerPoint, providing a cohesive workspace for users invested in the Microsoft ecosystem. |
Cost |
Google Sheets is free for personal use, making it an accessible tool for individual users and small teams. |
Excel is part of the Microsoft Office Suite, which requires a subscription. This might be a consideration for budget-conscious users. |
Visualization |
Google Sheets offers basic to intermediate data visualization options like charts and graphs, which are sufficient for most common uses. |
Excel has more advanced charts options, providing greater flexibility for specialized and complex representations. |
Updates and Version Control |
With Google Sheets, updates are automatic, and version control is straightforward with its revision history feature. It makes it easy to track changes and revert to previous versions if necessary. |
In Excel, users must manually update the software. Version control can be more complex, especially when collaborating, requiring more careful management of workbook versions. |
In summary, if real-time collaboration, easy access, and integration you need, Google Sheets is the way to go.
Create a New Google Sheets File
To create a new Google Sheets file:
- Go to the link (https://sheets.google.com/ and make sure to login first to your Gmail account.

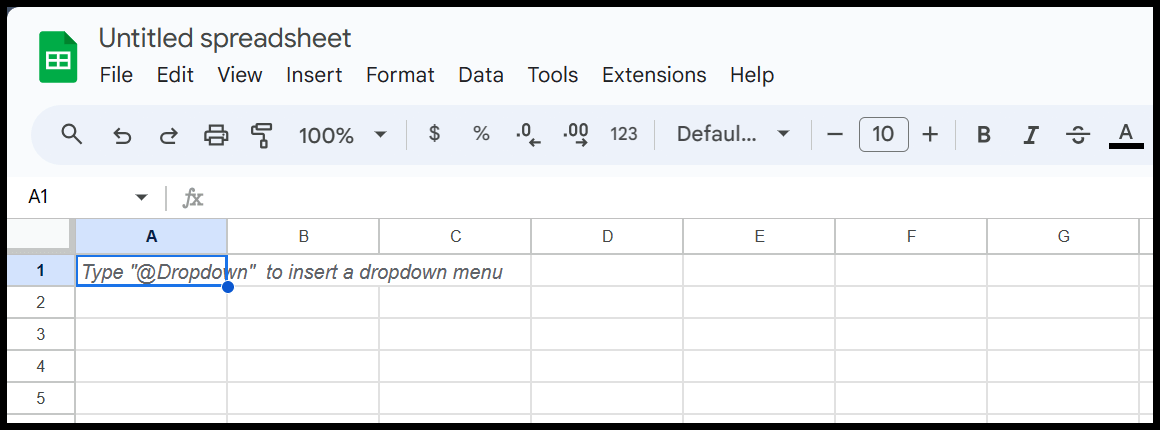
- Once you’re signed in, you will see the Google Sheets interface with a “+ Start a new spreadsheet” button. Click on this button.

- A new, blank Google Sheets workbook will open in a new tab. You can start editing this workbook immediately.
Note – All changes in Google Sheets are saved automatically, so you don’t need to worry about saving your work manually.
Note – Go to this link and sign in with your Gmail ID. Enter the username and password (if not login already). Otherwise, this link will open a new Google Sheet instantly.
From Google Drive
- Open “drive.google.com”, if you’re not already signed in, sign in to your Google account.

- Once you’re in Google Drive, click on the “+ New” button on the left-hand side of your screen.

- Dropdown menu will appear. Hover over the “Google Sheets” option. A secondary menu will appear to the right. You can choose to create a new blank spreadsheet or use a template. Click on the option you prefer.

- A new Google Sheets workbook will open in a new tab.
Understanding Google Sheets Toolbar
All the options available in Google Sheets are categorized into menus.

- File: This includes options such as New, which allows you to create a new spreadsheet; Open, which lets you open existing spreadsheets; Save, to save your current work.
- Edit: This provides options like Undo to revert your last action, Redo to repeat your last action, and Cut-Copy-Paste.
- View: This includes options like Zoom to magnify or shrink your view of the spreadsheet; Freeze to keep a row or column visible while scrolling.
- Insert: This offers options like adding a new sheet, inserting a chart, adding an image, inserting a drawing, and more.
- Format: This has options to change font settings like font, size, color, borders, fill color, etc. Conditional formatting, to automatically format cells based on their values, and other options.
- Data: This includes options like Sorting the data, applying a Filter, creating a Pivot table, Data validation, and more.
- Tools: This provides options like Spelling check, Script editor to write and run scripts, Macros to automate repetitive tasks, and other options.
- Add-ons: This consists of options related to additional features or extensions that you can add to Google Sheets to enhance its functionality.
- Help: This includes options like Sheets Help, to access Google’s help center for Sheets Training to find educational resources about using Sheets, Updates, to see the latest changes to Sheets, etc.
To search for an option within the menus, you can use the keyboard shortcut Alt + / to open the search bar.
Naming / Renaming a Google Sheets File
Here are the steps on how to do it:
- Once your workbook is open, look to the top-left corner of the screen. Here, you’ll see the current title of the workbook. Click on this title.

- Edit the filename: Upon clicking the title, a text box with the current name highlighted will appear. At this point, you can either delete the current name entirely or add to it.
- Save your Changes: After typing the new name, press the Enter key on your keyboard to save it. Remember to name your file clearly and accurately for easy identification in the future.
Apart from this, you can rename a file from the list of files in the Google Sheets main page. Click on the three dots to open the menu, and the click on the “Rename” option.

Create a Table in Google Sheets
- Select a starting cell for your table: Click on an empty cell where you want the top-left corner of your table to be. This will be the starting point of your table.
- Enter the Data: Begin entering your data into the cells, moving from left to right to fill out your rows and top to bottom to create new columns. Each row and column of cells you fill in will form the structure of your table.
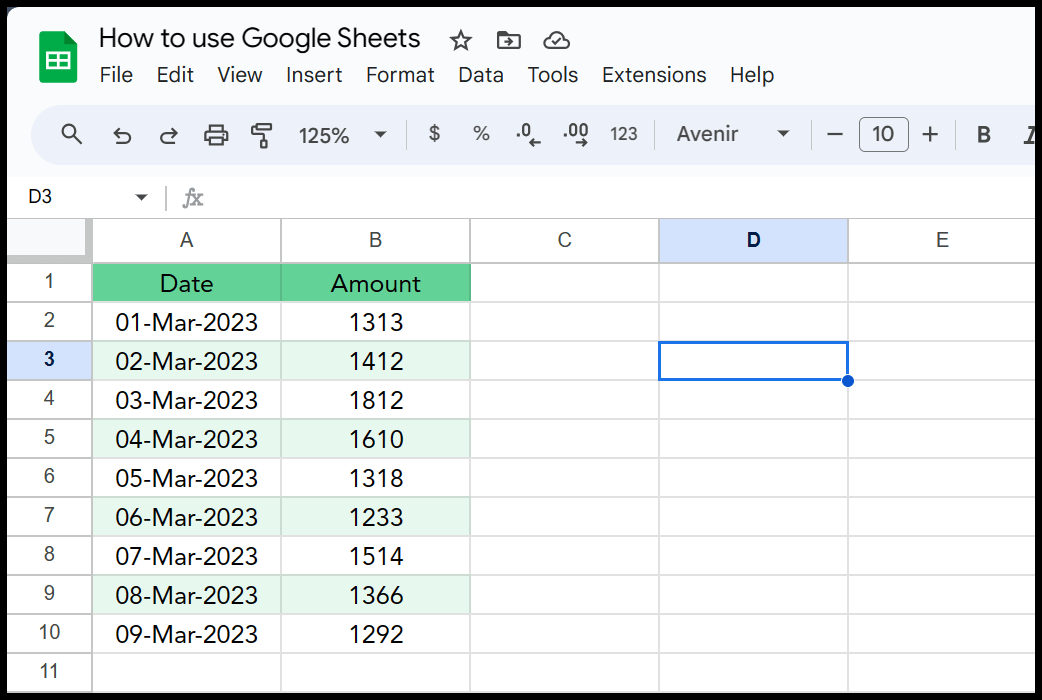
- Format your table: After entering your data, you can begin formatting your table to suit your needs.
- Cell Alignment Alternate Row Shading
- Format Each Column with the right Data Type
Functions and Formulas in Google Sheets
Google Sheets offers a range of functions for performing calculations from easy to complex. To use a function or a formula, you begin with an equal sign (=), followed by the name of the function. For example, to add two numbers in cells A1 and B1, you would use the function “=SUM(A1:B1)”.

There are numerous categories of functions in Google Sheets, such as math and trigonometry, statistical, text, date & time, financial, and logical.

Some commonly used functions:
- SUM: Adds up all the numbers in a range of cells.
- AVERAGE: Computes the average of a range of cells.
- COUNT: Counts the number of cells in a range that contain numbers.
- MIN and MAX: Find the minimum and maximum number in a range of cells, respectively.
- IF: Evaluates whether a condition is met and returns one value if it is true and another value if it is false.
Google Sheets: Examples, Tips, and Tricks
To share a Google Sheets file, follow these steps:
- Click on the Share button in the upper-right corner of the screen.

- In the pop-up window, you can either type the email addresses of the people you want to share the workbook with or create a shareable link and send it to them.

- You can also select whether the people you share the workbook with can edit, comment on, or only view the workbook.
- Click on Done to save your changes and close the window.
Download the Google Sheets File in a Different Format
Downloading Google Sheets in a different format can help you in several ways, such as offline Access, Data Backup, and Sharing and Collaboration.

Here are the steps to save a Google Sheets file:
- Once your file is open, click on the “File” option in the top left corner of the Window.
- After clicking “File”, scroll down through the options until you find “Download”.
- A dropdown will appear with a list of available file formats. (xlsx for Excel, ods for OpenOffice.pdf for Adobe Acrobat, csv for comma-separated values, csv for tab-separated values, html for a web page).
- After selecting your preferred file format, the file will automatically download in that format.
Adding New Tabs (New Worksheet)
- Look for the “+” Button: At the bottom of the Google Sheets interface, you’ll see a “+” button towards the right side.
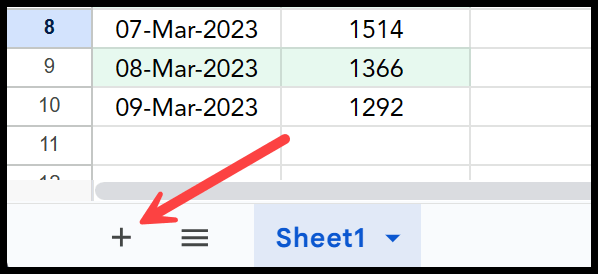
- Add a New Sheet: Click the “+” button to add a new sheet. A new sheet (tab) will be created immediately and will be named with the sequential number by default (e.g., “Sheet1”, “Sheet2”, etc.).

Formatting in Google Sheets
In Google Sheets, you can format your data the way you want. Here are some basic tips for formatting:
- Font Style and Size: You can change the font style and size from the toolbar at the top. Select the cells you want to format, then choose a new font style and size.
- Text Color and Cell Background: Use the toolbar button color of your text and the background color of your cells.
- Bold and Italic: Use the B (bold) and I (italic) buttons in the toolbar to format your text accordingly.

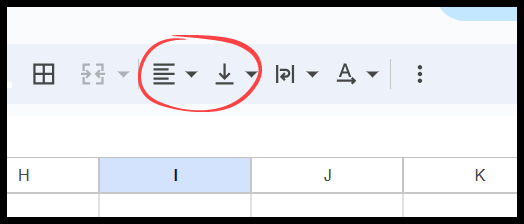
- Align Text: You can align text vertically and horizontally within a cell. Select your cells, then use the alignment tools in the toolbar to align text to the left, center, or correct, as well as the top, middle, or bottom.
- Format as Currency: Select your cells, then go to Format > Number to choose a specific format for your data, such as currency, percentage, date, and more.

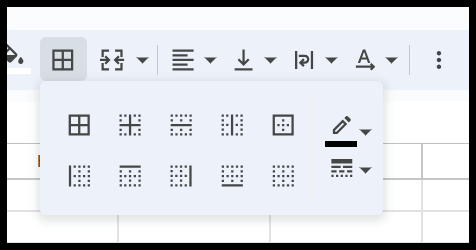
- Adding Borders: Select your cells and then use the borders icon to add or customize borders around and between your selected cells.
- Merge Cells: You can merge multiple cells to create a larger cell. Select the cells you want to merge, then click on the merge icon and choose how you want to merge them.

Add Bullet Points in Google Sheets
Like Excel, Google Sheets does not offer a direct option to add bullet points, but we can use different methods to create a bulleted list and add a bullet in a cell before the value.
- Keyboard Shortcut – You can use the keyboard shortcut Alt + 7 (From Numeric Pad) to enter bullet points in the cell.
- CHAR Function – You can use the CHAR function to insert bullet points. For example, =CHAR(8226) will give you a bullet point in a cell.
- Custom Number Formatting – You can also apply custom formatting to a cell to show a bullet point before a value in the cell.
- Use a Formula – You can combine value with a bullet point using a formula like =”• ” & A1, where A1 is the cell to which you want to add a bullet point.
- Copy-Paste – If you already have a bullet point in a cell or somewhere else, you can copy it from there and then paste it into your desired cell.
- Google App Script – With App Script, you can apply custom formatting or enter a button point in the cell before the values.
In this tutorial, we will learn all the methods in detail and try to understand which methods are better to use.
Keyboard Shortcut to Add Bullet Point
To add a bullet point in Google Sheets using a keyboard shortcut, you can use the following steps:
- First, click on the cell where you want to insert the bullet point.
- Then, press Alt + 7 on your numeric keypad.

It will insert a bullet point in the selected cell. If you don’t have a numeric keypad on your PC, you can use the on-screen keyboard just like I do.
Note – If you already have bullet points in your worksheet and want to remove all of them at once, you can use the Find and Replace feature.
Create a Chart in Google Sheets
Here is a step-by-step guide to creating a basic chart:
- Select the cells or range of cells for which you want to create a chart. If you have column titles and row labels, include them, as these can be used to label the axes of your chart.

- Go to the menu bar, click the Insert menu, and then choose the Chart. This will insert a simple line chart, which is the default chart. You can also use the Insert Chart button on the toolbar.

- Google Sheets will try to choose the most appropriate chart type based on your data, but you can change this.

- Once the chart is inserted, a Chart editor will appear on the right side. In the Chart editor, click on the Setup tab. Click on the dropdown menu under Chart type to see all available options.

In the Chart editor, you can switch to the Customize tab to access various options to tweak your chart’s appearance, including Chart style, Chart & axis titles, Series colors, Legend position, and Font styles and sizes.

Sorting in Google Sheets
In Google Sheets, you can sort data alphabetically, numerically, or even by date in ascending and descending order.
- Select the range of cells you want to sort, including any header row, and if you’re going to sort the entire sheet, select any cell within your data range.
- Go to the Data menu and click on the “Sort range”. Now choose “Sort range,” then “Advanced range sorting options” to open the sort dialog.

- Check “Data has header row” in the sort dialog box if your selected range includes headers. Select the column you want to sort by and specify the sort order.

- In the end, click sort to apply the sorting.
You can also sort the data using the “Sort range by” options.

But there’s one thing I feel Google Sheets needs to improve, it doesn’t show me the option to according to the data I have in the columns. Even though I have dates in the columns that I have selected, it still shows me options for text values.
Filter Data in Google Sheets
Filtering data in Google Sheets can help you narrow down the data. You can display only the rows that meet specific criteria while temporarily hiding the rest.
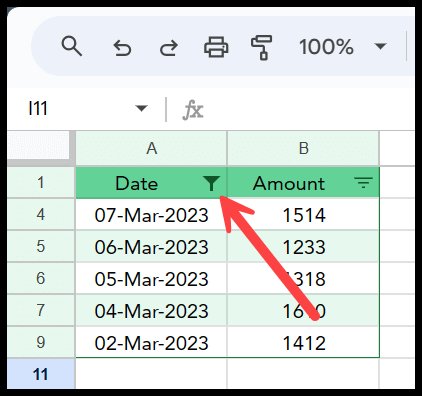
- First, select the columns you want to filter. You can click on any cell within your data. Go to the Data menu and select Create a filter. You can also click the filter icon (like a funnel) in the toolbar to apply filters to your selection.

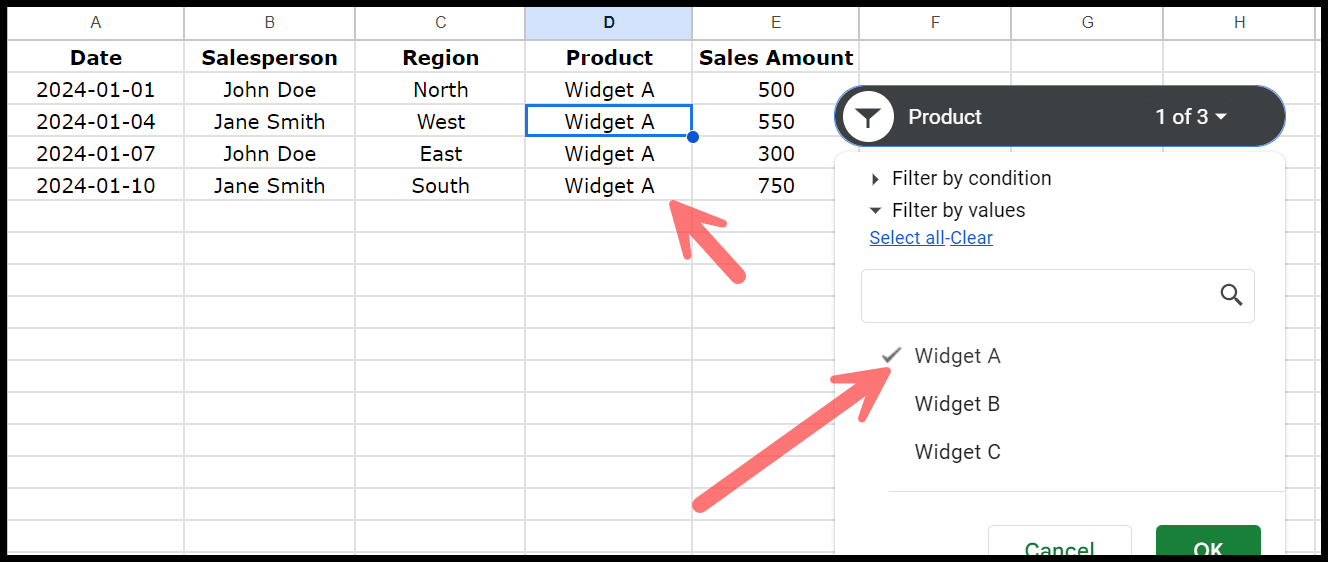
- Click on the dropdown arrow in the column’s header cell you want to filter. To filter by specific values, uncheck the boxes next to the values you want to hide and leave the boxes checked for the values you want to display.
- In the end, click Ok to apply the filter to the column.
Using Comments in Google Sheets
Adding comments in Google Sheets is a great way to collaborate with others or take notes within the sheet.

- Adding a Comment – Select a cell, and then from the right-click menu, select Comment, or from the Google Sheets menu, choose Insert > Comment.
- Type Your Comment: A comment box will appear. Type your comment in the box. Once done, click the Comment button or press Ctrl + Enter (Cmd + Enter on Mac).
Mentioning Someone in a Comment – In the comment box, type @ followed by the email address of the person you want to say. Suggestions appear as you type if the user has access to the sheet.

Create a Pivot Table in Google Sheets
A PIVOT TABLE in Google Sheets is a tool that allows users to summarize and analyze large data quickly and easily. It utilizes a structure that will enable rows and columns to be defined, creating a summary table that displays values from large datasets in a compact form. You can sort and filter a pivot table to change its view.
Creating a pivot table in Google Sheets can be a great way to summarize and analyze large data. Here’s a step-by-step guide to help you create your first pivot table:
- Select the Data: Select the cells that contain the data you want to use in your pivot table. Include the column headers, but exclude any total rows or columns.

- Insert Pivot Table: Go to the top menu and click on Data. Select the Pivot table from the dropdown menu. Choose whether you want the pivot table in a new or existing sheet. It’s generally best to place it in a new sheet for clarity.

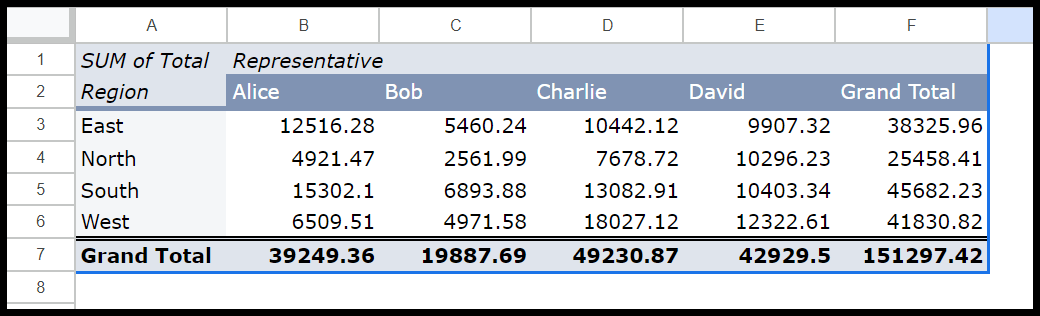
- Choose Row/Column Labels – In the pivot table editor (which appears on the right side of the screen), use the Rows and Columns sections to add fields to organize your data vertically and horizontally. For example, drag the “Region” field to the Rows and Representative to the Columns.

- Add Value Field: Drag fields to the Values section to perform calculations over your data (We are using the “Total” column in our example to use as Values).

By default, Google Sheets summarizes the data using the SUM. Still, you can change this by clicking on the dropdown next to the field under “Values” and selecting another type of calculation like COUNT, AVERAGE, MAX, MIN, etc.

Now, at this point, your pivot table is ready.
Understanding the Major Parts of a Pivot Table
Understanding the different parts of a pivot table is essential to fully utilizing it.
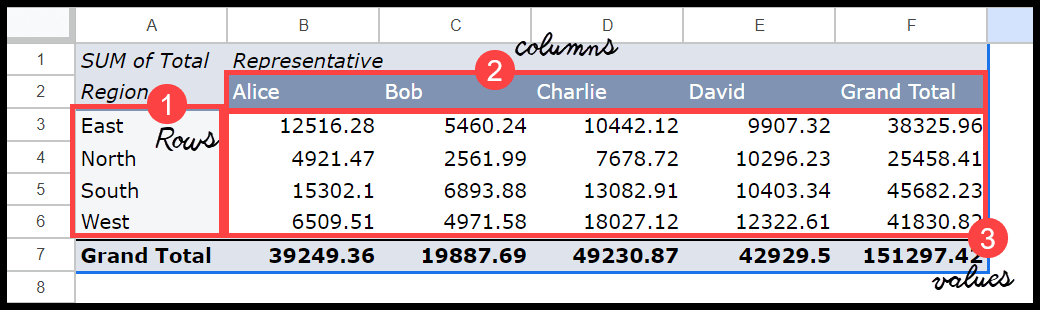
- The rows area in a pivot table displays the data vertically. You can drag fields to the rows area to organize your data by them. For example, adding the “Region” field here would organize your data in rows grouped by regions.
- The columns area works similarly to the rows area but displays data horizontally. Fields added here will organize data across the top of the pivot table. For instance, adding the “Representative” field to columns will display all Representative names across the column headers.
- The values area is where you add fields to perform calculations. You can summarize data using different calculations such as sum, average, count, max, min, etc. For example, adding a “Total” field to the values area and setting it to sum would give you the total amount.
Examples, Tips, and Tricks for using Google Sheets
Apply Underline
Applying underlining to cells in Google Sheets can be quickly done with a keyboard shortcut.
- For Windows and Linux Users: Press Ctrl + U
- For macOS Users: Press Cmd + U
You can select a single cell, a range of cells, or multiple ranges (using the Ctrl key or Cmd key on macOS). With the cells selected, use the keyboard shortcut (Ctrl + U or Cmd + U) to toggle underlining on or off. This will underline all text within the selected cells.

As I have mentioned above, to remove underline, reselect the text and press the same shortcut again. This toggles the formatting off.
And here’s the another method.
- Select the cell or range of cells where you want to apply the Underline.
- After that, click Format in the menu at the top of Google Sheets.
- Then, go to the Text option to expand additional options.
- In the end, click on Underline from the expanded menu options.

And the same option can be used to remove the underline from a cell or a range.
Unhide Rows
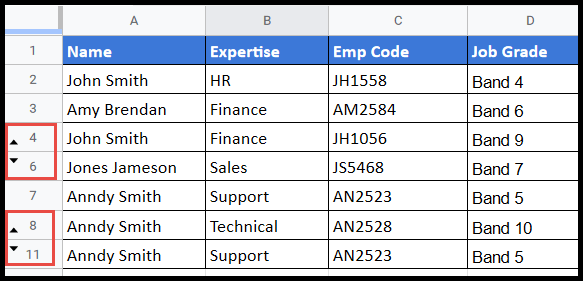
Hidden rows can be found using the below steps:
- Open to the data set wherein you want to review for the hidden rows.
- Scroll the data set to examine the row headers and if you notice any gap or missing number between the row’s header numbers sequence, it means there are rows hidden between them.
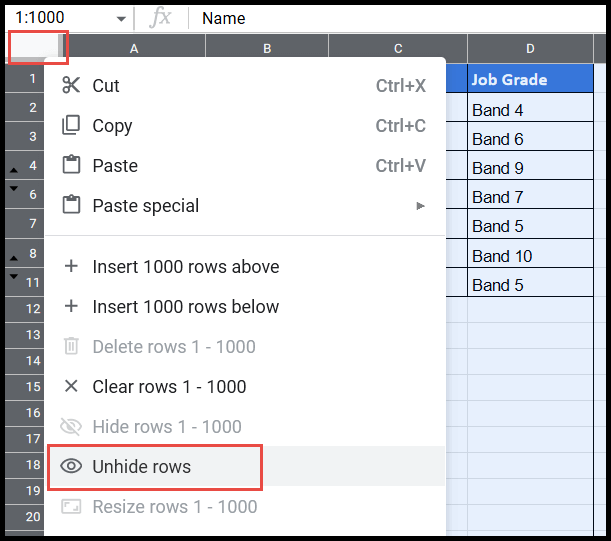
- The other way for large data sets, instead of scrolling is to first select the entire sheet by just clicking on the top left corner of the spreadsheet.
- After that, place the mouse courser on that white blank cell and right click the mouse button to get the drop-down list opened.
- The drop-down list will show the “Unhide rows” option only if there would be any row(s) hidden in the data set.
Dark Mode
If you use Google Chrome, Microsoft Edge, or any other Browers, you can install an extension to change the light theme in the Google Sheets into a Dark theme.
- Go to the Chrome Web Store – If you are using Google Chrome or any other Browser, you need to go to the Extensions, where you can install a new extension. In Google Chrome, click on the three dots on the top right side of Windows and then go to “Extensions”.

- Search for the Extension – In the search bar at the top left corner of the Chrome Web Store, type the extension name you want to install. For Dark Mode, you can use popular extensions like “Dark Reader,” “Night Eye,” or “Dark Mode”.

- Select the Extension – Select the extension you want to install from the search results. Click on the extension’s name or icon to go to its detailed page. For example, if you choose “Dark Mode – Night Eye”.

- Add the Extension: On the extension page, you will see a blue button that says “Add to Chrome”, click this button.

- A pop-up message will appear, asking for confirmation to add the extension. It will also list the permissions the extension requires. Review the permissions; if you agree, click “Add Extension”.

Once you install it, you need to refresh your Google Sheets workbook and then apply the dark Mode to it once it gets a refresh.
As you can se
Slicer
Once your data is ready, you can use the below steps to add a slicer to your data table.

- First, select any cells from the data you have in your worksheet.
- Now, go to the “Data” menu at the top of the Window and select “Add a Slicer”.
- Then, from the pane on the right side, select the columns you want to add to the slicer for the filter.
- In the end, click on the “All” button to open all the values you have in the slicer to filter the data.
When you select any of the values from the slicer to filter the data and click OK, it automatically filters the table using the selection you have made in the slicer.
Text to Column
In Google Sheets, text-to-columns is a powerful option that allows users to split the data of a single column into multiple columns based on a specified delimiter, such as a comma, space, or any other character.
-
First, select the column with the data you want to split. To do this, click on the column header to select all the cells in that column.

- Next, go to the menu bar and click on the “Data” menu. Click on the “Split text to columns” from the drop-down menu. When you click on it, Google Sheets will try to detect the delimiter from the column and split the data based on that. But it will also show you a small drop-down where you can select the delimiter.

- From that drop-down, you can select the delimiter. We need to use the comma (,) as a delimiter. And you can see when I select the comma from the drop-down, it shows me three separate columns (adjacent columns).

- In the end, you can use autofit to adjust the width of the columns according to the data you have.

You can also select a custom delimiter from the drop-down to split the column into multiple columns.
If a worksheet or cells are locked in Google Sheets, you won’t be able to use the “Split text to columns” option on those cells. If you attempt to apply this feature to locked cells, Google Sheets will display an error message or prevent the action. If you have a merged cell in the data, this option will split the data and make the split cells also merge with the data separated.
Wrap Text
To fit lengthy text within cells, Google Sheets offers a ‘wrap text’ feature that splits the cell value into multiple lines and fits it into the cell.
-
First, select the cells where you want to wrap the text.

- After that, go to the “Format” tab and hover the mouse on the “Text Wrapping” option and click on “Wrap”.

- At this point, the text in the selected cells has been wrapped and fit into the cells.

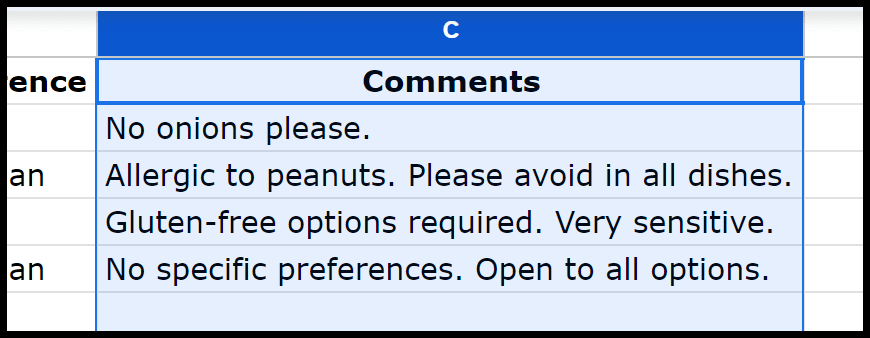
In the above image, you can see the text got split into multiple lines, and the height of the cells got auto-increased to fit those split lines.
AutoFit Columns and Rows
This is the easiest way to apply autofit to a column. All you need to do is to hover your mouse to the right corner of the column header, and the moment your mouse cursor turns into a resized mouse cursor, double click there to adjust the content in the columns as per the length.
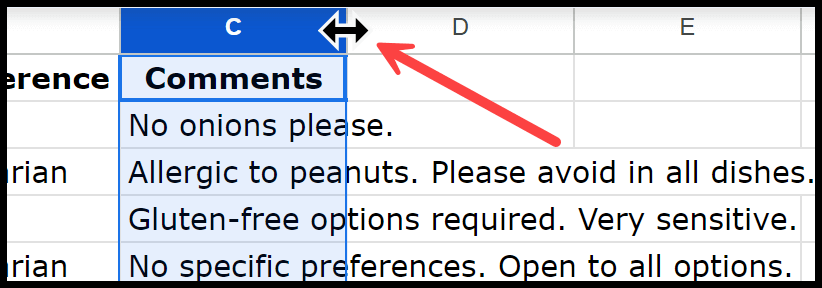
When you do this, consider the most lengthy value in the cell and make the columns much wider to adjust that value.
As I said, this is the quickest way to do this. Suppose you have two or multiple columns and want to auto-fit all those columns in one go. In that case, you need to use the header of any of those selected columns, and after hovering your mouse in the right corner, double-click to adjust all the columns using the autofit.
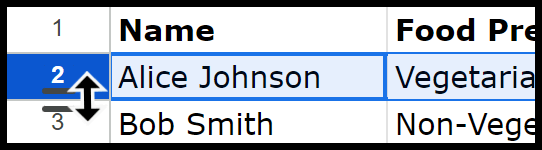
If you want to autofit a row, go to the bottom border of the row heading and double-click on it to adjust the row.
Insert a Checkbox in Google Sheets
- First, select the cell where you want to add the checkbox and then go to the Insert menu. Now, in the “Insert” menu, you must click the “Checkbox” option. And the moment you click on this option, you will get a check box in the selected cell.

- The second way is to copy and paste a checkbox from a cell where you already have one. When you copy and paste a checkbox from a cell and paste it somewhere else, the new checkbox instantly connects to the new cell.

WRITING FORMULAS IN GOOGLE SHEETS
Here we have some of the basics formula writing examples for you to write your first formulas in Google Sheets:
SUM in Google Sheets
In Google Sheets, like all other spreadsheet applications, you have the SUM function to sum values from a column or a row. In simple words, SUM adds up numbers from a range of cells. The syntax of SUM is simple; you need to enter the function and then refer to the range that you have in the column to add to the result.
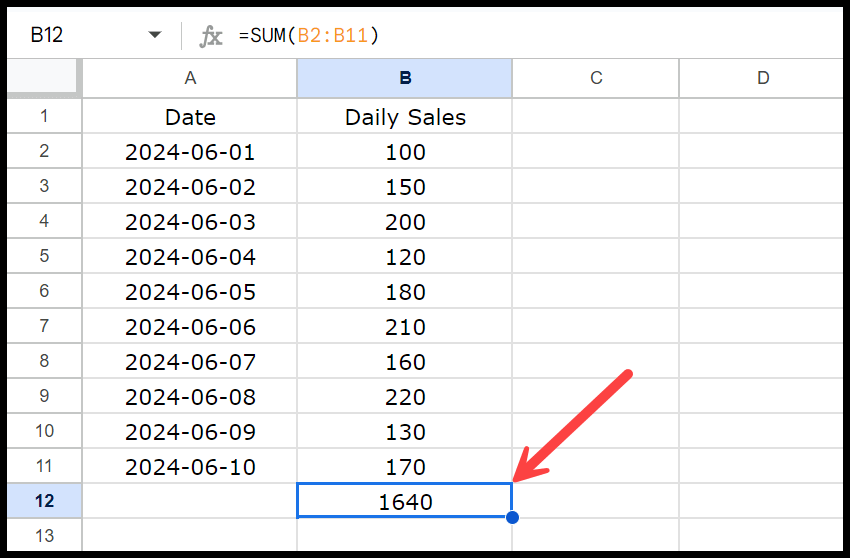
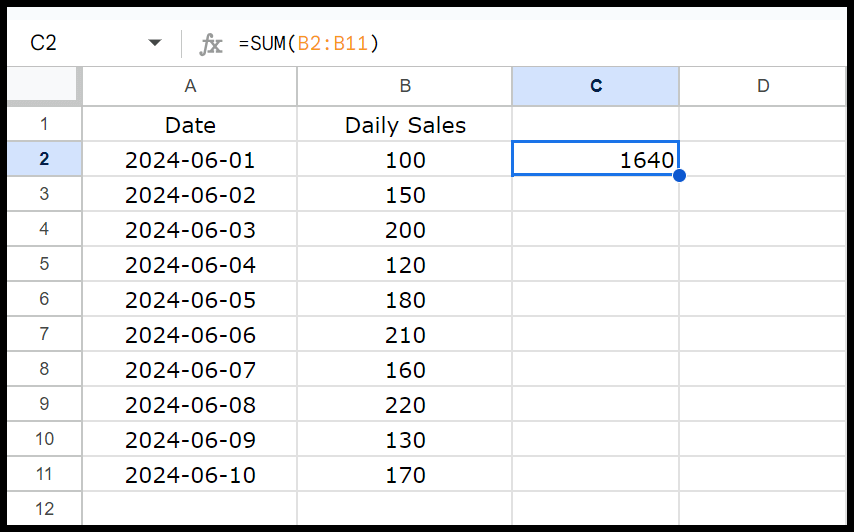
To use this, let’s say you have sales amounts in cells B2 to B11; you can type =SUM(B2:B11) in cell B12 to get the total sales numbers. Here’s an awesome tip: when you type SUM in cell B12 to sum the values from the column above, Google Sheets is smart enough to know that you want to sum values from the cells above, giving a predefined formula in the list.

See the above example; I have only typed “Su”, which has shown me the sum formula with the range from the above cells. This is amazing. I love how Google Sheets is getting good at understanding its users. Here, you need to press the Tab key to enter the formula. Type “Su” and press the Tab key to enter the formula; that’s it. But, if you want to get the sum of the column in a different cell or other than the cell below the values, in that case, you need to type the formula manually.
Note: Sum only adds values from cells with numeric values.
Count in Google Sheets
Counting the values is one of the most essential calculations in Google Sheets or any other spreadsheet application. In Google Sheets, we have numerous functions that can help you count, but among them, COUNTA is the most critical and first function.

COUNTA counts non-empty cells. In simple words, when you refer to a range of cells, it returns a count of all the cells where you have a value. Non-blank cells contain text, numbers, dates, formulas, or error values. In COUNTA, you need to refer to a range of cells or multiple cells as a separate reference.
In the example below, we have values in the range A1:A3, which is the same range we specified in the COUNTA function. When you press Enter to obtain the result, it returns 3.

As shown in the example above, we have three values: one is a date, the second is a text, and the third is a number. And counting all of them, it has returned 3 in the result as it can count all three types of values. If you change the range from A1 to A4, the result still shows the exact count of values.

This is because there is no value in cell A4, and COUNTA can only count the cells with a value.
Subtract in Google Sheets
The best way to subtract a number in Google Sheets is to use the minus (-) operator. This isa quick way to write a formula:

- Select the Cell: Firstly, click on the cell where you want the result of your subtraction to appear. It is where you will enter your subtraction formula.
- Enter the Formula: Start your formula by entering ‘=’ into the selected cell. All formulas in Google Sheets start with an equal sign, which tells you you’re about to enter a formula.
- Write the Formula: Specify the cell that contains the first number. In our example, it is A, so that’s why we have A1 in our formula. And after that, enter the “-“ sign to tell Google Sheets that you want to subtract numbers. Now, specify the cell where you have the second number.
- Hit Enter: To get the result, press Enter, and the result will be calculated in the cell.
=A1 - B1
And if you want to subtract numbers by adding directly into the formula, you just need to ue a formula like the following:
= 200 - 50
If you want to subtract values from two cells from two different sheets:
=Sheet1!A1-Sheet2!A1Divide in Google Sheets
The easiest way to write a formula to divide is to use the division operator:

=A1/B1
- Equal Sign (=): You need to start a formula using the Equal Sign. It tells Google Sheets that the cell has a formula rather than a normal value.
- Dividend: The number you want to divide. In the formula =A1/B1, A1 has the dividend, which is 200. It’s the quantity that you are dividing up.
- Division Operator (/): This operator is used to perform division. It tells Google Sheets to perform the calculation. It goes between the dividend and the divisor.
- Divisor: This is the number by which you divide the dividend. In =A1/B1, B1 has the divisor, and the value is 10. It’s the number of parts you divide the dividend into.
You can also enter the values directly into the formula, in addition to using the cell reference.
When you try to divide a number by zero in Google Sheets, you get an error represented by #DIV/0! (Function DIVIDE parameter 2 cannot be zero). This error is Google Sheets’ way of indicating that your calculation has a fundamental mathematical issue.

To handle this, you can use functions like IF to check if the divisor is zero before doing the division, which can prevent the error. For example, you can use the formula =IF(B1 = 0, “There’s a 0″, A1/B1) to display ” There’s a 0″ if the divisor is zero, avoiding the #DIV/0! Error.

Calculate Average in Google Sheets
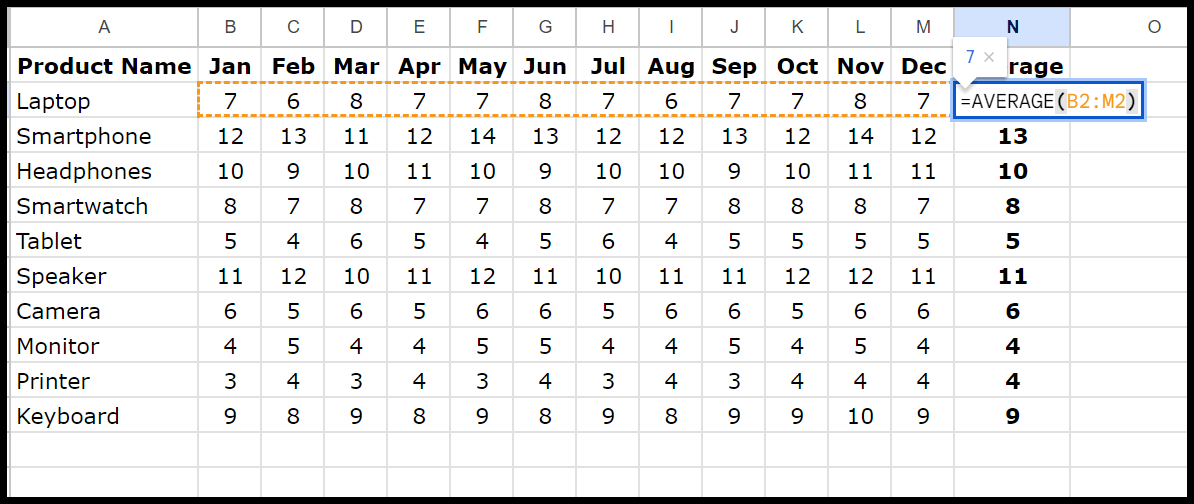
The AVERAGE Function is a basic but one of the most used statistical functions that calculates the average of given numbers. AVERAGE has a simple syntax =AVERAGE(value1, [value2, …]) where you can directly refer to a range or input values into the function.
- Enter the “=” operator.
- Type the function name and opening parentheses.
- Refer to the range by selecting it.
- Close the function and hit enter.
Now, this formula finds the average numbers in cells B2 through M2. These cells contain monthly laptop sales data from January to December. Once you enter the formula, you can drag it to the below cells to get the average for all the products.
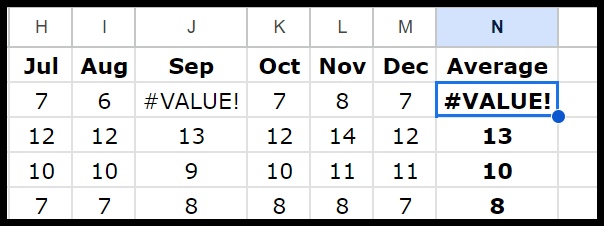
When you use the AVERAGE with values in the range that include errors (like #DIV/0! or #VALUE!), the function will return an error instead of calculating the average. This is because any error within the range disrupts the calculation.
When numbers are saved as text, the AVERAGE function will ignore those text values and calculate the average of the actual numeric values. But if all values in the range are text, it will return a #DIV/0! Error because there are no numeric values to average.
Percentage Calculation in Google Sheets
There are two methods for calculating percentages in Google Sheets. In the first method, we need to use (part/whole) * 100, which is illustrated in the example.
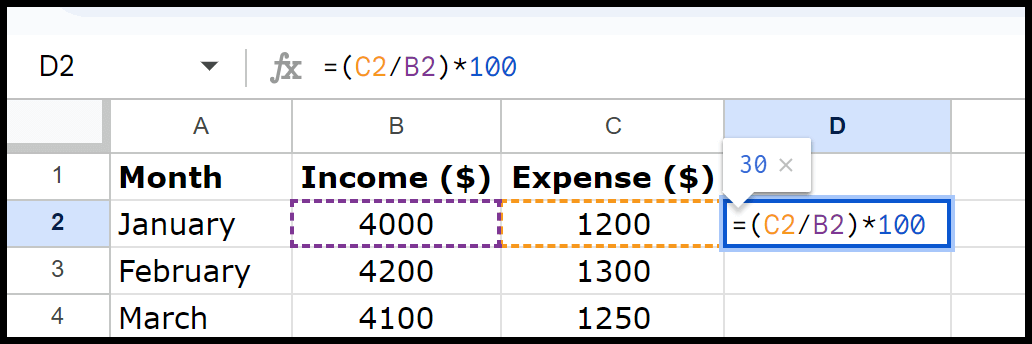
Here, the formula calculates the percentage of income spent as expenses for January. The formula divides the expenses by the income (C2/B2), which gives the proportion of income spent.
Then, it multiplies the result by 100 to convert this proportion into a percentage. So, =(1200/4000)*100 calculates to 30. This means 30% of the income was spent on expenses in January. When you use this formula, you don’t need to apply the percentage format to the cell.
Alert: Be cautious with divisions to avoid errors. For instance, ensure the whole is not zero, as this will cause a division by zero error.
Now, let’s move to the second method. In this method, you don’t need to multiply it by 100. You can divide the part by the whole and then apply the percentage format to the cell.
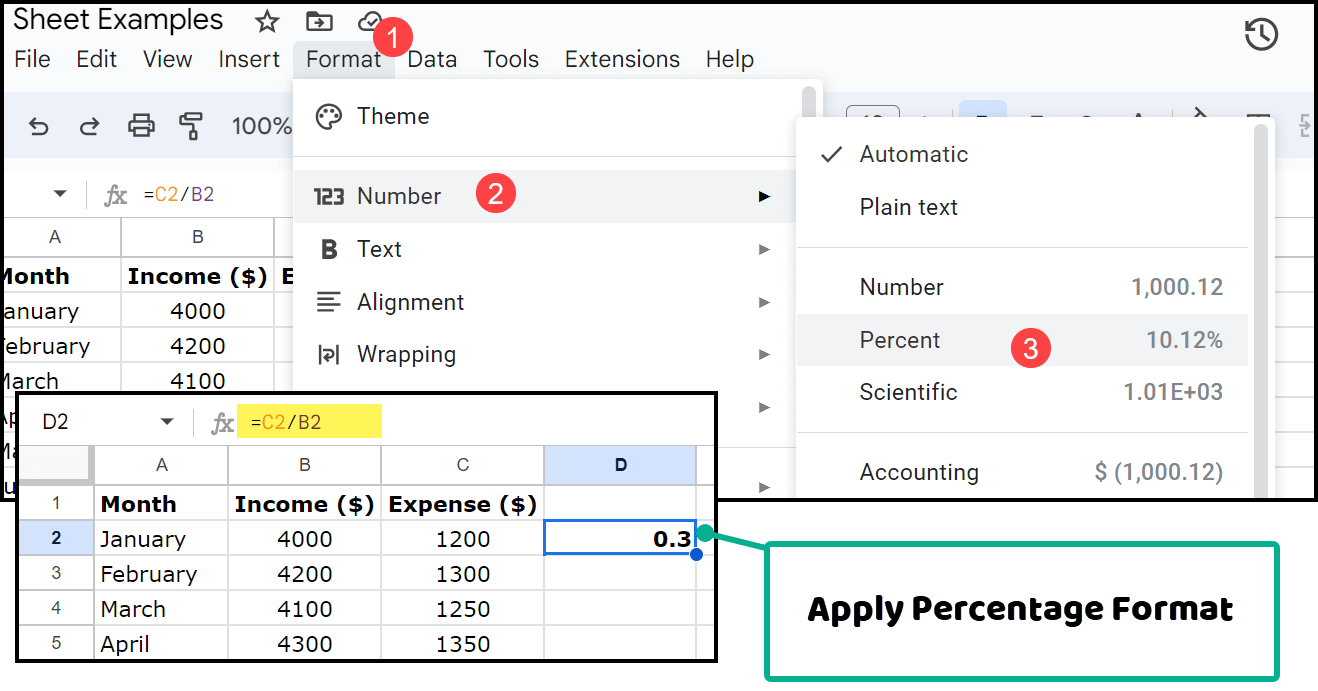
The result shows 0.3. Now, this 0.3 is the part of 1 here instead of 100. But the proportion is the same: 0.3 in 1 and 30 in 100 have the same proportion. Right? That’s why you need to apply the percentage format to the cell: it will show as a percentage value instead of a number. To do this, you need to go to Format > Number > Percentage, or you can also go to Toolbar > Number Format (123) > Percentage.

Count Unique Values in Google Sheets
This function is why I said that Google Sheets has a better way of counting unique values than Excel. When you enter this function, you need to refer to the range where you have the values and then hit enter to get count in the cell.
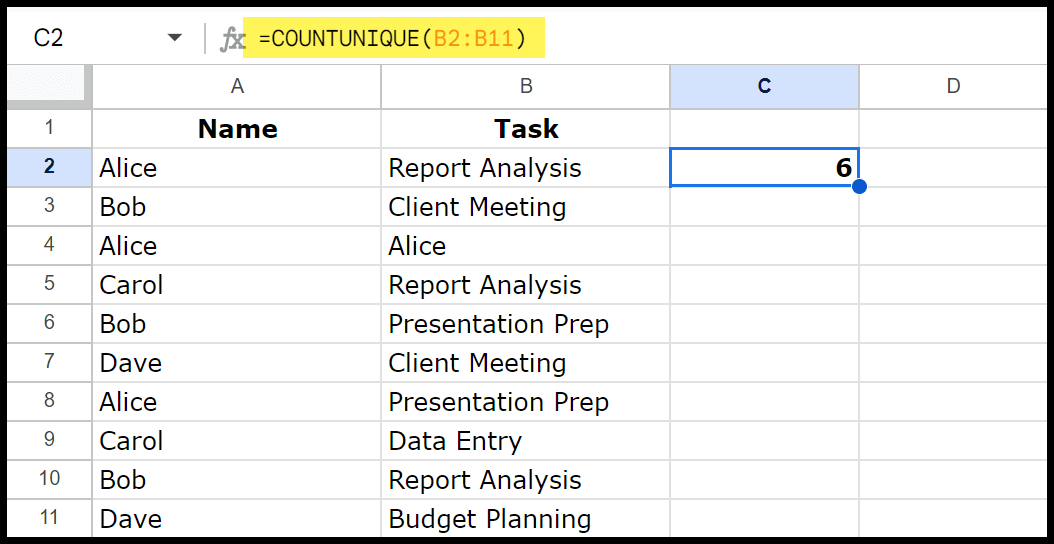
=COUNTUNIQUE(B2:B11)
Here, COUNTUNIQUE scans the range B2:B11 to identify all distinct values within this range. It counts each unique value only once, ignoring any duplicates. In this case, it counts six unique tasks, each appearing at least once in the specified range.
Count Nonblank Cells in Google Sheet
This is the easiest way to count cells that are not blank. COUNTA counts how many cells in a range are not empty. It includes cells with text, numbers, or any other data. Its syntax is simple; you must refer to the range and hit enter to get the result.
When you enter the function, it returns 6 in the result, meaning you have 6 cells in the range with a number, a text, or another value.

Notes: If your data contains errors, COUNTA will count those cells as well. You can also combine multiple ranges to count nonblank cells. Cells with logical values, such as TRUE or FALSE, are considered non-empty.
Adding a Day or Two to a Date in Google Sheets
Simple addition is the best method for adding days to a date in Google Sheets. Here’s how you can do this:
- First, type the equal sign to start the formula.
- After that, refer to the cell where you have the date.
- Next, enter the plus sign (+) to tell the formula to add.
- In the end, enter the number of days to add (1) and hit enter to get the result.
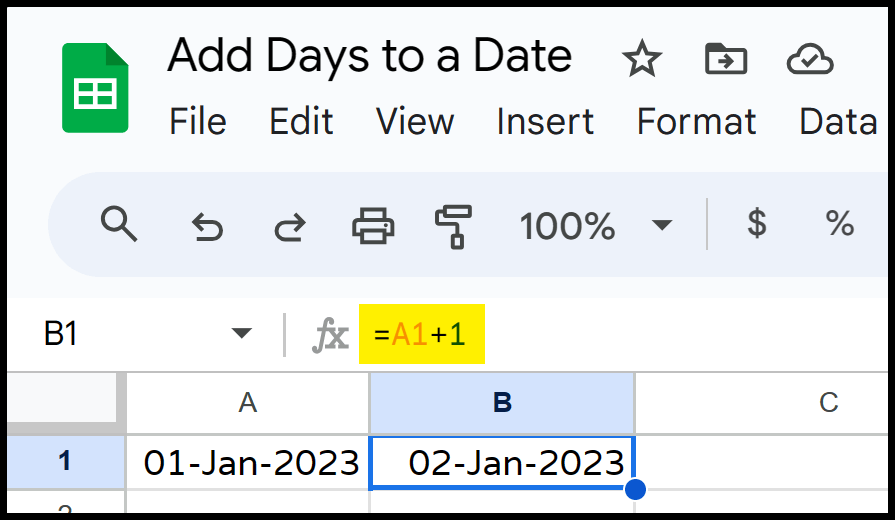
=A1+1In the example above, we have the date 1st January; when you add one day, the formula returns 2nd January in the result.
Note – Make sure the date you are using is valid as per Google Sheets. The formula will not work correctly if sheets don’t understand your date.
Multiply in Google Sheets
Let’s say you want to multiply two numbers in a single cell; in this case, you can use the below formula, which has two hard values within the cell using an asterisk (*).

To directly include values in a formula in Google Sheets, you can enter the numbers directly into the formula. For example:
=30*50
This formula multiplies 30 by 50 and returns 1500 when entered in any cell.
When using direct values in a formula, such as =30 * 50, ensure that the numbers entered directly are accurate, as they can’t be dynamically updated like references to cell values.
Add Days to Today’s Date
You can also use the TODAY function to add specific days to today’s date. The TODAY() function is helpful for inserting the current date automatically in a cell.
This function always displays the current date. Let’s say you want to add 7 days to today’s date.
- First, type (=) in a cell to start the formula.
- Now, enter the TODAY function to get the today’s date.
- After that, type the plus sign (+) to add the days.
- In the end, enter the number of days you want to add (7) and hit enter to get the result.

Today is 22-Nov-2023, and when we add 7 days to it, it returns 29-Nov-2023 in the result, which is 7 days ahead of today’s date.
=TODAY()+7Important: TODAY is a volatile function whose value changes when you change anything in the sheet. But you can change the settings from the File > Setting > Calculation.
Adding Days to a Date in Google Sheets using DATE, YEAR, MONTH, & DAY
These functions can take a date and create a new date with the days added. Before that, let’s have a look at these functions.
- DATE(year, month, day): This function returns a date based on the year, month, and day you specify.
- YEAR(date): Returns the year of a from a date.
- MONTH(date): Returns the month from a date.
- DAY(date): Returns the day from a date.
Let’s say you have a date in cell A1 (e.g., 01-Jan-2023), and you want to add 10 days to this date:
=DATE(YEAR(A1), MONTH(A1), DAY(A1) + 10)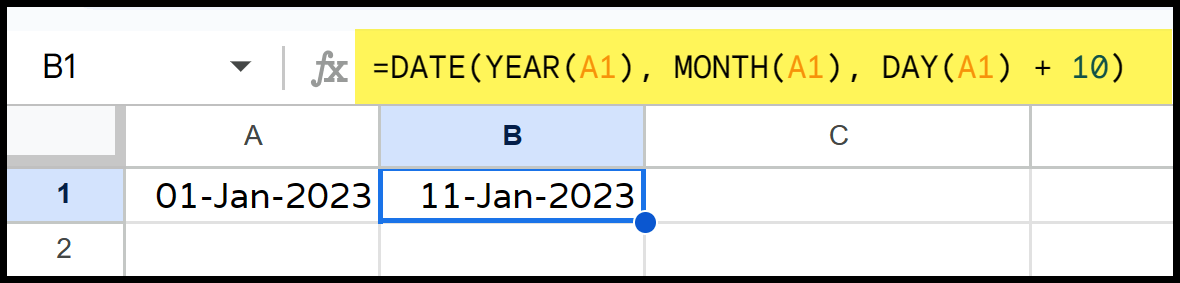
- YEAR(A1): This gets the year from the date in cell A1.
- MONTH(A1): This gets the month from the date in cell A1.
- DAY(A1) + 10: This gets the day from the date and adds 10 days to it.
This formula is handy in situations where you need to add a fixed number of days to a series of dates (such as adding a warranty period to a purchase date, scheduling follow-ups, etc.) and can be easily adapted to add any number of days or even to subtract days (by adding a negative number).
Use WORKDAY for Adding Business Days
Use the WORKDAY function to add a specific number of business days (without weekends and holidays). To add 10 business days to 01-Jan-2023:
=WORKDAY(A1,10)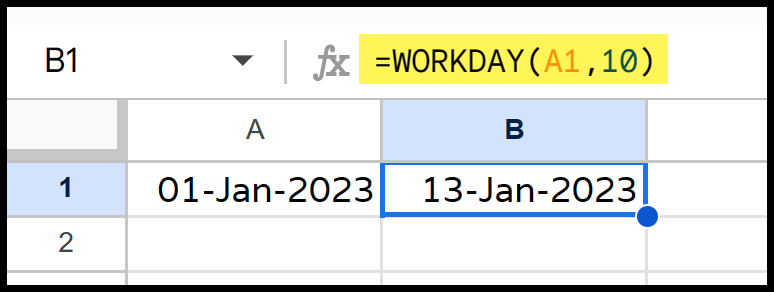
- A1: This cell contains the start date for the calculation.
- 10: business days you want to add to the date by skipping Saturdays and Sundays.
If you want also to exclude specific holidays, define those dates in a range of cells (example C1:C3) and specify in the formula:
=WORKDAY(A1,10,C1:C3)Note – Remember that Google Sheets counts the start date as day 0 when adding days to dates.
Subtract Days from a Date
And in the same way, you can also subtract days from a date. For this, you need to use the minus instead of plus.

=A7-5In the above example, we subtracted 5 days from 01 Jan 2023, which returned 27 Dec 2022 in the result 5 days before.
Add Hours to a Time Value
In the below example, we have the time value 10:30 PM and now we need to add 1 hour to this time.

Now to add one hour to this time, you can use the below formula:
=A1+TIME(1,0,0)

When you enter this formula, and hit enter it returns the 11:30 PM which is one hour ahead from 10:30 PM. As I said, =A1+TIME(1,0,0) adds 1 hour to the time in cell A1. In this formula, A1 contains your starting time.
The TIME(1,0,0) function uses 1 hour, 0 minutes, and 0 seconds. When you add this to the time in A1, it increases the time by 1 hour. Or, you can also use the below formula to add an hour to a time value.
=A1+1/24
The above formula adds 1 hour to the time in cell A1. Here, A1 contains your starting time. The 1/24 part represents 1 hour because there are 24 hours a day (1 hour is 1/24 of a day).
When you add this to the time in A1, it increases the time by 1 hour. And below is the third formula which you can use:
=A1 + TIMEVALUE("1:00:00")
Now, this adds 1 hour to the time in cell A1. TIMEVALUE(“1:00:00”) function converts the text “1:00:00” (1 hour) into a time value. When you add this to the time in A1, it increases the time by 1 hour.
Add Minutes to a Time Value
In the same way, if you want to add 25 minutes to a time value. You need to use the same formula, but instead of adding the hours, you need to add the 25 minutes to the TIME function.

Here, A1 is your starting time, and TIME(0,25,0) represents 0 hours, 25 minutes, and 0 seconds. When you add this to the time in A1, it increases the time by 25 minutes.

And the other formula is:
=A1+25/1440
The above formula adds 25 minutes to the time in cell A1, which contains your starting time. The 25/1440 part represents 25 minutes because there are 1,440 minutes in a day (25 minutes is 25/1440 of a day).
When you add this to the time in A1, it increases the time by 25 minutes. And one more formula to add minutes to the time.
=A1 + TIMEVALUE("0:25:00")
It adds 25 minutes to the time in cell A1. TIMEVALUE(“0:25:00”) converts the text “0:25:00” (25 minutes) into a time value. When you add this to the time in A1, it increases the time by 25 minutes.
Add Seconds to a Time Value
And in the same way, you can add seconds to a time value. For this, you need to use the below formula:

=A1+TIME(0,0,50)

The above formula adds 50 seconds to the time in cell A1. Here, A1 contains your starting time. The TIME(0,0,50) function represents 0 hours, 0 minutes, and 50 seconds. When you add this to the time in A1, it increases the time by 50 seconds.
And the other formula is:
=A1+50/86400
The above formula adds 50 seconds to the time in cell A1. The 50/86400 part represents 50 seconds because there are 86,400 seconds in a day (50 seconds is 50/86400 of a day). When you add this to the time in A1, it increases the time by 50 seconds.
One more formula with the use of TIMEVALUE:
=A1 + TIMEVALUE("00:00:50")
The formula adds 50 seconds to the time in cell A1. TIMEVALUE(“00:00:50”) converts the text “00:00:50” (50 seconds) into a time value. When you add this to the time in A1, it increases the time by 50 seconds.
IF Contains in Google Sheets
In the example below, we have s list of tasks and need to check if the cells in column B contain the text “Meeting”. Now, you need to write a formula with IF.
Syntax for IF – =IF(condition, value_if_true, value_if_false)
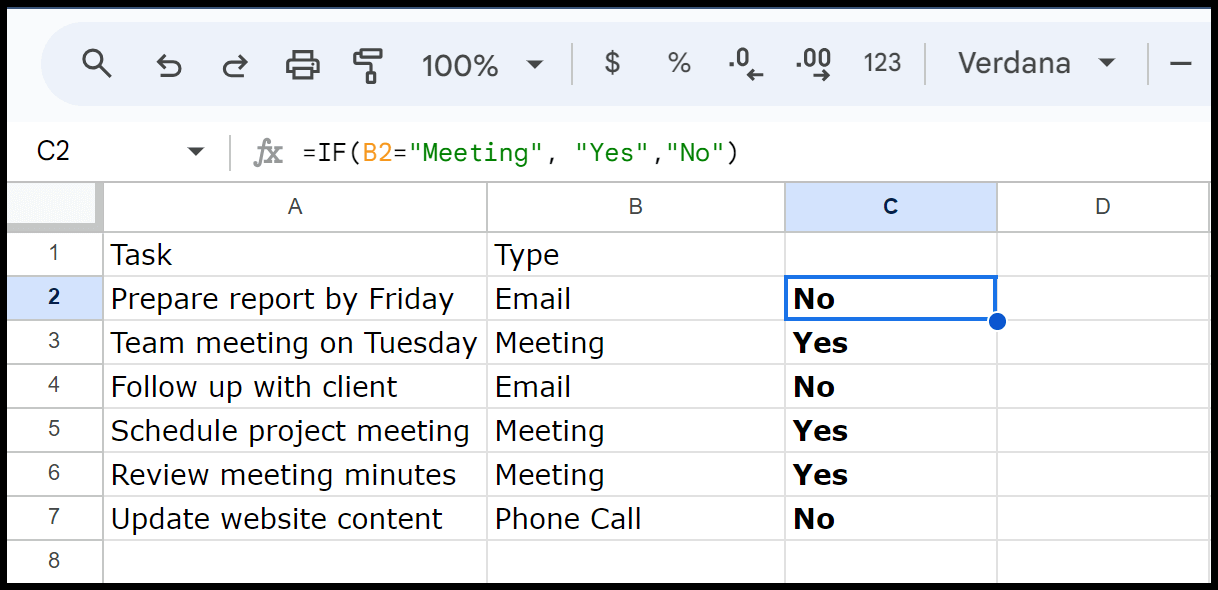
The formula used in cell C2 is =IF(B2=”Meeting”, “Yes”,”No”). This formula in cell C2 checks if B2 contains the value “Meeting”. If B2 is “Meeting,” the formula shows “Yes” in C2. If B2 is not “Meeting,” it shows “No”.
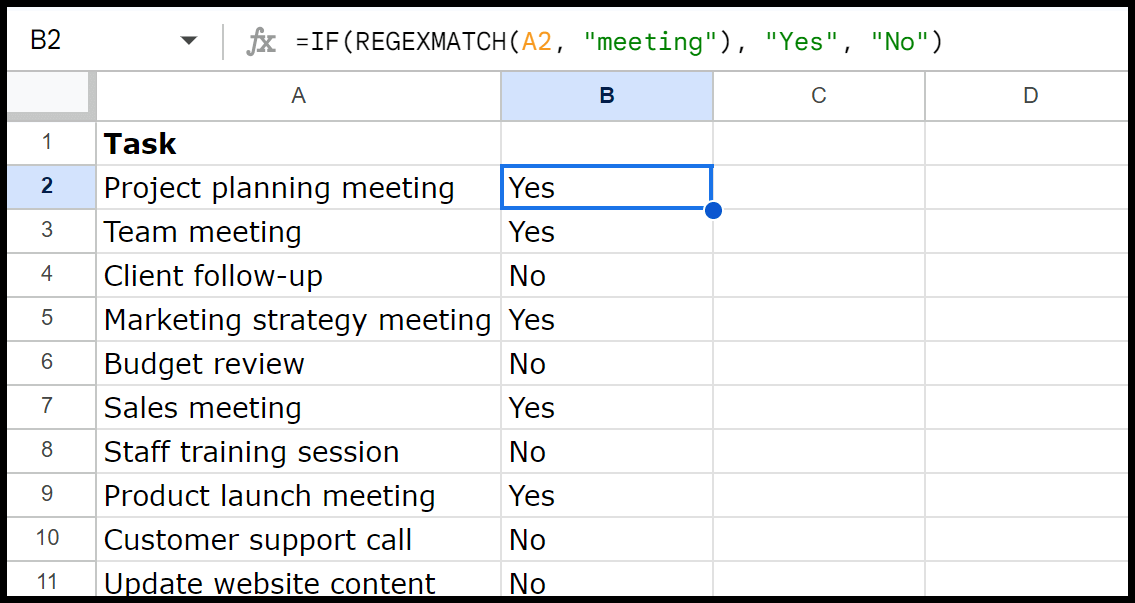
Let’s say you want to check if a substring is present in a cell; I mean, you want to check if that text is in the cell, and it contains a long text. See the example below, where we need to check for cells that contain the text “Meeting” within them.
You can use a combination of the IF and REGEXMATCH for this. The REGEXMATCH function in Google Sheets checks if a cell’s value matches a specified pattern. It returns TRUE if a match is found and FALSE if not. The formula will be:
=IF(REGEXMATCH(A2, "meeting"), "Yes", "No")
Here’s a simple explanation for this formula:
- REGEXMATCH(A2, “meeting”): This part of the formula checks if the word “meeting” is anywhere in the text of cell A2.
- IF Function: The IF function uses the result of REGEXMATCH. If “meeting” is found (REGEXMATCH returns TRUE), it shows “Yes”. If not (REGEXMATCH returns FALSE), it shows “No”.
We have used the formula in the entire column to check which cells contain the text “Meeting”.
Note – REGEXMATCH is case-sensitive, differentiating between uppercase and lowercase letters. For example, REGEXMATCH(A2, “meeting”) will only match “meeting” and not “Meeting” or “MEETING.”
Use a Combination of IF, ISNUMBER, and SEARCH Test IF Contains
If you don’t want to consider the case of the text while checking if a cell contains that text, you can combine IF with ISNUMBER and SEARCH.
- ISNUMBER function checks if a value is a number. It returns TRUE if the value is a number and FALSE if not.
- SEARCH finds the position of a substring within a text string, ignoring the case. It returns the position number if found and an error if not found.
=IF(ISNUMBER(SEARCH("meeting", A2)), "Yes", "No")
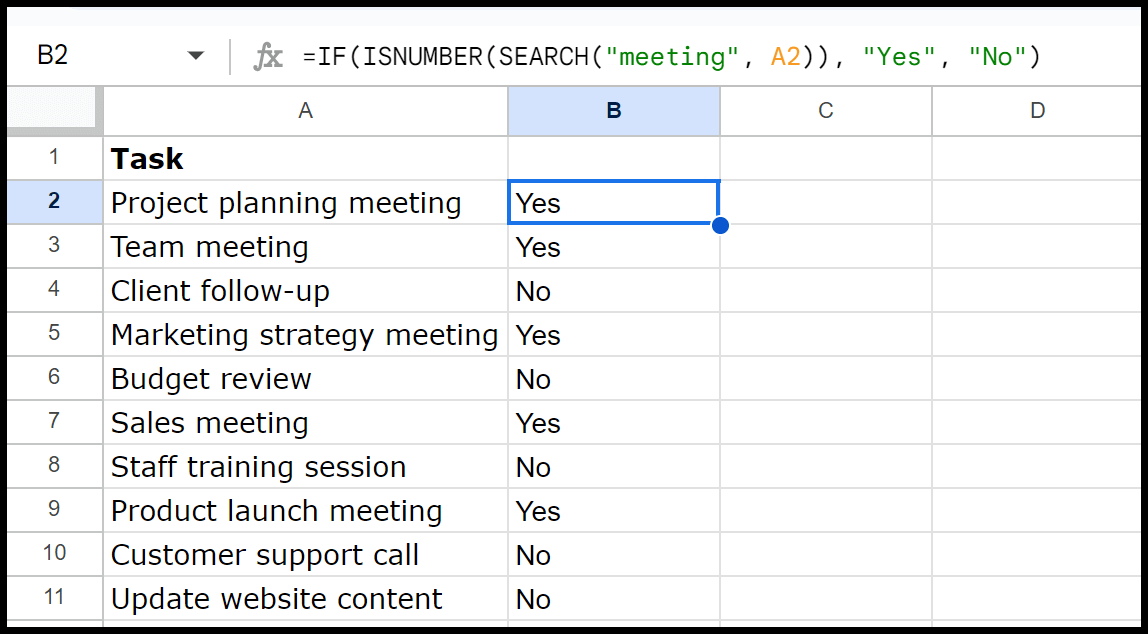
The formula checks if the word “meeting” appears anywhere in cell A2. The SEARCH looks for “meeting” and returns a number if it finds it. ISNUMBER function then checks if SEARCH found “meeting” by seeing if the result is a number. If it is, ISNUMBER returns TRUE. The IF function then shows “Yes” if TRUE and “No” if FALSE.
So, if “meeting” is in the text of cell A2, B2 will show “Yes”. If not, B2 will show “No”.
ISBLANK
The ISBLANK function in Google Sheets is an information function that indicates whether a cell is empty. Think of it as a quick way to check if someone has forgotten to fill in their part of a form or sheet. When you use ISBLANK, it checks a specific cell and returns “TRUE” if the cell is empty and “FALSE” if it contains a value. In simple words, it’s for checking empty cells.
Let’s take the example we have discussed above. To check for empty cells next to the column where employees mark their attendance, you can use a formula that includes the ISBLANK function.

You can use the formula =ISBLANK(B2) in column C. It will return “TRUE” if the cell in B2 is blank, meaning the employee didn’t attend. If B2 is filled, it returns “FALSE.” Doing” this for each row quickly shows which employees missed the training.
IFERROR
The IFERROR function is a logical function that is useful for handling formula errors. You can wrap your formula in IFERROR and specify a value to return if an error occurs. Or, if no error is returned in the result, you get the result as it is. In the example below, we need to divide 20 by zero. As you know, when you divide any number by 0, you get a #DIV/0! Error.

However, when you wrap the formula in the IFERROR function and specify a value to return if the error occurs, it returns that value in the result instead of the error. With IFERROR, you get “There’s an Error” in cell B1, making it clear something went wrong in a more understandable way.

As I mentioned earlier, if you skip specifying the value_if_error, then a blank value is displayed in the cell if an error occurs in the result.

Not Equal Operator
Like Microsoft Excel, in Google Sheets, the “Not Equal” operator is used to compare two values and determine if they are different. The syntax for the “Not Equal” operator is <>. It indeed combines two operators: “greater than” (>) and “less than” (<). To enter it, you can use the key on the keyboard.

A1 <> B1 This checks if the value in cell A1 is not equal to that in cell B1. If the values are different, the result is TRUE. If the values are the same, the result is FALSE.
The not equal is often used in IF to test conditions. Let’s say you have a list of students and their grades, and you want to mark those who did not get an “A” as needing improvement.
=IF(B2 <> "A", "Needs Improvement", "Excellent")
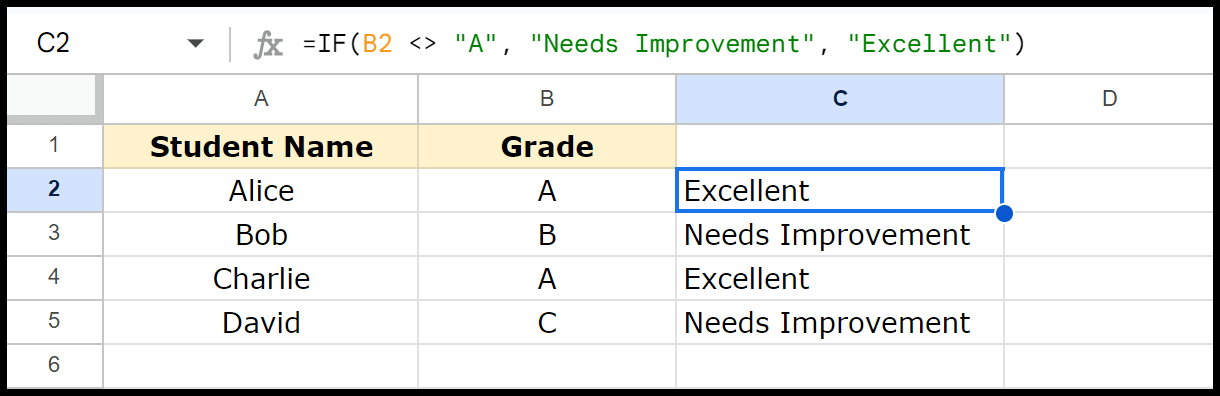
Here, the IF statement checks whether a condition is true or false and returns one value if the condition is true and another value if it is false.
- B2 <> “A” – This condition uses the not equal operator (<>) to check if the value in cell B2 is not equal to “A”. If the grade in B2 is anything other than “A”, this condition is true.
- IF(B2 <> “A”, “Needs Improvement”, “Excellent”) – If condition B2 <> “A” is true (meaning the grade is not “A”), the formula returns “Needs Improvement”, and if the condition is false (meaning the grade is “A”), the formula returns “Excellent”.
The formula categorizes students based on their grades, marking those with grades other than “A” as needing improvement and those with an “A” as excellent.
Read Also – Greater Than or Equal To in Google Sheets
Absolute Reference in Formulas
In simple words, an absolute cell reference in Google Sheets is a way to keep a cell reference fixed when copying a formula to other cells. That means the cell reference will always point to the same cell no matter where you copy the formula. You create an absolute cell reference by adding a dollar sign ($) before the column letter and row number, like $A$1.

In the above example, the formula in cell B1 is =A1*$D$1. Here, $D$1 is an absolute cell reference. The dollar signs ($) before the column letter D and row number 1 ensure that this reference always points to cell D1, no matter where the formula is copied.
Cell D1 contains the number 100. The formula in cell B1 multiplies the value in cell A1 (151) by the value in cell D1. When this formula is copied down column B, each cell in column B multiplies the corresponding value in column A by the fixed value in cell D1 because we have used the absolute cell reference.
This way, while the reference to column A changes (A2, A3, etc.), the reference to D1 stays fixed (absolute), ensuring consistent multiplication by 100 for each row.
As I said, in Google Sheets, the dollar sign ($) is used in cell references to create absolute references. It ensures that the specified column, row, or both remain constant when you copy the formula to other cells.

- $A$1: Both column (A) and row (1) are fixed. No matter where you copy the formula, it will always refer to cell A1.
- A$1: Only row (1) is fixed. When you copy the formula horizontally (across columns), the row remains the same, but the column changes (e.g., B$1, C$1).
- $A1: Only column (A) is fixed. When you copy the formula vertically (across rows), the column remains the same, but the row changes (e.g., $A2, $A3).
Using a dollar sign allows you to control which part of the cell reference remains fixed, enabling flexible and accurate formula copying.
Alert: Always verify the location of the dollar sign when using a semi-absolute reference. One of the most common mistakes users make is fixing the row instead of the column or vice versa.
Translate in Google Sheets
GOOGLETRANSLATE helps you translate text from one language to another. You can use it by entering the text you want to translate, a code for the source language, and a code for the language you want to translate it to.
Here’s the syntax of the function in detail.
=GOOGLETRANSLATE(text, source_language, target_language)
- “text” is the word or phrase you want to translate. You can enter it directly in the function and refer to the cell where you have the text. If you want to add it to the function directly, you need to use quotation marks for this.
- source_language” is the code for the language the text is currently in (also in quotation marks).
- target_language” is the code of the language you want to translate the text into (also in quotation marks).
“en” stands for English, and ” pt-BR ” stands for Brazilian Portuguese. The function will then show the translated text “Country” from “País”.
=GOOGLETRANSLATE(B1, "pt-BR", "en")

To enter this function in a cell:
- Enter the function.
- Refer to the cell where the value is located.
- Specify the source language code.
- Also, specify the target language code.
- Hit enter to get the result.

Subtract the Start Date from the End Date to Get the Count
The easiest way to get the number of days between two dates is to subtract the start date from the end date. You have the start date in cell A2 and the end date in cell B2. To find the total days in cell C2, type the formula =B2 – A2.
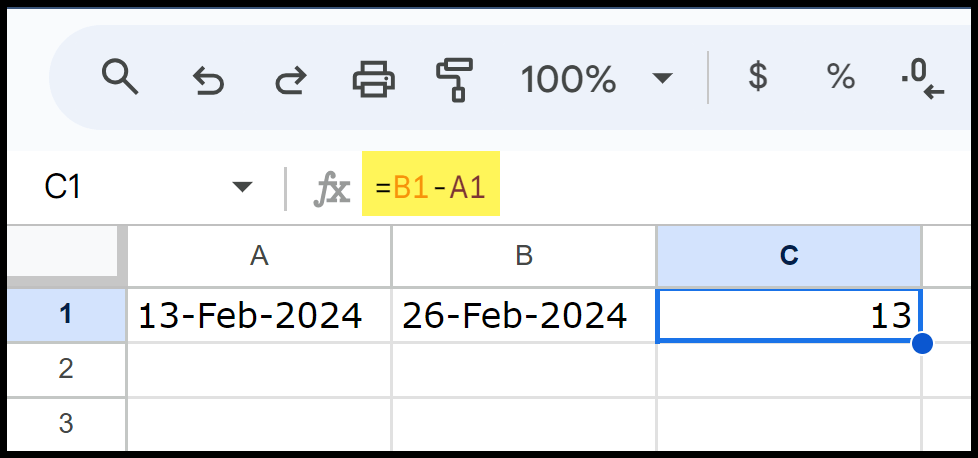
As a result, we have 13 days between February 13, 2024, and February 26, 2024. This is the most efficient way to calculate the number of days between two dates.
Count Days Difference Between TODAY and a Start Date
In the same way, you can use the TODAY function to get the count of days between a start date and today’s date. See in the example below:

Here, TODAY returns the current date (26-Jun-2024). In this example, cell A1 contains a date (13-Feb-2024).
The formula =TODAY() – A1 calculates the days between the current date and the date in cell A1. It subtracts the date in A1 from today’s date.
As of the current date, this formula calculates 134 days between February 13, 2024, and today.
Calculate Days IF Dates have Time Also
To calculate the number of days between two dates that include time and use the INT function to ensure that the result is an integer. Enter the below formula in cell C1 to calculate the difference:
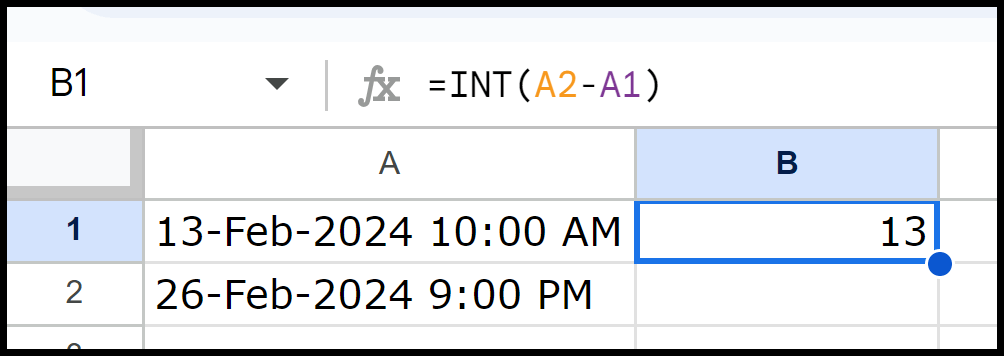
=INT(A2-A1)
- A2-A1: Calculates the total difference in days, including the fractional part representing hours and minutes.
- INT: Rounds down the result to the nearest integer, effectively giving you the number of days between the two dates.
The start date and time are 13-Feb-2024 at 10:00 AM, and the end date and time is 26-Feb-2024 at 2:00 PM; the difference includes a fractional part (13.1667 days). But as you are using INT, it gives you 13 full days.
Calculate Days Between Two Dates with DATEDIF
The DATEDIF function calculates the difference between two dates. You can use it by entering =DATEDIF(start_date, end_date, “unit”), where “unit” can be “D” for days, “M” for months, or “Y” for years. As we need to get the count of days, you can use a formula like the one below:
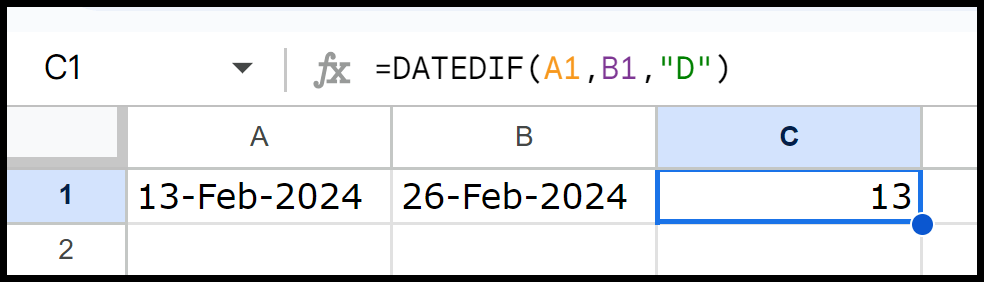
This formula calculates the number of days between two dates. In this example, cell A1 contains the start date (February 13, 2024), and cell B1 contains the end date (February 26, 2024).
It uses the DATEDIF function, where “D” stands for days. By entering this formula in cell C1, the difference between the two dates is calculated, and the result is displayed in cell C1, showing 13 days. This shows the total number of days from the start to the end.
Get Days Between Two Dates with the DAYS
The DAYS function calculates the difference between the two dates by subtracting the start date from the end date. Here’s the syntax: DAYS(end_date, start_date)
- end_date: The end date (the date you want to subtract from).
- start_date: The start date (the date you want to subtract).
=DAYS(B1, A1)
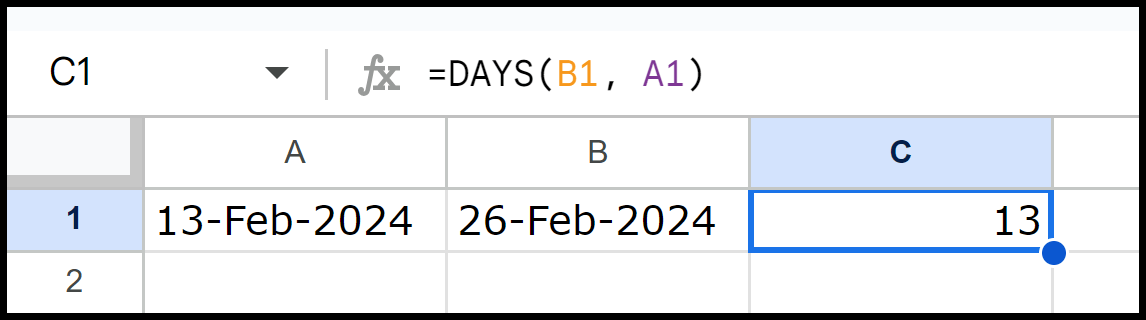
This will calculate the number of days between both dates. DAYS function here calculates the number of days between two dates. In this example, cell A1 contains the start date (13-Feb-2024), and cell B1 contains the end date (26-Feb-2024).
The formula =DAYS(B1, A1) subtracts the start date (A1) from the end date (B1) and returns the number of days between them. As shown in the image, the result is 13 days.
NETWORKDAYS and NETWORKDAYS.INTL to Get Days Between Dates
NETWORKDAYS calculates the working days between two dates, excluding weekends (Saturday and Sunday). Just use =NETWORKDAYS(start_date, end_date) to get the count of weekdays.
=NETWORKDAYS(A1, B1)
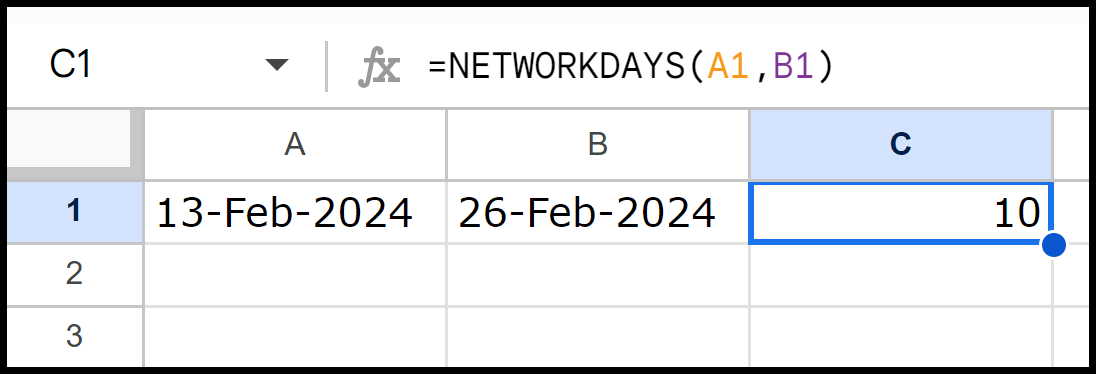
This will calculate the working days between the start and end dates, excluding weekends (Saturday and Sunday).
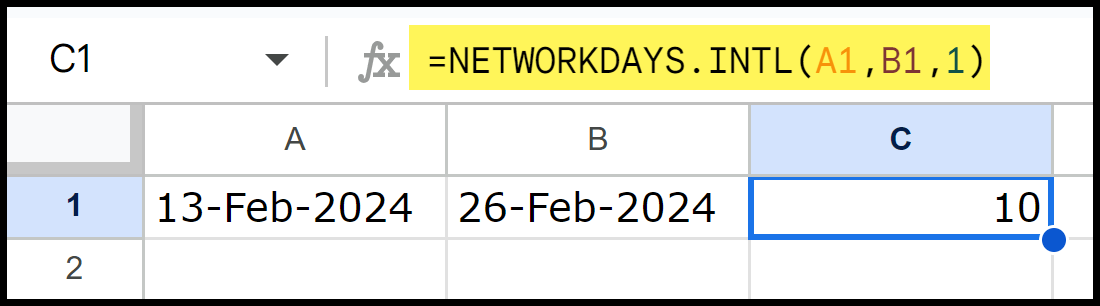
NETWORKDAYS.INTL calculates the number of working days between two dates, which you can customize to include weekends. Use =NETWORKDAYS.INTL(start_date, end_date, weekend) to set specific weekend days.
=NETWORKDAYS.INTL(A1,B1,1)
It also allows you to exclude custom dates while calculating the number of days between dates. See in the example below; we have two dates to exclude.
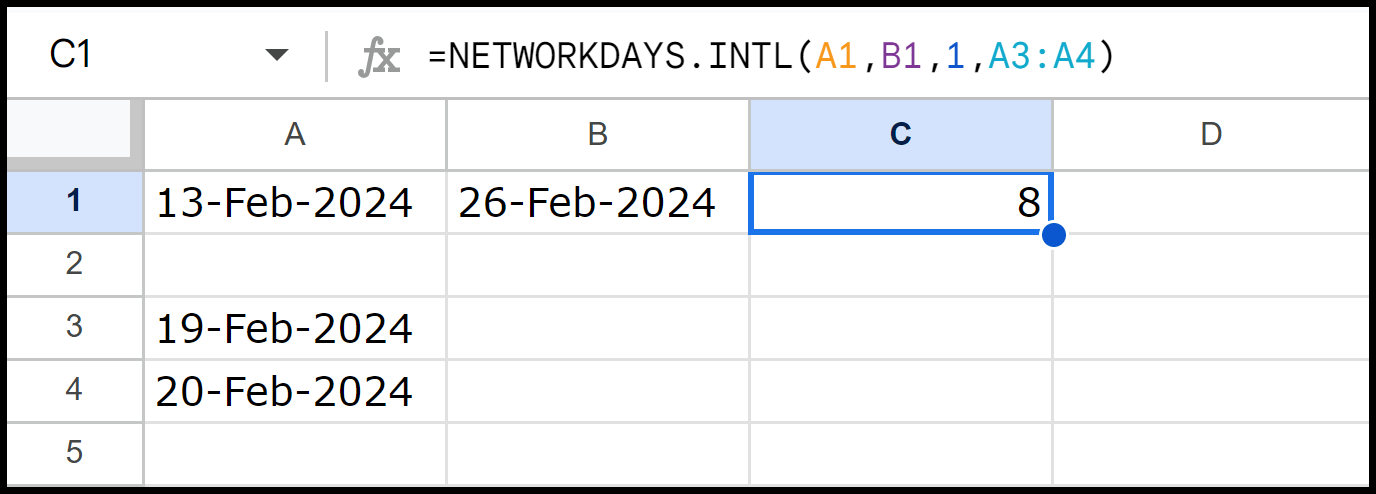
Here, the formula calculates the working days between the dates in cell A1 (13-Feb-2024) and cell B1 (26-Feb-2024). The 1 specifies the default weekend (Saturday and Sunday). The range A3:A4 lists the holidays (February 19, 2024, and February 20, 2024), which should be excluded from the working days count.
The formula calculates eight working days between 13 February 2024 and 26 February 2024, excluding weekends (Saturdays and Sundays) and the holidays on 19 February 2024 and 20 February 2024.
Count Cells with Text in Google Sheets
The easiest and best way to count cells with text is to use COUNTIF with an asterisk. The COUNTIF function counts the number of cells in a range that meet a specific condition. When using an asterisk in COUNTIF as a criterion, it counts the number of cells with any text in the range from B2 to B10.
The asterisk (*) is a wildcard character representing any text, so it helps count all non-empty text cells within the specified range. By using the same sample data that we have seen above, enter the formula in any empty cell to get the count of non-empty cells with text:
=COUNTIF(B2:B11, "*")
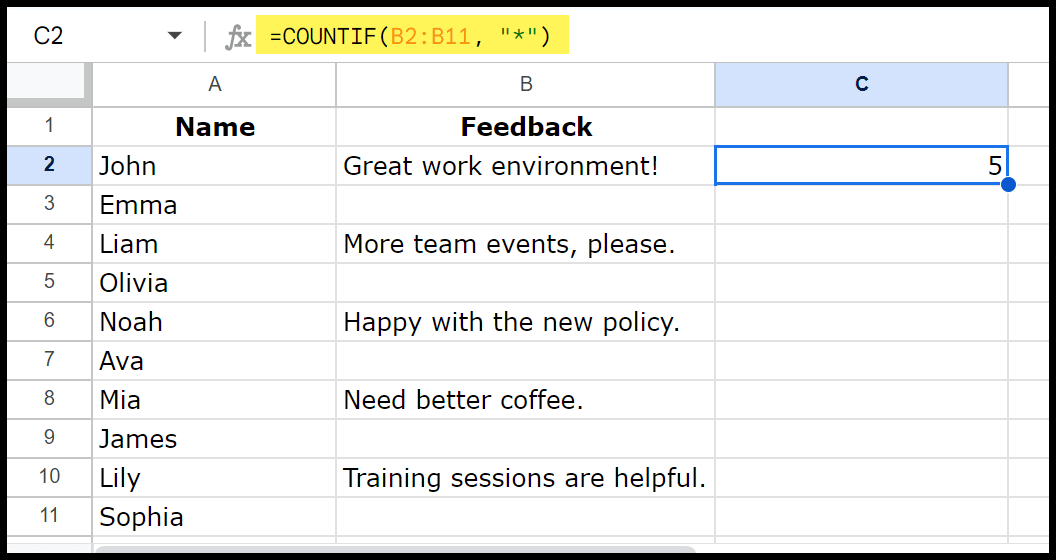
When you enter this formula, it counts the number of cells in the range B1 to B10 that contain any text. In our example, it will return 5, as the list has four feedback comments. It’s a quick way to see how many employees have shared their thoughts.
In the same way, you can also use SUMPRODUCT with ISTEXT to count the total number of cells in a range with text values.
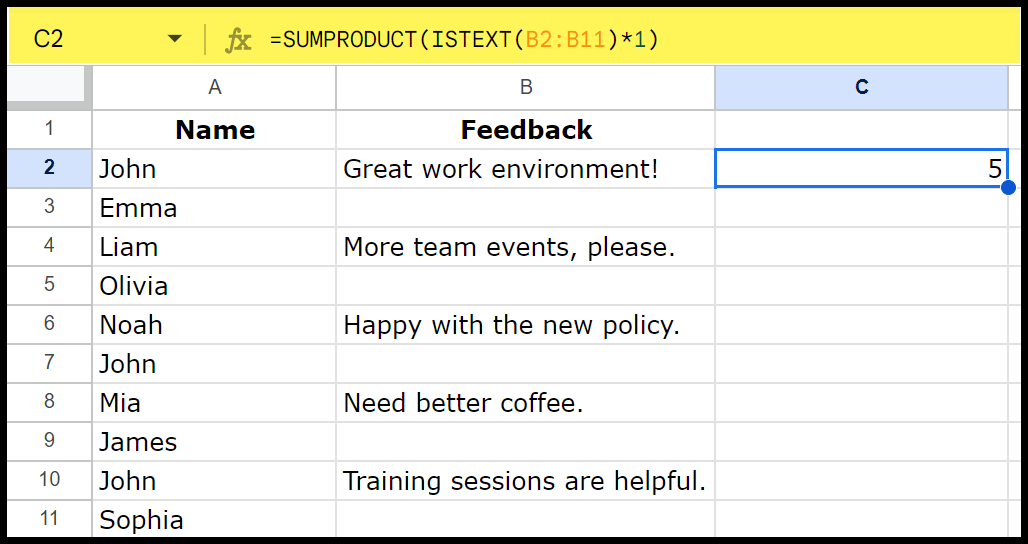
=SUMPRODUCT(ISTEXT(B2:B11)*1)
The formula =SUMPRODUCT(ISTEXT(B2:B10)*1) sounds complex but straightforward. The ISTEXT checks each cell in the range B2 to B10 to see if there’s text inside.
It gives a TRUE for text and a FALSE for empty cells. When you multiply these TRUE/FALSE values by 1, TRUE becomes 1, and FALSE becomes 0.
In the end, SUMPRODUCT adds up all the 1s, giving you the total count of cells with text. So, you quickly know how many employees have given their feedback!
Separate Names in Google Sheets
The SPLIT function helps you to split text from one cell into multiple cells based on a specific character, known as a delimiter. In the example below, you can see that we have a full name in cell A1; when I used the SPLIT in cell B1, the first and last names in cell B1 and C1 were returned, respectively.

=SPLIT(A1," ")
In cell A1, we have a space between that name, and in our formula, we have used a pace as a delimiter. This tells the formula to use a space to split values into parts.
SPLIT is a dynamic function; when you enter it in cell B1, it automatically enters the second value into cell C1. This is not limited only to first and last names; if you have a name with a first, middle, and last name, you can still separate it into parts with this function.
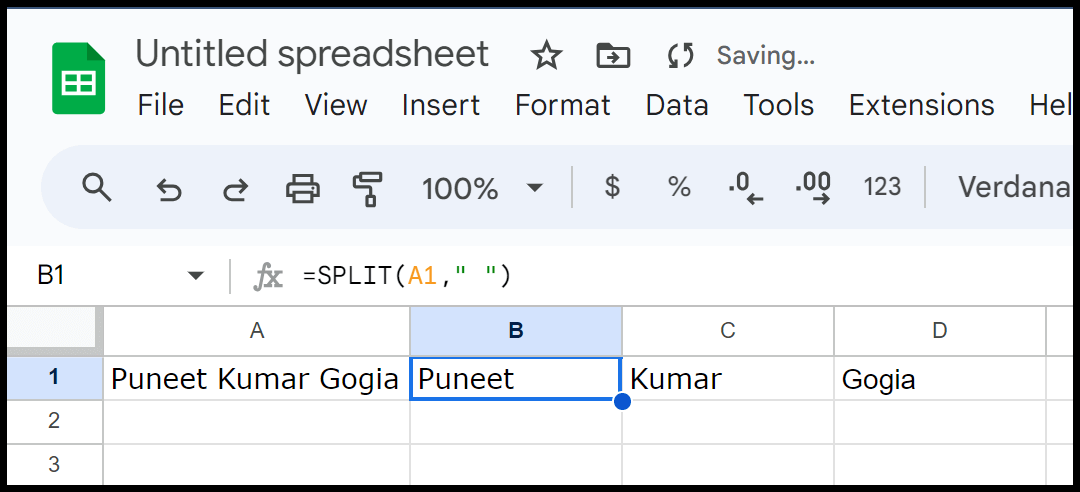
In the above example, the formula is the same, but in cell A1, we have a name with three names in it, and when you enter the formula, each name is separated in
If you want to split names from an entire column or a range of cells, you can use a combination of ARRAYFORMULA + SPLIT, as I have used in the following formula:
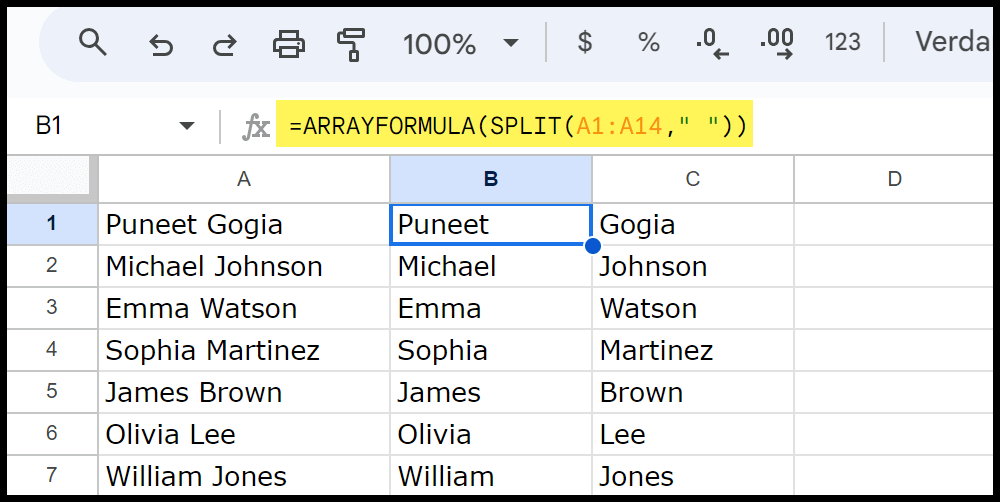
=ARRAYFORMULA(SPLIT(A1:A14," "))
It splits the full names from the range A1:A14 into first and last names using a space as the separator. The ARRAYFORMULA allows the SPLIT function to work across multiple rows simultaneously, dividing each name into first and last names.
Concatenate Text with Separator in Google Sheets
The most effective and straightforward way to accomplish this is to utilize the TEXTJOIN function. This function is specifically designed for this.
TEXTJOIN(delimiter, ignore_empty, text1, [text2, …])
- delimiter – The string or a separator that will appear between each text value.
- ignore_empty – A TRUE or FALSE value where TRUE will ignore empty cells in the range.
- text1, text2, … – The text or string values to concatenate.
Now, to use this function, you can use the following steps:

- Enter the TEXTJOIN function in a cell.
- In the first argument, which is the delimiter, specify the separator.
- Use TRUE in the second argument to tell the function to ignore the blank cells.
- Specify the range of cells in the third argument where you have the values you want to combine.
=TEXTJOIN(" ",TRUE,A1:A3)
- ” ” is the delimiter, the character inserted between each text item being joined. In your example, it’s a space.
- The ignore_empty parameter is TRUE. If it’s set to TRUE, the function will ignore any empty cells in your joining range. If it were FALSE, the function would include empty cells.
- A1:A3 is the range from which you need to combine in a single cell.
In this example, we have values in the range A1:A3, which we have used. But if you have strings in non-continuous cells, you can define the cell, as in the following example.

=TEXTJOIN(" ",TRUE,A1,A3,A5,)
TEXTJOIN is the best way to combine strings. It allows you to select an entire range in a single go.
T.Test in Google Sheets
In Google Sheets, there is a function with the name T.TEST, which you can use to calculate the T-Test. In this tutorial, we will use this function with the sample data we have.

The syntax for the T.TEST function in Google Sheets is:
T.TEST(range1, range2, tails, type)
This function is essential for statistical testing in experimental data analysis, allowing for hypothesis testing regarding differences in means between groups.
Calculate Standard Deviation in Google Sheets
Let’s say you want to analyze the test scores of a class with the standard deviation to understand how much variation there is from the average score.

Here’s how to calculate standard deviation using the STDEV.S for students, broken down into simple steps:
- First, add the numbers you want to analyze into a column in Google Sheets. For example, we have student data in the range A1:B8, and their scores are in column B.
- Then, select a cell where you want the standard deviation to result in. Let’s say this cell is D2.
- Now, in cell B9, type the formula =STDEV.S(B2:B8). This is the range where we have the students’ scores to test for standard deviation.
- In the end, press Enter. Google Sheets will calculate and return the standard deviation of the scores in the range B2:B8.
=STDEV.S(B2:B8)
Here, the standard deviation of 9.20 points suggests that the scores generally deviate from the mean by about 9.20 points. This indicates a moderate variability among the scores. Assuming the scores are somewhat normally distributed, you can use the SD to estimate that approximately 68% of the scores lie within one SD of the mean (mean ± 9.20).
About 95% of scores lie within two standard deviations (mean ± 2 * 9.20), and about 99.7% within three standard deviations (mean ± 3 * 9.20).
Spell Check
Spell checking is easy, and you don’t need to follow complex steps. Go to Tools > Spelling > Spell Check to open the Spell Check option.

There are three ways to spell check:
- Selected Cells
- Current Worksheet
- Entire Workbook

As I have mentioned above, to open the Spell Check, you need to select the cells if you want to spell check for some specific cells, go to the Tools Menu, Spelling, and then click the Spell Check.
The moment you click on the option, you will get a dialog box that shows you the value with the wrong spelling, and it will also suggest a correct spelling. In this dialog box, you have three options to use further:
- Change/Change All – When you have a spelling error, you need to click on the change to correct the spelling error in the current cell or Change All to correct the spelling error in the entire selection/Sheet/Workbook.
- Ignore/Ignore All: If you don’t want to correct the spelling mistake, then you can click on the ignore button to ignore the mistake and move to the next mistake, and if you want to ignore that mistake in the entire selection/Range/Workbook, click “Ignore All”.
- Add to Dictionary: Now, when you check for a spelling mistake, even if it is not a mistake, and you want Google Sheets not to consider it a mistake, you add that work to the dictionary.
Remove Blank Rows
In Google Sheets, you can remove those unwanted blank rows in multiple ways based on your preference. This tutorial will show you how to remove the blank rows from the data in Google Sheets.
- First, select the first blank row and then press and hold the “Ctrl” key (Cmd for Mac) and then select the other blank rows.
- Once all are selected, just right-click on the mouse and click on “Delete selected rows”.

Set Print Area
Unlike other spreadsheet programs like Microsoft Excel, which allow you to set a print area that is recalled every time you print the sheet, Google Sheets does not have a dedicated “set print area” option. But you can use these simple steps when you want to print a specific range of cells:
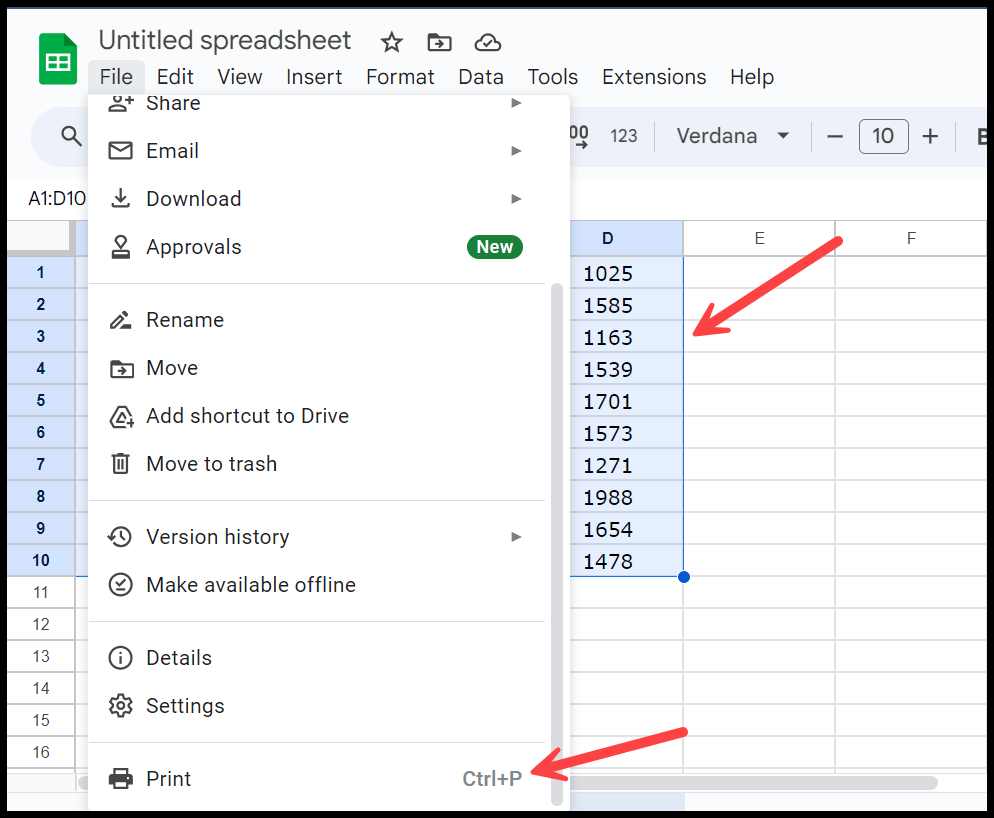
- Select the cells or range that you want to print. Go to File > Print or press Ctrl + P (Cmd + P on Mac).
- In the print settings menu, under the “Print” section, you will see an option named “Current Sheet”. Click on the dropdown menu and select “Selected cells” instead (it automatically adjusts to the range you’ve selected).

- Click on “Next” to see a preview of your worksheet, and then click on Print to print the range.
Yes, that’s it. But apart from this, by selecting the cells, you can customize how they occur on the printout, like orientation (portrait or landscape), scaling (fitting to width or height), margins, and more.
Open CSV File
Importing a CSV file means getting the data from the CSV file into an already existing Google Sheets workbook or create a new workbook when you import the data. Here are the steps to do this:
- Click on File in the top menu bar of the Google Sheets, and then click on Import to open the import menu.

- Now, you can select a CSV file from your device to upload. It can be any CSV file stored on your device. After you’ve found the File, double-click it to upload it, click once to select it, and then click ‘Open.’

- Once your File is uploaded, you’ll need to decide how to insert your data:
- Create new spreadsheet: Imports the CSV data into a new sheet (creates a new workbook).
- Insert new sheets: Add a new tab to your current spreadsheet and place the data there.
- Replace Spreadsheet: Replace the data of the current sheet with the data from the CSV file.
- Replace current sheet: Overwrites the data in your active sheet with the data from the CSV.
- Append to current sheet: Adds the CSV data to the bottom of the active sheet.
- Replace Data at selected cell: Adds data to the current sheet stating from the selected cell.

- Next, you can also choose the type of the separator (Auto Detected, Comma (,), Semicolon (;), Tab, or Space) you want to separate the data from the CSV format in the normal Google Sheets workbook. This feature is handy if your CSV file uses a delimiter other than a comma, such as semicolons, commonly used in Europe.

- In the end, click on the “Import Data” button to import the file in the Google Sheets. The data from the CSV file will appear according to the option you selected.
When you choose to create a new workbook to import the data it won’t open it right away but give you a link to open it after importing the data.

You just need to click on it to open it.

Merge Cells
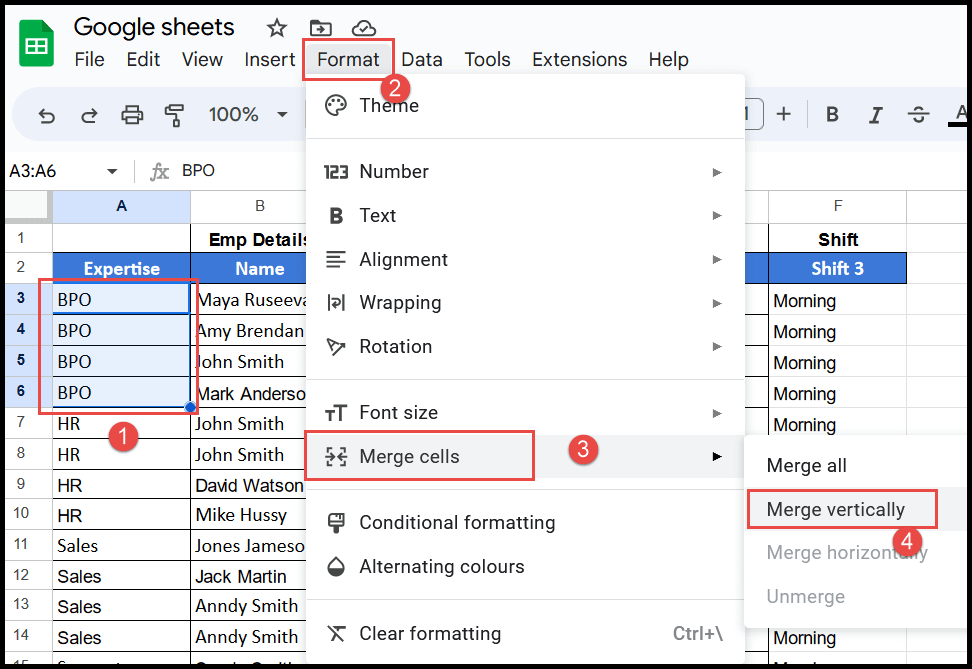
Merging cells in Google Sheets is quite simple. One of the easiest ways for this is to use the “Merge Cells” option from the Format menu:
- Select Cells to Merge – Once your document is open, decide which cells you want to merge. You can select these cells by clicking and dragging the mouse across them. Alternatively, you can click on a cell, hold down the Shift key, and use the arrow keys to highlight multiple cells.
- Go to the Format Menu: After selecting the cells, go to the “Format” menu at the top menu bar.
- Click on the Merge Cells Option: In the “Format” dropdown menu, select the “Merge cells” option. This option allows you to merge your selected cells into one larger cell.
- Select the Merge Option: In the “Merge cells” option, you will see three choices: “Merge all”, “Merge horizontally”, and “Merge vertically”. Choose the one that suits your needs. “Merge all” will combine all selected cells into one single cell. “Merge horizontally” will combine cells in the same row, and “Merge vertically” will combine cells in the same column.
When you click on the merge option you want to use, Google Sheets will show you a pop-up to remind you if there are values in the selected cell.

If you need to undo the merge, you can easily do so. Just use steps 3 and 4 to navigate back to the “Merge cells” option, then click on “Unmerge.” Alternatively, you can simply use Ctrl + Z to undo.
If you select columns and rows and then use this merging option, it will merge those as well. There is no limit to the number of cells, rows, and columns you can merge, but you always need to know how many cells you need to merge.
Lock Cells
To lock a cell or a range of cells in Google Sheets is quite simple and easy, you don’t need to make much change to the settings and other options. You just need to follow a few quick steps for this:
- Select the Cells You Want to Lock – Select the cells or range that you want to protect. You can also click on a column or row label to select the entire column or row, or use the keyboard keys Shift + Arrows to select the range.

- Open the “Protect sheets and ranges” Option – Go to the Data menu on the top menu bar. Click on Protect sheets and ranges. This will open a sidebar on the right side of your screen titled “Protected sheets and ranges”.

- Verify the Selected Range – On the right side of the screen you have the pane opened. And in this pane, you have the address of the range or the cell which you have selected. Even if you want to change the range, you can change it from there by typing or by “Select range button”.

- Set Permissions – Click on the Set permissions button which will open a new dialog. Here you’ll decide who can edit the protected cells. You will have a few options for permissions.

- Restrict who can edit this range: Select “Only you” to prevent others from editing, or “Custom” to select specific people who can edit. If you select “Custom,” you can enter the email addresses of those you wish to allow to edit the cells. You can also select groups if they have been set up in your organization.

- Done – Click Done after setting the permissions. Your selected cells/range or sheet is now locked.
The protected range will appear listed in the “Protected sheets and ranges” sidebar. It will show the range, description (if added), and who has permission to edit.

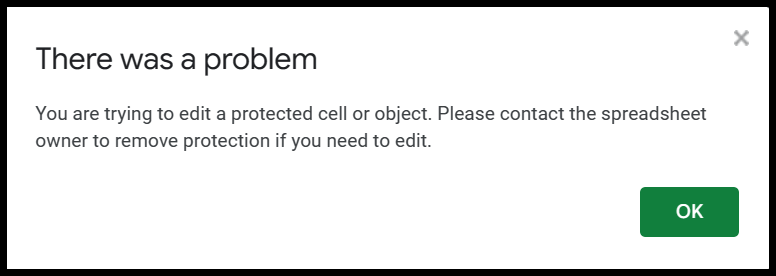
Now when a use will try to edit a cell from the range “A1:B4”, he/she will get an error show that this range or cells is locked.
Note – When you lock a cell or a range of cell, you can still change its formatting, height and width and copy.
Insert Page Break
Steps to Add Page Breaks in Google Sheets
It’s quite easy to add page breaks in Google Sheets; all you need to do is follow the below steps:
- First, make sure to have data in a well-structured form. No value should be overlapped in the cells. If you think you have long values in any of the cells, you can apply wrap text to move the long text to the next line.

- After that, click on the File menu in the top-left corner. From the drop-down menu, select Print. This will open the print settings window.

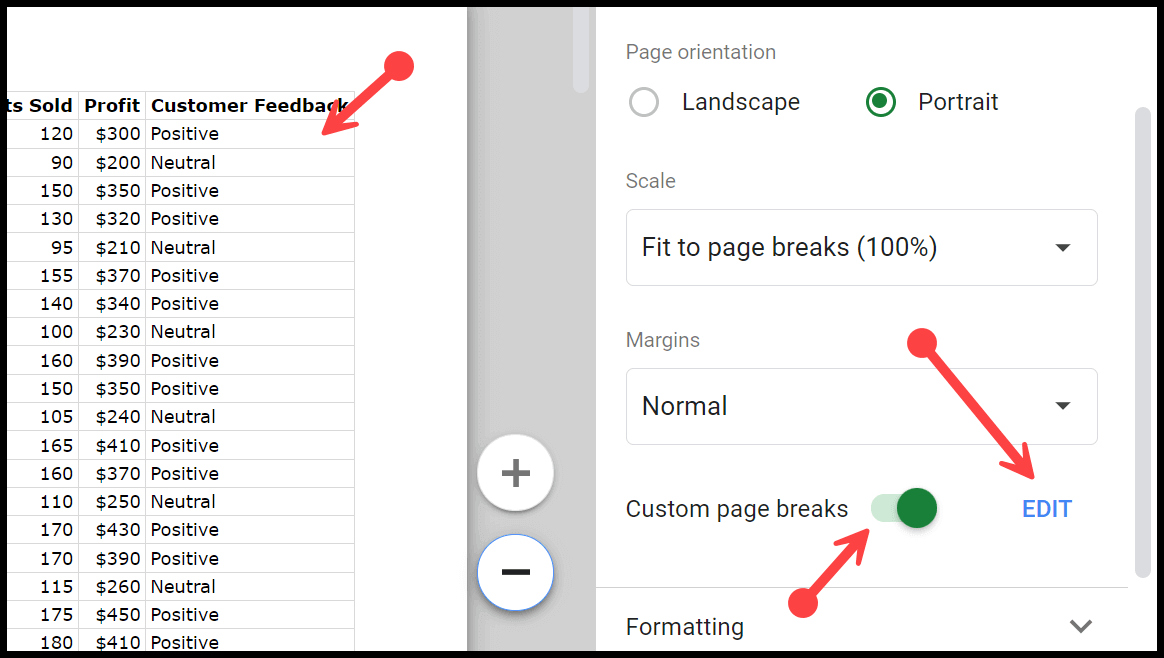
- Now, in the print settings window, look for the “SET CUSTOM PAGE BREAKS” option on the right side of the window. Then, click on it to open the page break section.

- Next, in the page break mode, you will see blue lines that show the current page breaks. By default, Google Sheets will automatically determine where the pages break based on the paper’s size and the sheet’s data.

- To move a page break, click and drag the blue line up to that column or row. For example, you can drag the blue line to the end of each customer feedback column to ensure it is included on the page.

- Once you have adjusted the page breaks as you want them, click the Confirm button at the top-right corner of the page break editing mode. This will save your page breaks and return you to the main print settings window.

Returning to the print settings window, you can now see a preview of how your data will look when printed with the new page breaks.
Even if you download your worksheet as a PDF file, the same page break will be present. You can add that to the file, or you can edit page breaks while exporting it.
Now, when you have applied a custom page break, Google Sheets allows you to edit it or turn it off to let Google Sheets use the default page breaks. When inserting a page break, it is always better to adjust the margins to get the print preview in the print settings.
Script Editor in Google Sheets
Google Sheets allows you to automate tasks using Google App Script. With Apps Script, you can create custom menus, automatically send emails based on spreadsheet data, and even set up reminders and alerts. You need to use the Google App Script Editor to write these scripts. You don’t need to install it to use it. You can access it directly from Google Sheets by going to the Extensions and selecting Apps Script.

- Open Google Sheets.
- Click on Extensions.
- Go to App Scripts
It opens the code editor in the new tab where you can write your scripts.

Script Editor Interface & Components
You will see different options and buttons when you open the Script Editor for the first time. Now, it’s important to understand some of the basic available options.

- Code Editor: This is the main area where you write your code. It has syntax highlighting to help you identify different parts of your script, making it easier to read and debug.
- Toolbar: At the top, the Toolbar offers quick access to buttons like saving, running, and debugging your scripts. It also includes buttons to create new files and folders within your project.
- File Navigator: On the left side of the Script Editor, the File Navigator displays a list of all the files and folders in your project. You can organize your scripts into different files and folders, making it easier to manage larger projects.
- Triggers: You can set up triggers in the Script Editor to automatically run your scripts at specific times or in response to events, like when a workbook is opened or edited.
- Execution Log: This is an area at the bottom of the editor that shows the output of your scripts when you run them. It includes messages about errors, successful executions, and any custom logs you add to your scripts.
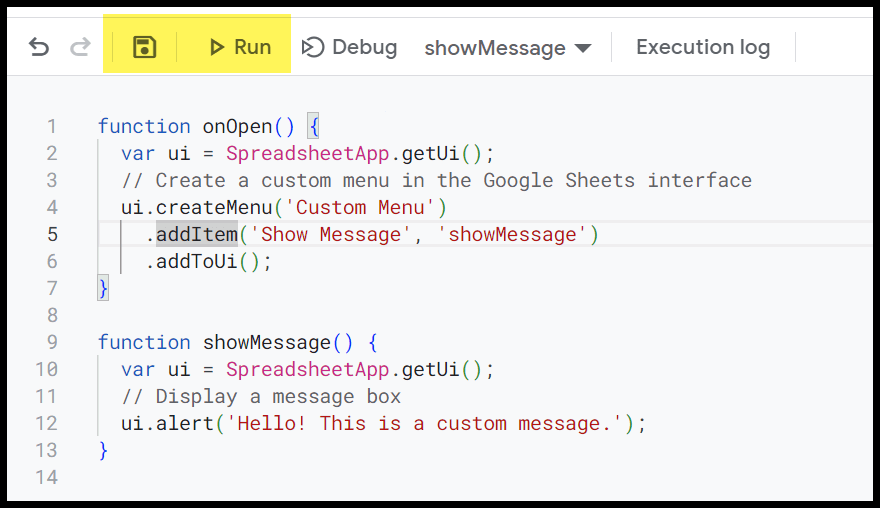
Save and Run a Script in Google Sheets
After pasting or writing your script, click on the disk icon or select “File” and then “Save” to save it. If prompted, give your project a name. Once saved, you can run your script by clicking the script editor’s play button (a triangle icon).
As I mentioned, if your script needs to run automatically, like when you open the sheet, you can set up triggers by clicking the clock icon in the script editor and following the prompts.
Renaming a Project in Google App Script Editor
In the script editor, look at the top left corner, where the project name is next to the App Script icon.

Click on the current project name to make it editable. Type in your desired new name and press Enter or click outside the text box to save the new name.