

Press Ctrl + S to save changes to the current file. The first time you save a new workbook, Excel asks for a name and a folder; after that, Ctrl + S overwrites the file without asking.
To save under a new name, folder or format, press F12 (Fn + F12 on many laptops) to open the Save As dialog, or go to File → Save As → Browse. Pick the folder, type a new File name, choose the Save as type and click Save.
If the file is stored in OneDrive or SharePoint with AutoSave switched on, Excel saves every change as you make it, and File → Save As becomes File → Save a Copy. Make the copy before you start changes you might not want to keep, because the original is overwritten as you work.
Save As moves you into the new file. From that point your edits go into the copy, and the original keeps only what was last saved to it. If you meant to carry on in the original, close the copy and reopen the original.
The Save AutoRecover information every setting in File → Options → Save (10 minutes by default) does not save your workbook. It only keeps recovery data in case Excel closes unexpectedly, so you still need Ctrl + S or AutoSave.
There are three different ways to save a workbook in Excel, and in this tutorial, we will learn all these methods in detail. So, let’s get started.
Save the Workbook as a New Workbook (First Time)
When you create a new workbook, you need to save it somewhere on your system. For this, you need to use the “Save As” option.

- Click on the File Tab.
- Then click on “Save As”.
- After that, click “Browse”.
- Now, locate the folder where you want to save it and type a name for the file.
- In the end, click Save to save the file.
Note: You can also use the shortcut key F12 to open the Save As dialog box. Once you press the key, Excel opens the “Save As” dialog box, and then you can save the file.
Save Recent Changes in the Workbook
When you are working on a workbook and you want to save the work that you have done in it, you can use the steps below:
- Click on the File tab.
- You will find all the options on the left side of the window.
- Now, click on the “Save” option to save the workbook.
Note: You can also save the recent changes using the keyboard shortcut Ctrl + S. This will save your updates to the workbook. On a Mac, the shortcut is Command + S.
If you press Ctrl + S on a workbook that has never been saved, Excel opens the Save As screen first, so you can pick a folder and a name.
Save a Copy of the Current Workbook
If you have a workbook saved but want to save a new copy, you can go to the File tab, click “Save As”, and save it as a new copy. But make sure to change the workbook’s name if you want to save the copy in the same location; otherwise, Excel asks you to replace the existing file.
Once you save it as a copy, Excel keeps the new copy open, and the original file stays as it was when you last saved it.
In Excel for Microsoft 365, when a file is saved on OneDrive or SharePoint and AutoSave is turned on, you’ll see “Save a Copy” in the File tab instead of “Save As”. It works the same way: it saves a new copy with a different name or location, and the new copy is the one that stays open. Use it before you make big changes, because AutoSave keeps saving your changes to the original file.
Save As Button on the Quick Access Toolbar
To add the Save and Save As buttons to the quick access toolbar, go to File > Options > Quick Access Toolbar.

In the Excel Options, go to the Quick Access Toolbar:
- From the “Choose commands from” list, select “File Tab”.
- Select “Save” from the list of options and click the Add button.
- And then, repeat step 2 for the “Save As” option.
- Finally, click OK to add buttons to the quick access toolbar.
Save Settings
Excel also allows you to change the save settings from the Excel options. Open the Excel Options and go to the “Save” tab.
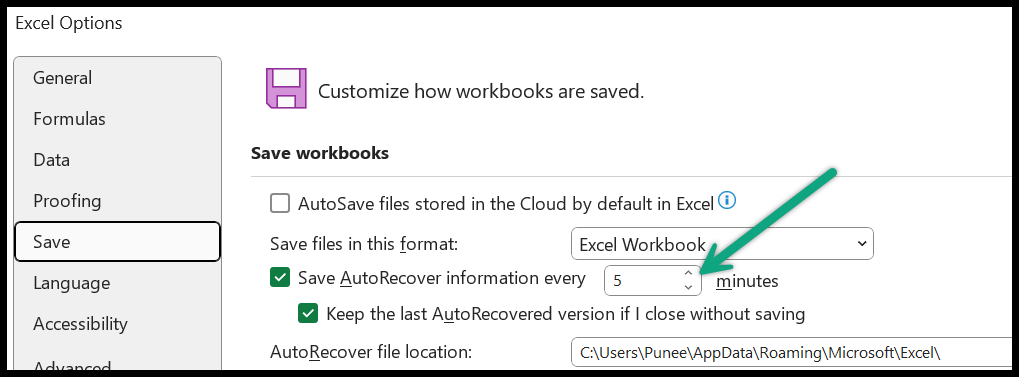
From here, you can change the AutoRecover timing (Save AutoRecover information every … minutes). It’s 10 minutes by default, but you can change it to 1 or 5 minutes according to your need.
AutoRecover is not the same as saving. It keeps a backup copy that Excel uses to recover your work if Excel closes unexpectedly. You still need to save the file with Ctrl + S. In the same Save tab, you can also choose the default file format and the default local file location for new workbooks.
AutoSave in Excel
In Excel for Microsoft 365, you’ll see an AutoSave switch at the top left of the window. When the workbook is saved on OneDrive or SharePoint, AutoSave saves your changes every few seconds, so you don’t need to press Ctrl + S. For files saved on your computer, AutoSave is not available, and you need to save them yourself.
Choose the File Format When You Save
In the Save As dialog box, the “Save as type” list lets you choose the format of the file:
- Excel Workbook (.xlsx): The default format for most workbooks.
- Excel Macro-Enabled Workbook (.xlsm): Use it when the workbook has VBA code; an .xlsx file can’t keep macros.
- Excel Binary Workbook (.xlsb): Saves and opens large files faster.
- CSV (Comma delimited): Saves only the active sheet as plain text, without formulas or formatting.
- PDF: Saves a copy that others can view and print but not edit.
Recover a Workbook You Didn’t Save
If you closed a workbook without saving it, go to File > Info > Manage Workbook and click Recover Unsaved Workbooks. Excel shows the files it saved with AutoRecover, and you can open one and save it with Save As. This works only when AutoRecover is turned on in the Save settings.
Frequently Asked Questions
What is the difference between Save and Save As?
Save updates the file you’re working on with your latest changes. Save As saves the workbook as a new file, with a new name, location or format, and then keeps that new file open.
What is the shortcut for Save As in Excel?
Press F12 on Windows to open the Save As dialog box. On a Mac, press Command + Shift + S.
Why don’t I see Save As in the File tab?
When AutoSave is on for a file saved on OneDrive or SharePoint, Excel shows Save a Copy instead of Save As. You can use Save a Copy in the same way, or turn off AutoSave to see Save As again.
Written by
Puneet Gogia
Microsoft MVP — Excel · Founder, Excel Champs
Twelve years of teaching Excel, and a decade before that using it as a data analyst. Every tutorial here is written from a file I actually built.