

Range("A1:C100").Sort Key1:=Range("A1"), Order1:=xlAscending, Header:=xlYes sorts the block by column A, A to Z, and keeps row 1 as the header. Use xlDescending for Z to A, or largest to smallest.
For a second level, add Key2 and Order2: Range("A1:C100").Sort Key1:=Range("A1"), Order1:=xlAscending, Key2:=Range("B1"), Order2:=xlDescending, Header:=xlYes. The Sort method takes up to three keys; for more, use the sheet’s Sort object.
For data that changes length, find the last row first with lastRow = Cells(Rows.Count, "A").End(xlUp).Row, then sort Range("A1:C" & lastRow). Include every column in the range. If you sort column A alone, the other columns don’t move with it and the rows get scrambled.
Always set Header. Without it, Excel guesses whether row 1 is a header and can sort the headings into the data. Numbers stored as text sort separately from real numbers, so convert them with Data → Text to Columns → Finish before sorting.
Let’s say you work in an office, managing employee data. You have a sheet listing all employees, their departments, and birthdays. Every month, you need to send out birthday cards.
Using a VBA code in Excel, you can sort this list by birthday month and day, so you always know whose birthday is coming up next. This makes it quick and easy to stay organized.
To sort a range of cells using VBA, you need to use the “SORT” method that allows you to set a single key (column) or multiple keys (for multiple columns) to sort.
You can also define the order (ascending or descending) in which you want to sort, and you can specify if you have a header or not.
VBA’s Sort Method
Before you write a macro to sort a range, it’s better to take a deep dive into the sort method and understand its arguments.
Sort (Key1, Order1, Key2, Type, Order2, Key3, Order3, _
Header, OrderCustom, MatchCase, Orientation, SortMethod, _
DataOption1, DataOption2, DataOption3)
The following are the most important arguments that you will be using in real life.
- Key: The primary key by which you want to sort. In the example, Range(“A1”) refers to the first cell in the specified range, which means the data will be sorted based on the values in the first column.
- Order: This can be xlAscending (for A to Z or smallest to largest) or xlDescending (for Z to A or largest to smallest).
- Header: A constant that specifies whether the first row contains headers. Use xlYes if there is a header, and xlNo if not. If you leave it out, Excel uses xlNo, and you can also use xlGuess to let Excel decide.
Sort a Range with VBA
- Use the range object to specify the range that you wish to sort.
- Type a dot and enter the sort method.
- Specify the key that you want to use to sort.
- Define the sorting order.
- Mention if you have a header or not.

Range("A1:A11").Sort Key1:=Range("A1"), _
                     Order1:=xlAscending, _
                     Header:=xlYes
- Range(“A1:A11”) specifies the range of cells you want to sort in the worksheet. It includes all cells from A1 to A11 in column A.
- .Sort is the method that performs the sorting on the specified range. Simply put, the method tells Excel to sort the range with the code.
- Key1:=Range(“A1”) sets the key for the sort. This means that the sorting will be based on the values found in the column, starting in cell A1.
- Order1:=xlAscending defines the order of the sort. xlAscending means the data will be sorted from smallest to largest (or alphabetically from A to Z).
- Header:=xlYes specifies that the first row of the specified range (A1) is a header row. Excel will treat it differently by keeping it at the top and not sorting it with the rest of the data.
Sort Descending
In the following code, I have used “xlDescending” to sort the amount column in descending order.

Range("A1:A13").Sort Key1:=Range("A1"), _
                     Order1:=xlDescending, _
                     Orientation:=xlSortColumns
This code doesn’t have the Header argument, so Excel sorts the first row along with the rest. If the first row of your range has a header, add Header:=xlYes to the code.
Sort a Range but Exclude Headers
Another way to keep the header out of the sort is to start the range from the second row. In the code below, the range starts at A2, so the header in A1 stays where it is, and Header:=xlNo tells Excel that the range has no header row.
Sub SortExcludingHeader()
    With ThisWorkbook.Worksheets("Sheet1").Range("A2:A100")
        .Sort Key1:=.Cells(1, 1), Order1:=xlAscending, Header:=xlNo
    End With
End Sub
Using Multiple Columns to Sort
You can also use more than one column to sort a range. Let’s take an example of the below table where you have multiple entries with employee names and cities, and you need to sort using the name and city.
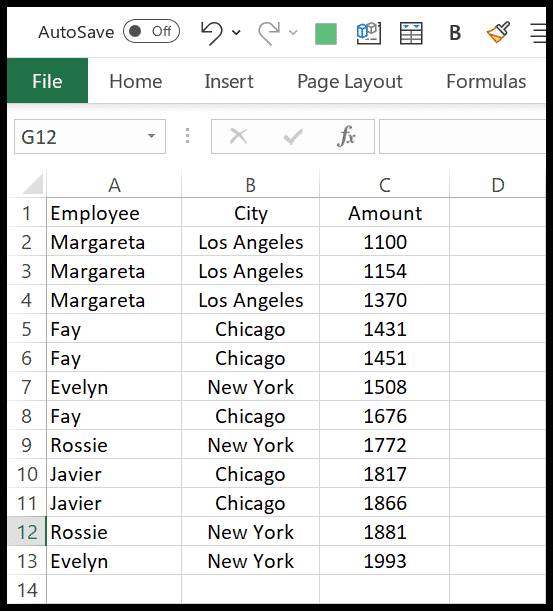
Here’s the code that you need to use:
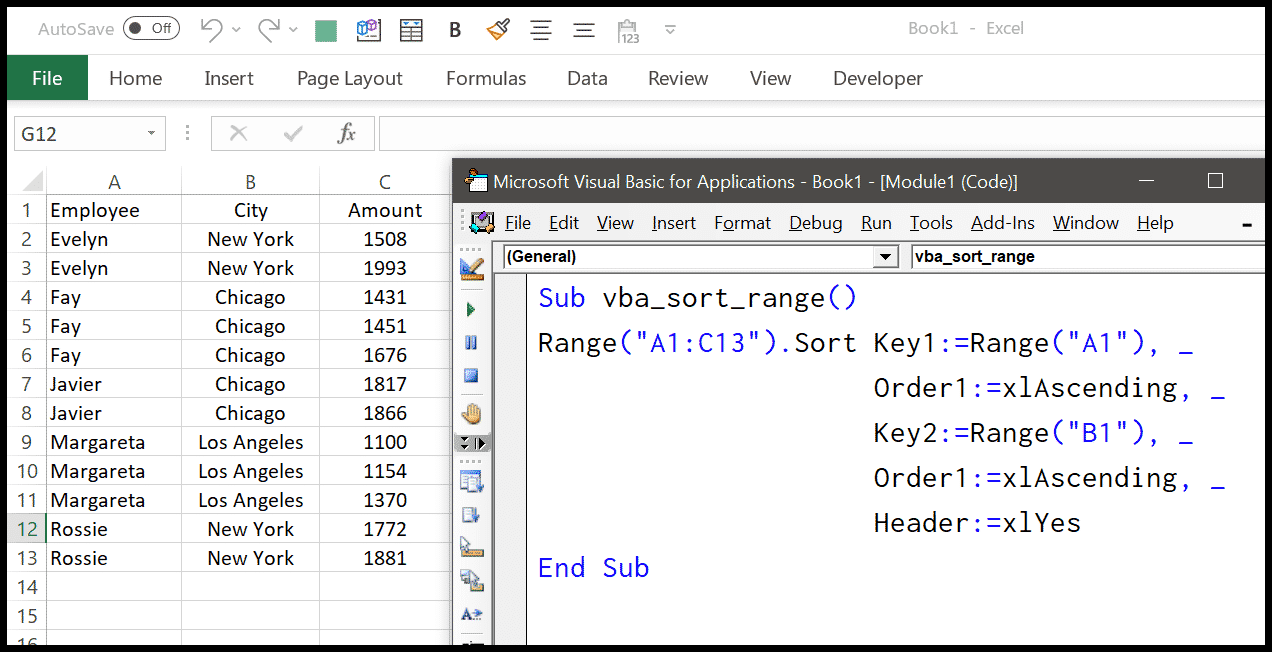
Range("A1:C13").Sort Key1:=Range("A1"), _
                     Order1:=xlAscending, _
                     Key2:=Range("B1"), _
                     Order2:=xlAscending, _
                     Header:=xlYes
As you can see in the code, you have Key1 and Key2, each with its own order (Order1 and Order2). In Key1, you have the column with the employee name, and in Key2, you have the city column. For both columns, the sorting order is ascending, and headers are there. You can add a third column with Key3 and Order3.
Note: You can use any column you want as a sort base, using the keys and orders.
Changing Sort Orientation
When you normally sort data in Excel, by default, you sort using columns (top to bottom). But from the sort options, you can change the sort orientation to left to right instead of top to bottom.

In the same way, you have an argument in the sort method to change the orientation: xlSortRows sorts left to right, and xlSortColumns sorts top to bottom, as in the “Sort Descending” example above (link).
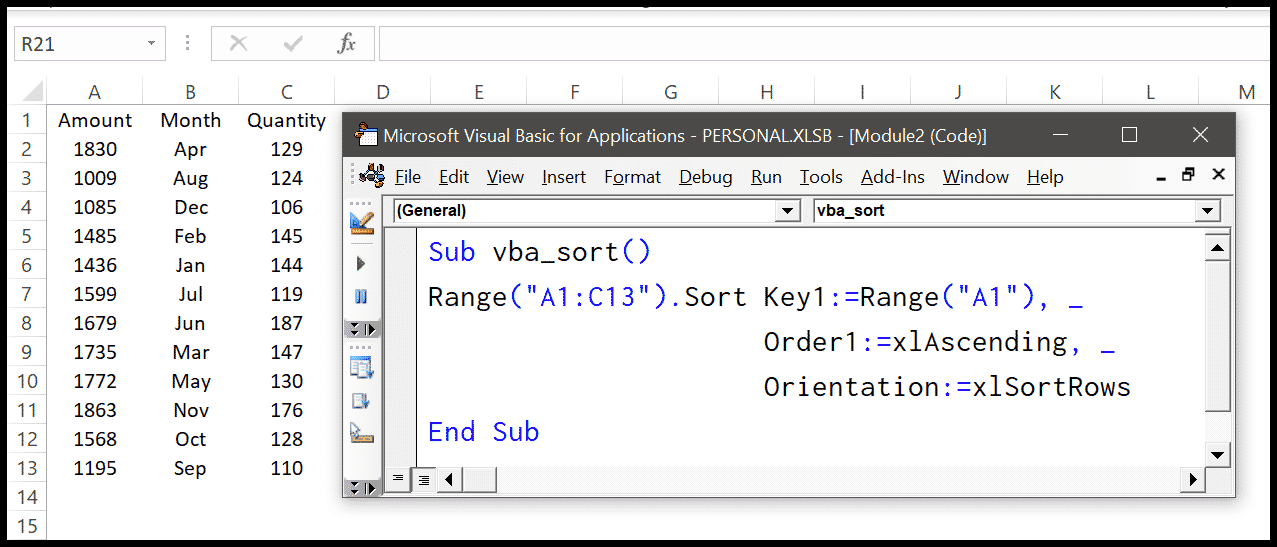
Range("A1:C13").Sort Key1:=Range("A1"), _
                     Order1:=xlAscending, _
                     Orientation:=xlSortRows
Dynamic Range Sort
It finds out how many rows of data you have in column A. Then, it sorts all the data from the first row down to the last filled row in columns A and B.
It sorts in ascending order, from smallest to largest or earliest to latest. The code assumes that the first row has headers. It helps keep lists organized without manually finding the range each time.
Sub DynamicRangeSort()
    Dim ws As Worksheet
    Dim lastRow As Long
    Dim sortRange As Range
    Set ws = ThisWorkbook.Worksheets("Sheet1")
    lastRow = ws.Cells(ws.Rows.Count, "A").End(xlUp).Row
    Set sortRange = ws.Range("A1:B" & lastRow)
    sortRange.Sort Key1:=ws.Range("A1"), Order1:=xlAscending, Header:=xlYes
End Sub
Sort by Birthday Month and Day
Now, let’s go back to the birthday list from the start of this tutorial. If you sort the birthdays as dates, Excel sorts them by year first, which doesn’t help you find the next birthday. To sort by month and day only, you can use a helper column with a formula that turns each date into a number like 1231 for 31 December:
=MONTH(C2)*100+DAY(C2)
The code below assumes you have names in column A, departments in column B, birthdays in column C and an empty column D. It enters the formula in column D, sorts the data by that column, and then clears the helper column.
Sub SortByBirthday()
    Dim ws As Worksheet
    Dim lastRow As Long
    Set ws = ThisWorkbook.Worksheets("Sheet1")
    lastRow = ws.Cells(ws.Rows.Count, "A").End(xlUp).Row
    ws.Range("D2:D" & lastRow).Formula = "=MONTH(C2)*100+DAY(C2)"
    ws.Range("A1:D" & lastRow).Sort Key1:=ws.Range("D1"), _
                                    Order1:=xlAscending, _
                                    Header:=xlYes
    ws.Range("D2:D" & lastRow).ClearContents
End Sub
Sort with More Than Three Columns (Sort Object)
The Sort method has only three keys (Key1, Key2 and Key3). When you need to sort by more columns, use the Sort object of the worksheet. It’s the same sort that you get from Data > Sort in Excel, and you can add as many sort fields as you need.
Sub SortWithSortObject()
    Dim ws As Worksheet
    Set ws = ThisWorkbook.Worksheets("Sheet1")
    With ws.Sort
        .SortFields.Clear
        .SortFields.Add Key:=ws.Range("A2:A13"), SortOn:=xlSortOnValues, Order:=xlAscending
        .SortFields.Add Key:=ws.Range("B2:B13"), SortOn:=xlSortOnValues, Order:=xlAscending
        .SortFields.Add Key:=ws.Range("C2:C13"), SortOn:=xlSortOnValues, Order:=xlDescending
        .SetRange ws.Range("A1:C13")
        .Header = xlYes
        .Apply
    End With
End Sub
In this code, SortFields.Clear removes the sort fields from the last sort, then each SortFields.Add line adds one column to sort by, in order. SetRange defines the data to sort, Header tells Excel that the first row has headers, and Apply runs the sort.
Sort an Excel Table with VBA
If your data is in an Excel table, you can use the Sort object of the table itself. That way, the code always sorts the whole table, even when you add new rows to it.
Sub SortTable()
    Dim tbl As ListObject
    Set tbl = ThisWorkbook.Worksheets("Sheet1").ListObjects("Table1")
    With tbl.Sort
        .SortFields.Clear
        .SortFields.Add Key:=tbl.ListColumns(1).Range, SortOn:=xlSortOnValues, Order:=xlAscending
        .Header = xlYes
        .Apply
    End With
End Sub
Change “Table1” to the name of your table and the number in ListColumns(1) to the column you want to sort by.
Frequently Asked Questions
Why does my header row get sorted with the data?
Because the Header argument is missing or set to xlNo, which is the default. Add Header:=xlYes, or start the range from the second row, as in the “exclude headers” example above.
How do I sort by more than three columns with VBA?
The Sort method has only three keys. Use the worksheet’s Sort object instead, with one SortFields.Add line for each column, as shown in the section above.
Can I sort in a custom order, like by month names?
Yes. With the Sort object, add a CustomOrder argument to SortFields.Add, like CustomOrder:=”Jan,Feb,Mar”. You can also use one of the custom lists that Excel already has, like the month names.

Written by
Puneet Gogia
Microsoft MVP — Excel · Founder, Excel Champs
Twelve years of teaching Excel, and a decade before that using it as a data analyst. Every tutorial here is written from a file I actually built.