

Power Query allows you to remove duplicates from the data, just like in Excel. And in this tutorial, we will learn to remove duplicate values from the data.
Steps to Remove Duplicates with Power Query
Below you have a list of names where some names are duplicates, and now you need to use Power Query to delete these duplicate values.
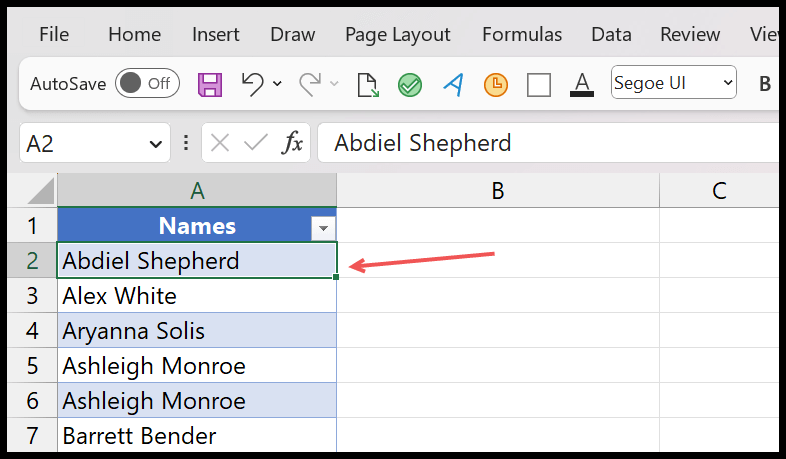
You can use the below steps:
- First, select the data and then go to the Data Tab > Get & Transform Data > Get Data > From Other Sources > From Table/Range.
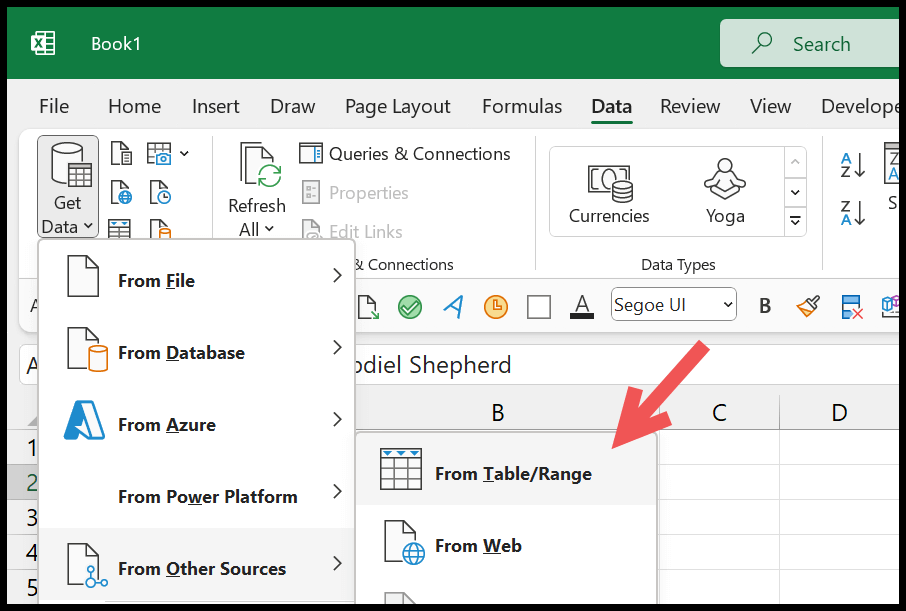
- After that, click OK to convert your Data into an Excel Table (if it’s not an Excel table already).

- Now, when you click OK, it opens the Power Query editor and loads the data into it.

- After that, from the Home Tab, click on the “Remove Rows” drop-down and then click on the “Remove Duplicates” option.
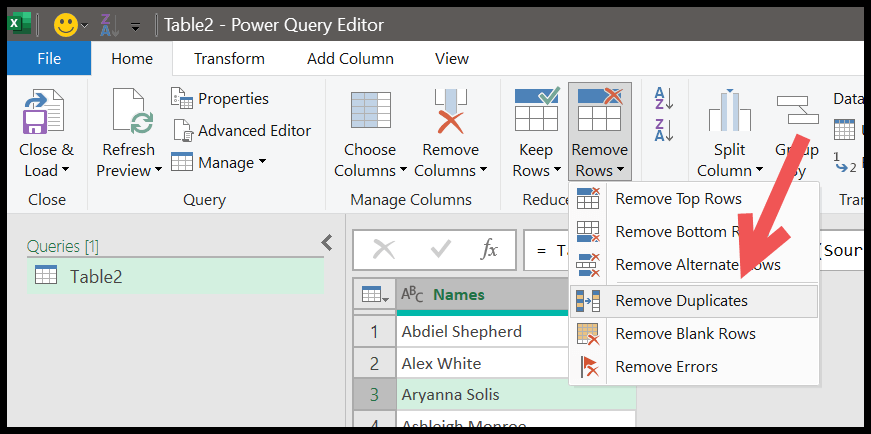
When you click on it, it removes the duplicate names from the list and leaves you with the unique names only.
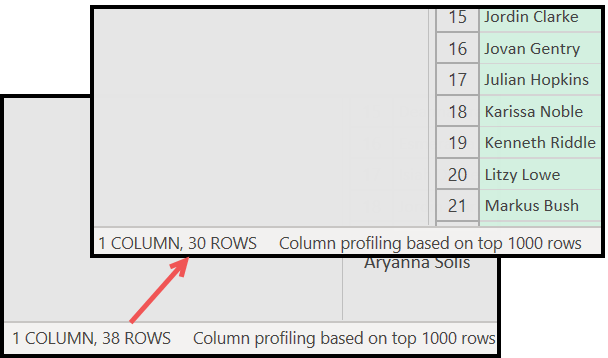
Above, the status bar shows the count of rows with duplicates and without duplicate values. Apart from the “Home Tab”, you can right-click the column header and click the “Remove Duplicates” option.

It is the same option you used in the above steps and does exactly the same thing.
Removing Duplicates When You Have Multiple Columns
If you have more than one column of data, then Power Query gives you two different ways to remove the duplicate values.
In the below example, you have two columns: names and scores.

Now if you want to remove duplicates by considering duplicates from both columns, then you need to select both columns and use the “Remove Duplicates” option.

And you can see that only one row is removed as a duplicate when we consider both columns, because only that row has the same name and the same score as another row.
The second way is to select only one column (like the names) and then use “Remove Duplicates”. In this case, Power Query looks only at that column and removes every row that repeats a name, even if the score in that row is different. It keeps the first row for each name. So, before you click the option, always check which columns are selected.
Information on Duplicate Values
In Power Query, you can also change the view of the data to get the count of duplicate values. Go to the View tab > Column Distribution.

Above, you can see how many unique and distinct values you have in each column. Distinct is the number of different values, and unique is the number of values that appear only once. When both numbers are the same as the row count, the column has no duplicates. By default, these numbers are based on the first 1,000 rows; click “Column profiling based on top 1000 rows” in the status bar and choose the entire data set to count all the rows.
Keeping Duplicate Values
There is an option allowing you to keep duplicates and remove unique values: Home Tab > Keep Rows > Keep Duplicates.

Remove Duplicates That Differ Only in Case or Spaces
Unlike Excel’s Remove Duplicates, Power Query is case-sensitive. So, “John” and “john” are two different values for it, and both stay in the data. The same happens with “John” and “John ” (with a space at the end).
- First of all, right-click the column header and go to Transform ➜ Trim to remove the leading and trailing spaces.
- After that, right-click the column header again and go to Transform ➜ Capitalize Each Word (or lowercase), so all the values have the same case.
- In the end, use Remove Duplicates as shown above.
Load the Data Back to Excel
Once the duplicates are removed, go to Home ➜ Close & Load. Power Query loads the unique rows into a new worksheet as an Excel table. The original data stays as it is. When you add new rows to the source table later, go to Data ➜ Refresh All, and Power Query removes the duplicates from the new data as well.
Behind the scenes, the Remove Duplicates step is written in the M language with the Table.Distinct function. You can see it in the formula bar of the Power Query editor (here for the Name column):
= Table.Distinct(#"Changed Type", {"Name"})
Frequently Asked Questions
Which row does Power Query keep when it removes duplicates?
It keeps the first row it finds for each value and removes the rest. If you want to keep a specific row, like the latest date, sort the data first.
Does Remove Duplicates in Power Query change the source data?
No. The source table stays as it is. Power Query only loads a new table without the duplicates.
Why are some duplicates not removed?
Because they’re not exactly the same for Power Query. The usual reasons are a different case, extra spaces, or another selected column that has different values. Use Trim and a case transform first, and check which columns are selected.