

A few years back, when I was working for a tech company, I was one of those people who were an Excel help point for all. And that’s the real reason I’m fascinated to learn more. One day, the lady who was working as a reception coordinator came to me and asked:
Puneet, I’m managing a list of tasks and I want to add date and time in the corresponding cell on completion of each task. Which is the best way?
And quickly I realized that she was talking about a timestamp. I’m sure you also use it while working in Excel. In general, it contains the current date and time, and we use it to capture the completion time of a task. Now the thing is: which is the best way to insert a timestamp in Excel?
In this post, you’ll learn how to create a timestamp in Excel in 5 different ways, and we will try to figure out which is the best of all. So let’s get started.
1. Using a Keyboard Shortcut to Insert a Timestamp
There are two different shortcuts to insert a date and a time, and here we need to use both of them, one after the other. Here are the steps:

- First of all, select the cell where you need to insert a timestamp.
- After that, use the shortcut key Control + ; (Press and hold Control and then press the semicolon). Once you press this, it will insert the current date (according to your system) in the cell.
- At this time, your cell is in edit mode. Press the Space bar to add a space after the date.
- Now, press Control + Shift + : (Press and hold the Control and Shift keys and then press the semicolon key, which gives the colon). It inserts the current time.
- Your cell is still in edit mode; now press the Enter key to complete the entry.
In short, you need to press two shortcuts in sequence to insert this. And if you want to add only the date or only the time, just skip the other shortcut key. On a Mac, use Control + ; for the date and Command + ; for the time.
PROs | Cons |
|---|---|
If you want to save time and have fewer cells, this method is perfect. | This is not a dynamic method, you have a static timestamp. And if you want to update the time stamp you need to enter it again. |
When you enter both the date and time, Excel automatically picks the right format to display it. | You need to press two different shortcut keys to enter it. |
2. Insert a Timestamp with NOW Function
A simple dynamic method. If you want to use a formula to insert a timestamp, the perfect way is to use the NOW function. When you enter this function in a cell, it returns the current date and time according to your system’s settings.
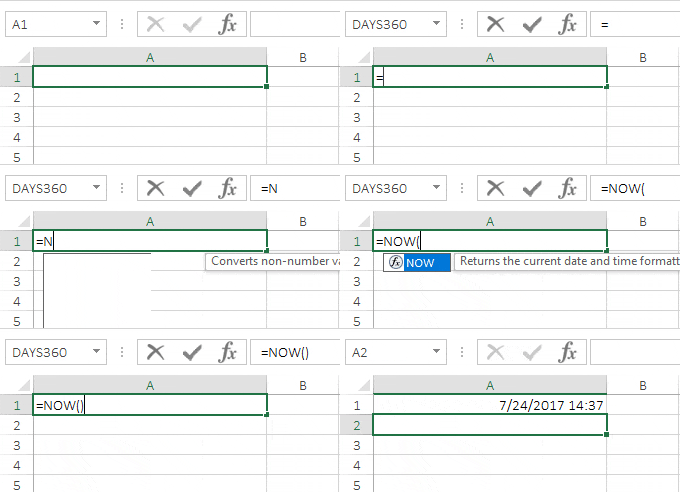
The default format of the date and time returned by NOW is mm/dd/yyyy hh:mm (it follows your system’s date settings). But for some reason, if you want a custom format, you can change its format using the custom format option. Select the cell ➜ Press shortcut key control + 1 ➜ Select “Custom” ➜ Enter “mm/dd/yyyy hh:mm” in the input box ➜ Click OK.

And if you want to enter only the date, then you can use TODAY instead of NOW, as it only returns the current date according to the system’s settings.

Pros
- It’s a dynamic method.
- You can use both of the functions with an IF function to create a condition to enter a timestamp if another cell has a value.
Cons
- Even though it’s a dynamic method, both functions are volatile, so they get updated whenever you make changes to your worksheet.
- And if you just want values instead of formulas you need to convert them into values manually.
3. Using Circular Reference for Creating a Timestamp
If you want to get into an advanced method and don’t want to use methods #1 and #2, then you can use a circular reference to insert a timestamp.
But before you learn this method, let’s understand what a circular reference is all about. Let’s say you have a value of 5 in cell A1 and a value of 10 in cell B1. Now, if you enter the formula =A1+B1+C1 in cell C1, Excel shows a circular reference warning.

This is because you are using cell C1 as a reference in cell C1. When a circular reference happens, there is a never-ending loop in the cell: the value of cell C1 depends on cell C1, and cell C1 depends on its own value.

But when a circular reference is entered, Excel doesn’t calculate it, and the never-ending loop never starts.
Here’s the deal:
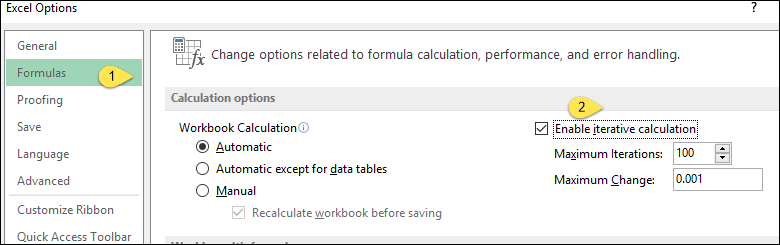
You can enable the “iterative calculation option” to force Excel to perform the calculation at least one time and use the NOW function in the calculation. This way, Excel will update the cell formula only one time instead of every time. Steps to enable the iterative calculation option:
- Go to File ➜ Options.
- In the Excel options, select Formulas.
- In the Calculation options section, check the Enable iterative calculation option.
- Click OK.
After that, in cell B2, enter the below formula in the formula bar.
=IF(A2<>"",IF(B2<>"",B2,NOW()),"")

Now, when you enter any value in cell A2, the formula in cell B2 will return a timestamp. As the formula refers to its own cell (B2), it keeps the first timestamp and doesn’t change it later, even when Excel recalculates. If you clear A2, the timestamp goes away. Format column B with a date and time format, as the formula returns the date and time as a number.
Keep in mind that iterative calculation applies to the whole Excel application, so it also hides real circular reference mistakes in your other formulas.

4. VBA to Add a Timestamp
If you are a VBA freak, then I’m sure you’ll find this VBA code useful. With this, you don’t need to enter a formula or even use any shortcut key. Just select the cell where you need to enter a timestamp and run the macro.
Sub timeStamp()

Dim ts As Date

With Selection

.Value = Now
.NumberFormat = "m/d/yyyy h:mm:ss AM/PM"

End With

End Sub
How to use this code
To use this code, you can add it to the QAT (quick access toolbar) and run it every time whenever you need to add a timestamp.
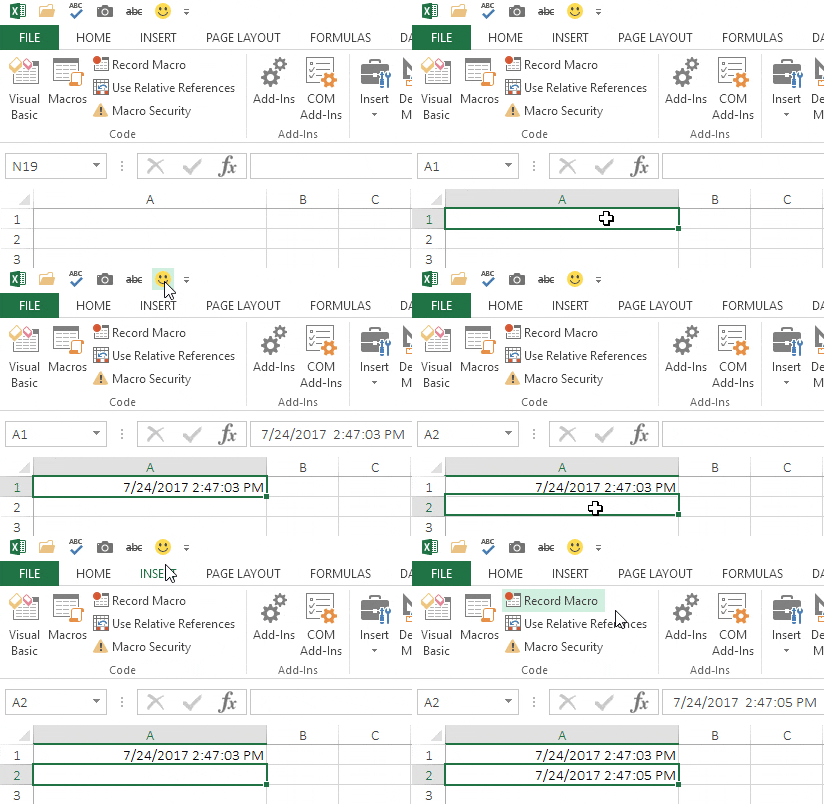
Here are the steps:
- Add this code to a module by opening the VBA editor.

- After that, go to File -> Options -> Quick Access Toolbar.
- Choose “Macros” from the “Choose commands from” drop-down.
- After that, add the timeStamp macro to the QAT.

- Now, select that macro and click the Modify button.

- Select an icon and click OK.
Now you have an icon on the QAT, and whenever you need a timestamp, you can select the cell and click this button to insert it.
4.1 Using UDF for Timestamp
Yes, you can also create a custom Excel function for inserting a timestamp in Excel. Below is the code for this UDF.
Function Timestamp(Reference As Range)
If Reference.Value <> "" Then
Timestamp = Format(Now, "dd-mm-yyyy hh:mm:ss")
Else
Timestamp = ""
End If
End Function
By using this user-defined function, you can get a timestamp in a cell if another cell has a value in it. Please follow the below steps:
- Go to the Developer tab and open the VBA editor.
- In the VBA editor, insert a new module and paste this code into it.
- Now, close the VBA editor and come back to your worksheet.
- In cell B2, enter the formula (formula below this list).
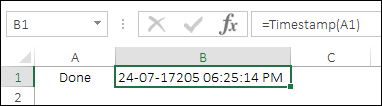
- Now, when you enter any value in cell A2, cell B2 will get a timestamp.
=Timestamp(A2)
A few things to know about this function: it returns the date and time as text (because of Format), so you can’t use it in date calculations; it updates again whenever A2 changes; and it can also update when you force a full recalculation (Ctrl + Alt + F9). Also, VBA names are not case-sensitive, so put the timeStamp macro and the Timestamp function in different modules, or rename one of them, to avoid the “Ambiguous name detected” error.
5. Automatic Timestamp with a Worksheet Change Event
This is the method I suggest when you want a timestamp that is added automatically and never changes. The code runs every time you change a cell in A2:A1000 and adds the current date and time in the next cell of column B. If you clear the cell in column A, it clears the timestamp too.
Private Sub Worksheet_Change(ByVal Target As Range)
    Dim c As Range
    If Intersect(Target, Me.Range("A2:A1000")) Is Nothing Then Exit Sub
    Application.EnableEvents = False
    For Each c In Intersect(Target, Me.Range("A2:A1000"))
        If c.Value = "" Then
            c.Offset(0, 1).ClearContents
        ElseIf c.Offset(0, 1).Value = "" Then
            c.Offset(0, 1).Value = Now
            c.Offset(0, 1).NumberFormat = "dd-mm-yyyy hh:mm:ss"
        End If
    Next c
    Application.EnableEvents = True
End Sub
- First of all, right-click the sheet tab and click View Code.
- After that, paste the code into the code window of that sheet (not in a normal module).
- In the end, save the file as a macro-enabled workbook (.xlsm).
Unlike the NOW function, this timestamp is a real value, so it doesn’t change when Excel recalculates, and you don’t need iterative calculation.
Which Method to Use
- Now and then, by hand: the keyboard shortcuts.
- A live date and time that should change: NOW or TODAY.
- An automatic timestamp that stays fixed, without macros: the circular reference formula.
- An automatic timestamp that stays fixed, with macros allowed: the Worksheet_Change code (the most reliable).
Conclusion
Adding a timestamp is something we often do while working in Excel. And you have 5 different methods to insert it, plus the change event code. If you ask me, I love to use the VBA button on the QAT for this. The best way is to add this code in a personal.xlsb so that you can use it in all the workbooks. This is the whole story about timestamps, and I’m sure you found it useful, but now tell me one thing.
Do you know any other method for this?
Please share with me in the comment section. I’d love to hear from you, and please don’t forget to share this tip with your friends.
Frequently Asked Questions
Why does my NOW timestamp keep changing?
NOW is a volatile function, so it recalculates every time the sheet changes. To freeze it, copy the cell and paste it as values, or use the shortcut keys or the Worksheet_Change code instead.
How do I show seconds in a timestamp?
Use a custom format with seconds, like mm/dd/yyyy hh:mm:ss. Note that the Ctrl + Shift + ; shortcut doesn’t add seconds, so the seconds always show 00 for that method.
Why does the circular reference formula show 0 or a warning?
Iterative calculation is turned off. Excel shows the circular reference warning and returns 0 until you turn it on (File ➜ Options ➜ Formulas ➜ Enable iterative calculation). The setting can switch off again when you open the file on another computer, so check it there as well.
If you want to sharpen your existing Excel Skills, check out these Excel Tips and Tricks.

Puneet, thank you so much for creating this article! The ‘VBA to Add a Timestamp’ works perfectly for my needs.
Question: Instead of having to choose a cell then click the button in the QAT… is there a way to configure the VBA to apply the timestamp to a specific cell so I only have to click the button in the QAT?
That’s a great idea…
Sub AddTimeStamp()
Selection.Value = Now()
End Sub
You need to add this macro to your personal macro workbook and then add this macro to the QAT.
https://excelchamps.com/vba/run-macro/#3_Add_a_Macro_Button_to_Quick_Access_Toolbar
https://excelchamps.com/excel-basics/quick-access-toolbar/
Need help. I wrote a script for Excel using 4th method(TimeStamp)
/* sht.Range(“E” & LastRow).Value = Format(Now(), “DD/MM/YY hh:mm:ss am/pm”) */
/* sht.Range(“E1002”).Value = Format(Now(), “DD/MM/YY hh:mm:ss am/pm”) */
and i have a counter variable
Dim Clients As Long
Clients = WorksheetFunction.CountIfs(Range(“E2:E1001”), “>=” & Range(“E1002”), Range(“E2:E1001”), “<=" & Format(Now(), "DD/MM/YY hh:mm:ss am/pm"))
I'm in USA and the variable Clients works fine all the time but when I send the Spread Sheet to Latin America, the variable Clients stop counting, even though after changing the region date and time, and started counting again.
Keeps throwing a compile/Syntax error
Sub timeStamp()
Dim ts As Date
With Selection
.Value = Now
.NumberFormat=“m/d/yyyy h:mm:ss AM/PM”
End With
End Sub
code is working fine, just try to delete and re-enter the double quatation marks.
.NumberFormat = "m/d/yyyy h:mm:ss AM/PM"on third method use semicolon “;”
=IF(A11″”;IF(B11″”;B11;NOW());””)
I set this up on a macro key on my keyboard. Thanks heaps!
Hi,
I have tried the UDF code. It works just fine, as long as the file is not closed. Once you close and re-open the file, all the timestamps get recalculated and it shows the date and time as of now. Even though I haven’t changed anything in the respective column/row.
Please help here.
I had the same problem, it keep reseting if you reopen the file.
Did you find a solution?
Hello,
thank you for the super macro (VBA to Add a Timestamp).
it is working perfectly. Is there a way to make the date permanently so the next day the date not changes?
thanks for your effort.
Tim Van velthoven.
Method 3 does not work
This keyboard shortcut is very helpful. I can get the time to timestamp, but it will not show the correct number of seconds, just (00) until the minute changes. I have tried changing the time format, but it still does not show the correct seconds. I want to use this to time a 5K down to the second. What am I doing incorrectly that it will not show the actual seconds?
Thank you!
I have tried to copy and paste the formula into the formula bar as instructed, but I get an error message and typing in the cell that is supposed to prompt the time stamp results in nothing. What is missing?
Try changing the quotation marks for the space to ” ” vs. the format shown in the formula. Hope this helps!
Process improver here: I LOVE METHOD 3! That way you can have two collumns: 1. What is the process doing? 2. until when.
In the second Collumn you put the formula and in the first collumn you just type what you observe during a process observation.
I like the timestamp idea but how can I use this code
Sub Timestamp()
Dim ts As Date
With Selection
.Value = Now
.NumberFormat = “m/d/yyyy”
End With
End Sub
but instead insert say my name when I click the quick access button.
Hi, need your help on this.
I’m currently below code and sometimes it works, sometimes it doesn’t.
There were a few times, where the date have already been generated example
Case 123 was updated on 11/01/21, marco captures and populate the data out on the cell.
21/01/20 I enter the file, Case 123 changes to 21/01/20 without me changing anything.
Is there anyway to stop it from changing once the data is recorded?
Working on a sharedfile.
——————————————————————————————————–
Created this under module > General > Declarations.
Sub SaveAsShared()
ActiveWorkbook.SaveAs , , , , , , xlShared
End Sub
Function Timestamp(Reference As Range)
If Reference.Value “” Then
Timestamp = Format(Now, “dd MMM yy hh:mm:ss”)
Else
Timestamp = “”
End If
End Function
Thanks for the quick timestamp solution!
How would I also add a username to that stamp? I need a user to sign off on a particular task with their username and time/date. We are converting from a Google sheet to Excel 365 and want to have the same sign of capabilities.
Thanks in advance!
so i have used a timestamp function UDF and it works great, fills in the date in cell a2 when i enter text into cell a1 but i also have macros that i run off of 2 clickable buttons, but when i run either one of those macros the timestamp (date) updates to todays date. My question is how can i make my timestamp static?
Below is my timestamp formula
Function Timestamp(Reference As Range)
If Reference.Value “” Then
Timestamp = Format(Now, ” mm-dd-yyyy”)
Else
Timestamp = “”
End If
End Function
You win. I’ve been looking for this quick entry shortcut for a timestamp for a while. THANK YOU! ctrl-shift-: — it’s perfect.
Why Microsoft does not provide a simple formula that would produce a static date and time? it’s very useful.