The data entry form is one of the best ways to enter data into a table. But, creating a form to enter data is not a cup of cake.
Yes, that’s right.
While struggling with this problem, I have found that you can create a form in Excel for data entry just with a single click. The best part about this form is it’s pre-designed and flexible. Just look at the below example.
Here’s the idea: To create this entry form, the only thing you need to do is to activate it.
Open Data Entry Form
In a short while, you will discover how helpful this tool is. But, this is hard to believe that there is no listing of this data entry form in the ribbon. So, you have to make it appear before we use it.
And before you activate this form, you need a table to enter data or at least headers of the data.

To activate it, click any of the cells in the table or just select one of the heading cells and use one of the below two methods.
- Use the keyboard shortcut key: Alt ⇢ D ⇢ O ⇢ O.
- Add an icon to the quick access toolbar.
- File ➜ Options ➜ Quick Access Toolbar.
- Choose Command From ➜ Commands Not In Ribbon ➜ From ➜ Add ➜ Click OK.

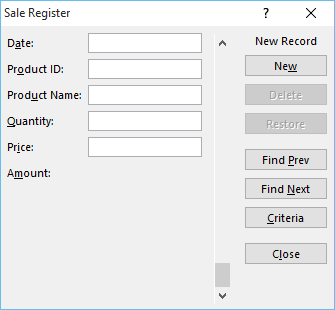
After using one of the above options, it will create a data entry form for you just like below.
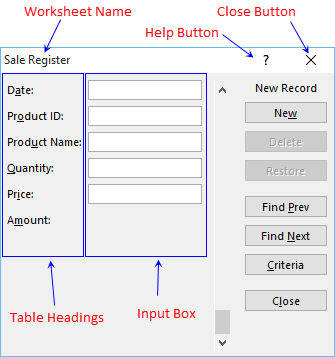
And if you notice, all the headings of your data table are automatically captured in the form.
1. Create a New Entry
To create a new data entry fill all the input boxes with data and click on the “New” button. Now if you look at the below example you’ll find that there is no input bar for the amount column.
We have a formula in the amount column to multiply the quantity by the price. That means this form is quite smart to discover the columns where there is no need to input data.
To navigate all the entries which you have entered in your data, you can use the scroll bar or you can use the “Find Prev” & “Find Next” buttons.
3. Edit Entries
To edit an entry you have to first navigate to that entry by the using method mentioned above. Once you navigate, you can make the changes in any of the input boxes and after that, just press enter key.
While editing your entry (before pressing enter or clicking the close button), if you want to restore your entry you can do it with the restore button. It will restore the previous data in all the input boxes.
4. Delete Entries
To delete an entry you have to navigate to that entry and click on the delete button. A pop window will appear for the confirmation of the deletion and it will instantly delete that entry from your data table.

5. Find a Specific Entry
If you are working on large data, you can use the “Criteria” button to find a specific entry.
For example, if you want to find entries below the table that match some specific criteria, just click on the Criteria button, enter the criteria in the input box, and press Enter. You will get the data entries matching your criteria. You can also use your criteria in more than one input box.
Important Points about this Data Entry Form
Well, there are some important points that you should know to play well with this form.
- The maximum number of input boxes you can use in the data entry form is 32.
- The width of the input box is purely connected with the related column in the worksheet. If your worksheet columns are not sufficiently wide to show values, the same width will reflect in your data form also.
- On the other hand, if only one of the columns is over in width, the same width will reflect for all input boxes in data form.
- If you have a range with the name “Database” then there is no need to select any cell from the table. It will always insert data into that table.
- While using criteria to pull some specific data, you can use Excel Wildcard Characters in this form.
- While creating data entries if you try to overwrite data in the cell, it will give you an alert message “Cannot extend list or database”.
.
Nice
I have a question
How can I hide a row automatic when an amount is zero on that row and automatic unhide that same row when the amount is > than 0.
Super helpful, have been wasting too much time trying to understand what you made understandable in minutes–thank you!!!
I like this write up because it is a ready made tool that just be used. Thanks for this.
Myself Ayesha its very helpful for learners the way which has showed step by step really very interesting & helpfull to learn.