

The simplest way is to change the format, not the value: select the cells, press Ctrl+1 → Custom, and enter mmm-yyyy. The cell still holds a real date underneath, so it sorts chronologically and still works in calculations — only the display changes.
If you need the month and year in a separate cell, use =TEXT(A1,"mmm-yyyy"), which returns May-2024. Just remember TEXT returns text, so a column built that way sorts alphabetically (April before January) and won’t group properly in a pivot table.
When you’re building month-year values for a report, the better approach is =DATE(YEAR(A1),MONTH(A1),1) formatted as mmm-yyyy — that gives you the first of the month as a real date, which looks the same but sorts and filters correctly.
And if you only want to summarise by month, a pivot table can group dates by month and year in two clicks without any helper column at all.
The easiest way to show a date as month and year is to change its formatting. This doesn’t change the date; it only changes how the date is displayed.
You can simply go to Custom Formatting and apply a custom date format (mmm-yyyy) for the month and year. Click OK, and your date will be displayed as the month and year.
The second-best method is to use the TEXT function, which allows you to convert a date into a specific format. The result will be returned in the cell where you enter the formula =TEXT(A1,"mmm-yyyy").
You need to use the same date format we used in Custom Formatting; the TEXT function will return the date as month and year.
In this tutorial, I’ve covered multiple methods for displaying a date as month and year. You can choose whichever method you find most convenient for your workflow.
Convert Date to Month and Year in Excel (TEXT)
Let’s say you need the result in a separate cell; in this case, you can use the TEXT function. The TEXT function changes how a date is shown by applying a specific format and returning the result in a different cell. For example, you can take a date like “5/8/2024” and display it as “May-2024”.

=TEXT(A1,"mmm-yyyy")
With the text function, you have two arguments to define. In the first argument (value), specify the date you want to convert to a month and year or a month and a year separately. In the second argument (format_text), you need to specify the format. You can use the formats below, which are the same as those we used in the first methods.
- mmm
- mm
- mmmm
- yy
- yyyy
- mmm-yyyy
- mm-yy
As you can see, when you use “mmm-yyyy” as the format_text in the TEXT function, Excel converts a date into this month-year format, making it easy to read.
Let’s consider a situation where you have day, month, and year as numbers in separate cells. You first need to mine all these to create a date and then get the month and year from it. For this, you can use the below formula:
=TEXT(DATE(YEAR(A1), MONTH(A1), 1), "mmmm yyyy")
And if you need a more textual way to show the month and years in a cell.
=TEXT(DATE(YEAR(A1), MONTH(A1), 1), "mmmm yyyy")
Use Month & Year Functions for Month-Year Formula
You can also write a formula by combining YEAR and MONTH functions.
YEAR extracts the year from a date. For example, if you specify a date like “5/8/2024” into it, it will return “2024”. And, the MONTH returns the month number from a date. For example, if the date is “5/8/2024”, the function will return “5” because May is the year’s fifth month.
Now to write formula with these two function to get month and year together, you can use a hyphen in between:
=MONTH("5/8/2024") & "-" & YEAR("5/8/2024")
When you enter this formula in a cell, it returns a number for the month, a hyphen, and a year number.
Use Custom Formatting to Convert Date into a Month, Year, or Month and Year
Custom formatting lets you change how dates appear in your cells without altering the actual date. You can format a date to show only the month and year, only the month, and only the year. You can use the steps below for this:
- First, select the cell where you have the date.

- After that, use the shortcut Ctrl + 1 to open the Format Cell option.

- From here, click on the “Custom” category.
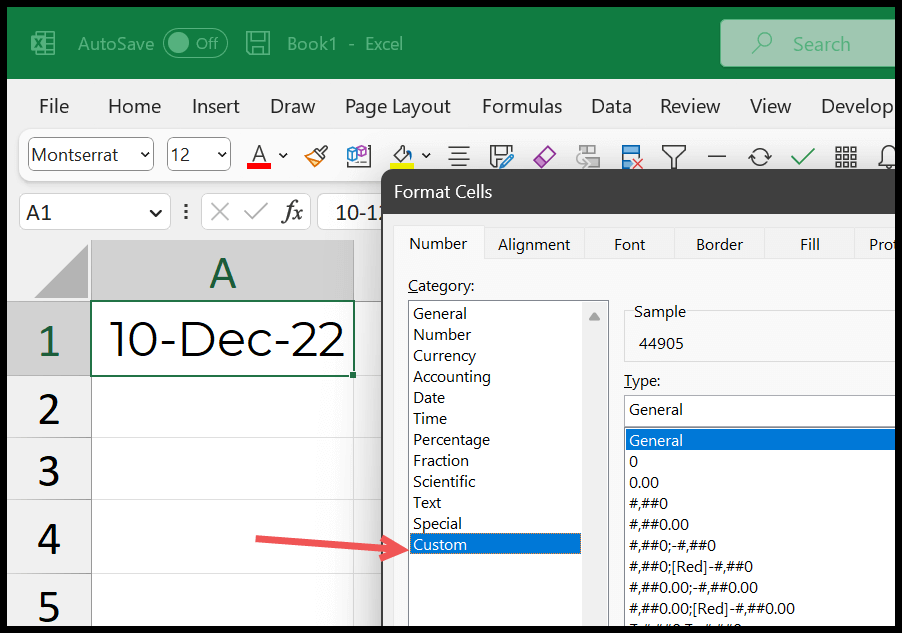
- Now, in the type input bar, you must specify the format to apply to the date. For example, you can enter “mmm-yyyy” for Month and Year.
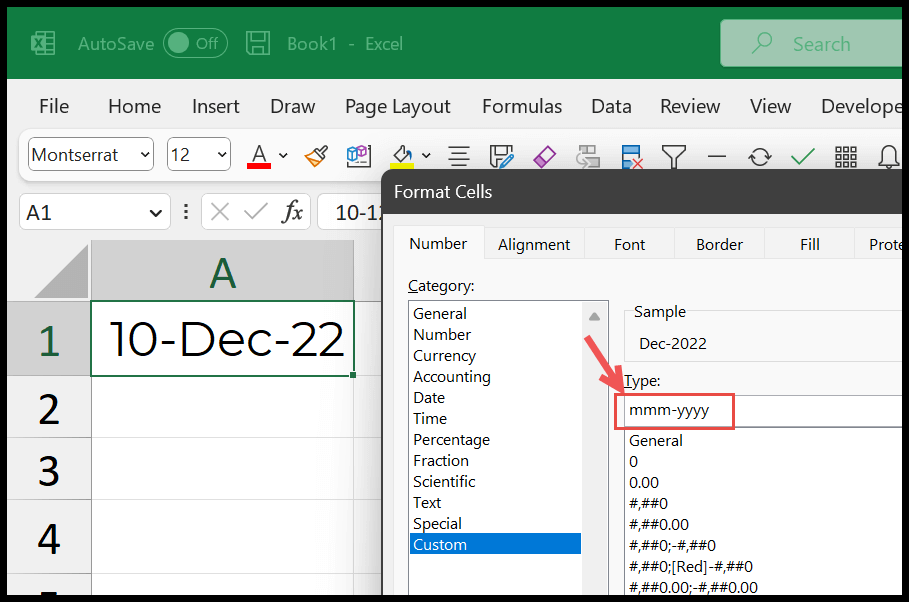
- In the end, click OK to apply the format to the cell.

And when you click OK, it will convert the date into month and year only.
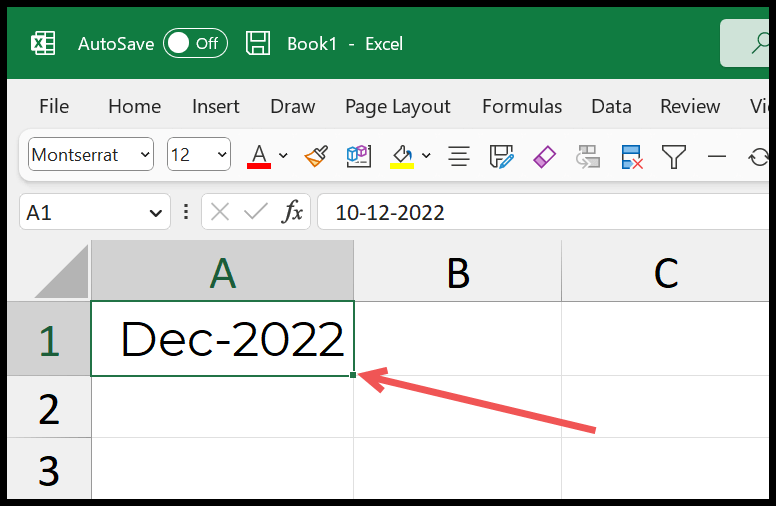
And if you see the formula bar, it’s still a date with day, month, and year. The only difference is the format you have applied to the cell to convert it into month and year.
Below are a few formats that you can use:
- mmm – for the short month name.
- mm – for the month number.
- mmmm – for the long month name.
- yy- for the two-digit year.
- yyyy – for the four-digit year.
Once you apply custom formatting to a single cell, you can use the Format Painter to apply formatting from one cell to another cell or a range of cells.
Create a Custom Function using VBA to Get Month and Year
If you are familiar with VBA, you can use the code below to create a custom Excel function that extracts the month and year from a date.

Here’s the code.
Function MonthAndYear(cell As Range) As String
    Dim inputDate As Date
    If IsDate(cell.Value) Then
        inputDate = cell.Value
        MonthAndYear = Format(inputDate, "mmmm yyyy") ' Formats the date to "Month Year"
    Else
        MonthAndYear = "Invalid Date" ' Returns this if the cell does not contain a valid date
    End If
End Function
When you enter this function, replace A1 with the cell that contains the date you want to convert. The function checks if the cell contains a valid date and, if so, returns the date formatted as the full month name followed by the year. If the cell does not contain a valid date, it returns the message “Invalid Date”.
Cell Reference Vs. Hard Values
Now, when using dates in formulas, you have two ways to enter them within a formula: one is to enter directly in it, and the second is to refer to a cell where you have the date. Referring to a cell is found to be better for several reasons:
- Using cell references allows you to change the date without editing the formula, making it easier to update or correct dates if necessary.
- Directly entering dates into formulas increases the risk of errors due to typos or incorrect date formats.
Written by
Puneet Gogia
Microsoft MVP — Excel · Founder, Excel Champs
Twelve years of teaching Excel, and a decade before that using it as a data analyst. Every tutorial here is written from a file I actually built.