

In Microsoft 365, select the cells and go to Insert → Checkbox. Each cell gets a checkbox that holds TRUE when ticked and FALSE when not, so formulas can use it directly, such as =COUNTIF(B2:B20,TRUE) to count ticked items. Press Space to tick or untick the selected boxes.
To remove in-cell checkboxes, select them and press Delete. Ticked boxes are unticked first, so press Delete again to remove them.
In older versions, use Developer → Insert → Check Box (Form Control) and click on the sheet. Right-click it, choose Format Control and set a Cell link on the Control tab; the linked cell shows TRUE or FALSE.
Copies of a form-control checkbox keep the original cell link, so every copy ticks the same cell. Relink each copy after copying or filling, or use in-cell checkboxes, which copy and fill like ordinary values.
To strike through a task when its box is ticked, select the task cells and add a conditional formatting rule (Use a formula to determine which cells to format) with =$B2=TRUE, then tick Strikethrough on the Font tab under Format.
One of the most demanding and fascinating things for an Excel user is to create interactive things in Excel. And a checkbox is a small but powerful tool that you can use to control a lot of things by unchecking/checking it.
In short: It gives you the power to make your stuff interactive. And I’m sure you use it in your work frequently. But the thing is: do you know how to use a checkbox to its best? Yes, that’s the question.
In today’s post, I’m going to show you exactly how you can insert a checkbox in Excel and all the other things which will help you to know about its properties and options. So without any further ado, let’s explore this thing.
Steps to Insert a Checkbox in Excel
Here you have two different methods to insert a checkbox. You can use whichever method you find convenient.
If you use Excel for Microsoft 365 (Windows, Mac or the web), there’s also a newer in-cell checkbox: select the cells and go to Insert ➜ Checkbox. Each cell gets a checkbox that holds TRUE when ticked and FALSE when not, so you don’t need to link it to a cell. You can tick the selected boxes with the Space key, and pressing Delete unticks them first and removes them on the second press. The steps below are for the classic Form Controls checkbox, which works in all versions.
Manual Method
- First of all, go to the Developer tab, and if you are unable to see the Developer tab in your ribbon, you can use these simple steps to enable it.

- In the Developer tab, go to Controls → Insert → Form Controls → Check Box.
- After selecting the check box, click on the place on your worksheet where you want to insert it.

VBA Code
This is another method to insert a checkbox: you can use the following VBA code.
ActiveSheet.CheckBoxes.Add(Left, Top, Width, Height).Select
ActiveSheet.CheckBoxes.Add(80, 40, 72, 72).Select
The first line shows the order of the arguments (Left, Top, Width and Height, in points), and the second line is an example. Using the above method is only helpful when you know exactly where to insert the checkbox and what size it should be. Learn more about this method here.
Link a Checkbox with a Cell
Once you insert a checkbox in your worksheet, the next thing you need to do is to link it with a cell. Follow these simple steps.
- Right-click on the check box and select Format Control.

- Now, you’ll get the Format Control dialog box.
- Go to the Control tab, and in the Cell link input bar, enter the cell address of the cell which you want to link with the checkbox.
- Click OK.
- In the cell which you have linked with your checkbox, you’ll get TRUE when you tick the checkbox and FALSE when you un-tick.

Deleting a Checkbox
You can delete a checkbox using two ways. The first way is to select a checkbox and press delete. This is a simple and fast method to do that.

And if you have more than one checkbox in your worksheet, select all the checkboxes by holding the Ctrl key and clicking them, and then press Delete to delete them all. The second way is to use the selection pane to delete them.
- Go to Home Tab → Editing → Find & Select → Selection Pane.
- In the selection pane, you will get the list of all the checkboxes you have used in your worksheet.
- You can select each of them one by one or you can select more than one by using the control key.
- Once you select them, press delete.

Printing a Checkbox
Most of the time users avoid printing a checkbox. But if you want to do that you can enable this option by using the following way.
- Right-click on the checkbox, and select Format Control.
- Go to Properties Tab.
- Tick mark “Print Object”.

This will allow you to print check boxes, and if you don’t want to print them make sure to untick this option.
Resizing a Checkbox
If you want to resize the checkbox, you can simply drag the dots on its border. And if you want to resize it to a particular height and width, you can do it by using the following steps.
- Right-click on the checkbox and select the Format Control option.
- Go to the Size tab -> Size and rotate.
- Enter the height and width that you want to fix for the checkbox.
- Click OK.

Quick Tip: To lock the aspect ratio for the size of the checkbox, tick “Lock aspect ratio”.
Copy a Checkbox in Multiple Cells
You can use three different ways to copy a checkbox from one place to another.
Copy Paste
- Select a checkbox.
- Right-click on it and copy it.
- Go to the cell where you want to paste that checkbox.
- Right-click and paste.
Use Control Key
- Select a checkbox.
- Press and hold the Ctrl key.
- Now with your mouse, drag that checkbox to another place where you want to paste it.
Using Fill Handle
- Select the cell on which you have your checkbox.
- Use the fill handle and drag it down to the cells where you want to copy the checkbox (the checkbox must be fully inside the cell for this to work).

Renaming a Checkbox
While renaming a checkbox, there is one thing you have to keep in mind: a checkbox has two different names, the caption (the text next to the box) and the actual name of the checkbox object.
- Question: How to change the caption name of a checkbox?
- Answer: Right-click, select Edit Text, then delete the default text and enter the new text.

- Question: How to rename a checkbox?
- Answer: Right-click on the check box. Go to the Name Box (left of the formula bar) and edit the name. Change it to the name you want and press Enter.

Fixing the Position of a Checkbox
By default, when you insert a checkbox in Excel, it will change its position & shape when you expand the cell on which it is placed.

But you can easily fix its position using these steps.
- Right-click on the checkbox, and go to Format Control → Properties Tab.
- In Object Positioning, select “Don’t move or size with cells”.
- Once you select this option, the checkbox will not move from its position by expanding the column or row.

Hide or Un-hide a Checkbox
You can also hide or un-hide a check box from your worksheet using these steps.
- Open the selection pane by using the shortcut key Alt + F10.
- On the right side of the name of every checkbox, there is a small icon of an eye.
- Click on that icon to hide a checkbox and the same icon again to unhide it.
- If you want to hide/unhide all the check boxes, you can use the Hide All button and the Show All button.
How to use Checkbox in Excel
Here I have a list of useful ideas for using a checkbox in your spreadsheet.
Creating a Checklist
In the below example, I have used a checkbox to create a checklist. And, I have used formulas in conditional formatting to create this checklist.
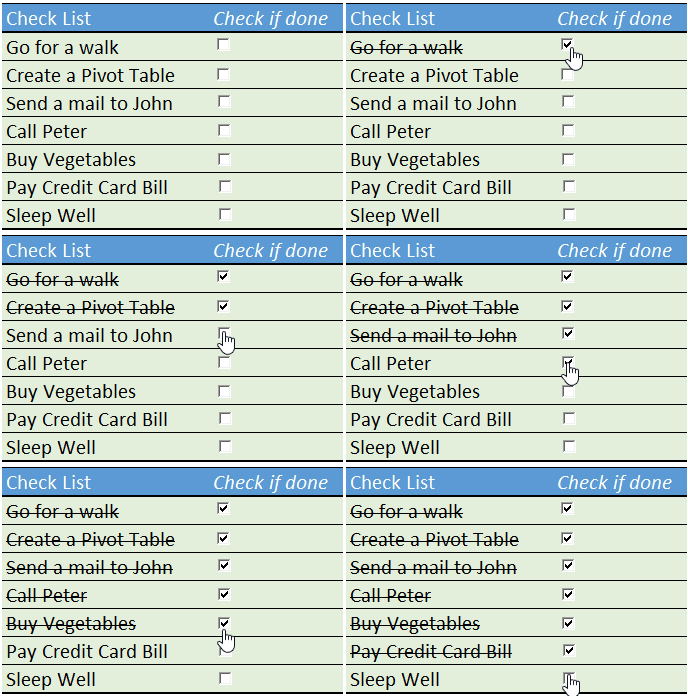
- Insert a check box and link it to a cell.
- Now, select the cell in which you have the task name and go to Home Tab -> Styles -> Conditional Formatting -> New Rule.
- Click on “Use a formula to determine which cells to format” and enter the below formula into it.
- =IF(B1=TRUE,TRUE,FALSE)
- Apply formatting for strikethrough.
- Click OK.
Now, whenever you tick the checkbox it will change the value in the linked cell to TRUE, and the cell in which you have applied conditional formatting will get a line through a value.
Create a Dynamic Chart with a Checkbox
In the below example, I have created a dynamic chart using a line chart and a column chart.

- Create a table with profit values and link it to another table using the below formula.
- =IF($I$17=TRUE,VLOOKUP($I4,$M$3:$N$15,2,0),NA())
- Then link $I$17 with the checkbox.
- Whenever I tick that checkbox, the above formula will use the VLOOKUP function to get the profit percentages. And if the checkbox is unticked, I’ll get #N/A, which a line chart doesn’t plot.
Use Checkbox to Run a Macro
While working on an invoice template, I got this idea. If you want the shipping address to be the same as the billing address, you just have to tick the checkbox, and the address will be copied to it.
And on the other side, when you untick that checkbox, the content will be cleared.

- Go to the Developer Tab → Code → Visual Basic, or you can also use the shortcut key Alt + F11 to open the Visual Basic Editor.
- Add below VBA code to the sheet in which you have inserted your checkbox.
Sub Ship_To_XL()
If Range("D15") = True Then
Range("D17:D21") = Range("C17:C21").Value
ElseIf Range("D15") = False Then
Range("D17:D21").ClearContents
Else: MsgBox ("Error!")
End If
End Sub
Please note you have to insert this code into the code window of the same worksheet in which you want to use it. In the above code, D17:D21 is the range for the shipping address and C17:C21 is the range for the billing address. In cell D15, I have linked the checkbox.
After that, right-click the checkbox, select Assign Macro, pick Ship_To_XL from the list and click OK, so the macro runs every time you tick or untick the checkbox.
Count Checked Checkboxes
As every linked cell (or in-cell checkbox) holds TRUE or FALSE, you can count the ticked boxes with COUNTIF. If the linked cells are in C2:C20, use:
=COUNTIF(C2:C20,TRUE)
And to show the progress of a checklist as a percentage, divide the ticked count by the total number of boxes:
=COUNTIF(C2:C20,TRUE)/ROWS(C2:C20)
Frequently Asked Questions
What is the difference between Form Control and ActiveX checkboxes?
Form Control checkboxes are simple and work on Windows and Mac. ActiveX checkboxes have more properties and events but only work on Windows, so Form Controls (or the new in-cell checkboxes) are the better choice for most workbooks.
Why can’t I select a checkbox without ticking it?
A left-click toggles a Form Control checkbox. Right-click it (and press Esc to close the menu), or hold Ctrl and click it, to select it without changing its value.
Why don’t I see Checkbox on the Insert tab?
In-cell checkboxes are only in Excel for Microsoft 365 and Excel for the web. In Excel 2021 and older, use the Form Controls checkbox from the Developer tab, as shown above.
Hi Puneet,
Thanks for such a useful and clear tutorial.
I randomly use check box on my sheets and curious to know if there is any way to link one check box with more then one cell.
Very comprehensive. Good work. Thanks.
Can I use a check box in a table? Will it automatically copy down when you enter a new line in the table? Also, if used in a table, can I use the check box in a formula in another table?
Really interesting blog. I use checboxes to hide one or several rows, though VBA. I Liked your invoice example. But why do you prefer to use macro instead of using formulas?
Thanks Torstein for your words.
I have two reason for that
1. Formulas will not allow me to add a custom address.
2. VBA gives me a neat worksheet.
Cheers
Puneet