Applying hanging indent can be a lifesaver if you are in academia. It ensures that each entry stands out, with the first line aligned to the left margin and all the subsequent indented.
This formatting style complies with academic citation standards, such as APA, MLA, and Chicago. It also enhances the document’s readability, making scanning very convenient for readers.
Beyond academia, hanging indents are crucial for structuring business documents. They help organize detailed descriptions, bullet points, and nested lists, enhancing clarity and professionalism. Today, I’ll explain how to apply hanging indent in Google Docs.
What is a Hanging Indent in Google Docs?
A hanging indent is simply a formatting style in which the first line in a paragraph is flushed to the left margin, and all the other lines are indented. Imagine a paragraph where the first line stands out while the rest politely step back. That’s a hanging indent for you.
This type of formatting is especially common in bibliographies, brochures, or business reports, where clarity and readability are of utmost importance. Hanging indents helps you highlight specific document parts, thereby increasing the focus on specific aspects of your project.
How to Add a Hanging Indent Using the Format Tab
One of the most convenient and quick ways to add hanging indent in Google Docs is using the ‘Format’ tab. You need to follow these steps:
- First, open the document where you want to add the hanging indent.
- Then, select the paragraph or text on which you want to apply this formatting style. You can highlight the full list if you are working on a bibliography.
- Next, go to the ‘Format’ tab on the top of the page and click on it.
- Once you click on the format tab, a drop-down menu will appear. On this drop-down list, hover over ‘Align and indent’ and then click on the ‘Indentation option’ from the submenu.
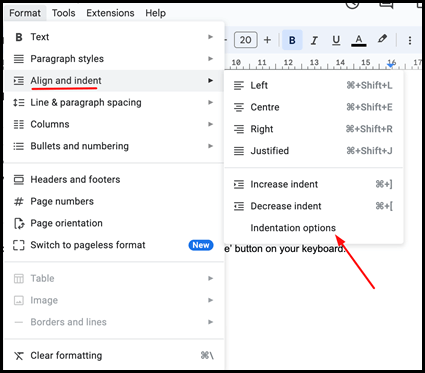
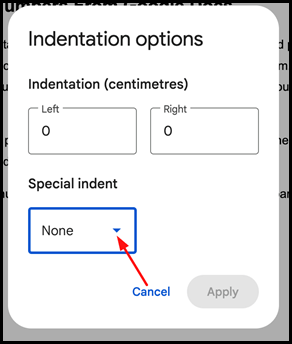
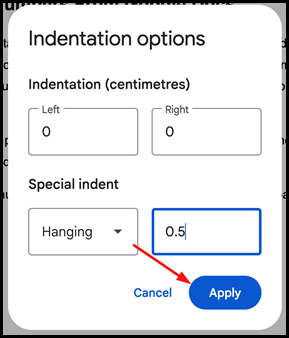
- A dialog box will appear after clicking the indentation option. On this dialog box, locate the section named ‘Special indent.’
- In the’ Special indent’ section, you will see a small downward arrow. Click on it and then choose ‘Hanging.’
- Here, you can adjust the depth of the indent according to your requirements. Note that 0.5 is the standard for hanging indents.
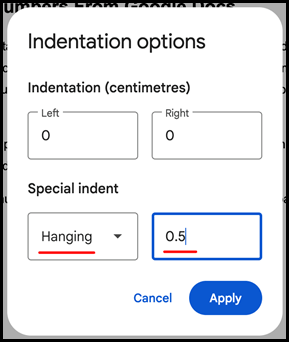
8. Finally, click ‘Apply’ to save the changes.
Once you do that, the selected text should have a hanging indent.
Add a Hanging Indent using the Keyboard Shortcut
Let me explain: Google Docs does not have a direct keyboard shortcut for adding hanging indents to your document. But I will show you how you can achieve the same result using a combination of shortcuts:
- The first step is to open the document on which you want to apply this formatting style.
- Then, select the specific text to which you want to apply the hanging indent.
- If you are working on a Windows, press ‘Ctrl+A’ to select the entire document or manually highlight a specific portion.
- If you are working on a Mac, press ‘Command+A’ or manually highlight a specific portion of your text.
- Then, press’ Ctrl+ \’ (for Windows) or ‘Command+ \’ to indent the selected text.
Please note that this shortcut might not work on all keyboards or operating systems. If it doesn’t, you can always use the menu method.
Add Hanging Indent using the Ruler
Apart from all the methods I already mentioned, there’s one more way you can add hanging indent in Google Docs. And that’s by using the ruler option. You can do it by following these steps:
- Like in all the other methods, you need to open the document to which you want to apply the indentation.
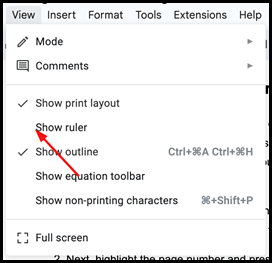
- Then, display the ruler. If you don’t see the ruler at the top of the page, you can enable it by clicking on the “View” tab and selecting the ‘Show ruler’ option.
- After that, highlight the text portion where you want to apply the hanging indent.
- Now, it’s time to adjust the ruler. Go to the top of your document where the ruler is displayed.
You will see two small blue markers on the left side of the ruler. The triangle one represents the first line indent, and the rectangle one represents the left indent for all lines.

Once you’ve located the markers, drag the rectangle (left indent marker) to the right to the desired position. The standard is 0.5 inches.
Then, drag the triangle marker (first line indent) all the way back to the left margin. This will immediately create a hanging indent on your selected text. The selected text will have a hanging indent applied with all lines indented except the first one.
Adjusting Hanging Indents for Multiple Paragraphs
If you want to apply hanging indent to not only one section but multiple sections or paragraphs in your document, you need to select all the sections simultaneously and then apply the indent.
- Hold the Ctrl Key (Windows) or Command Key (Mac) and highlight the sections where you want to apply the hanging indent.
- Once selected, use the Format tab, keyboard shortcuts, or ruler method to simultaneously apply the hanging indent to all highlighted sections.
Conclusion
Out of all the methods I suggested, I like the ruler method the best for applying a hanging indent. It is more visual and lets you adjust the indentation with the mouse.
Moreover, keep in mind that if you copy text from another source to your document, formatting, including hanging indent, might be lost when you paste it. But not to worry—there’s an easy solution to avoid this issue.
When you paste text, it comes with existing formatting applied to it. It is best to clear the existing formatting first (‘Format’>’ Clear formatting’) before you apply hanging indent on the text.