In Excel, you can create a simple drop-down with Yes and No values to use in the status column. In the following example, we have a list of students and now you need to create a drop-down with which we can enter yes or no in the “Passed” column.

Steps to Create a Drop-Down List with Yes & No
- First, select the cells or range of cells where you want to create this drop-down.

- Now, go to the Data Tab ⇢ Data Tools ⇢ Data Validation ⇢ Data Validation.

- From here, in the Data Validation Dialog box, select the “List” option from the “Allow” drop-down.

- Next, enter (Yes, No) in the source input bar.

- In the end, click OK to create this drop-down with the list value Yes and No.
Now the moment you click OK, you will get a drop-down on all the cells that you have selected.

While creating this drop-down with yes and no, you need to make sure that you have checked both of the following options from the dialog box.

- Ignore Blank: With this option activated, you can leave a cell blank, but if not checked, it will show you an error if you left a cell without selecting any value (Yes-No).
- In-Cell dropdown: This need to be checked to have a drop-down so that you enter values with it, not by typing in the cell or copy-paste.
Create a Yes-No Drop-Down List with Cell Reference
You can also add a yes or no drop-down in Excel, where you can refer to a range of cells where you have both values. You can refer to the cell A1 and A2 and enter Yes in the cell A1 and No in the cell A2. This helps you to edit and change the value in the future if you want.
Next, select the cell or range of cells you want the drop-down menu to add. Depending on where you need the drop-down menu, you can click on a single cell or select multiple cells.
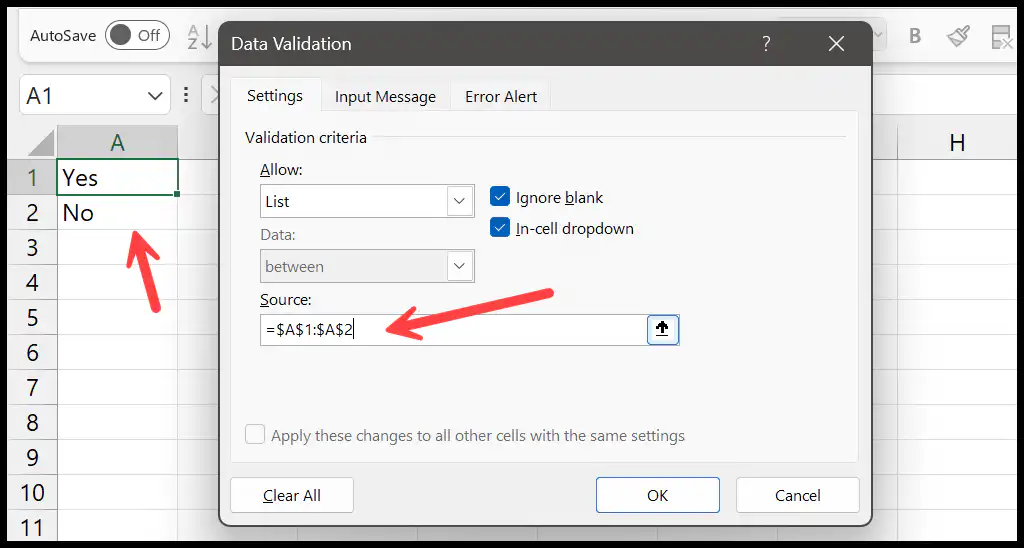
After selecting the cells, go to the “Data” tab on the Ribbon and click on “Data Validation” in the Data Tools group. This will open the Data Validation dialog box. In this box, under the “Settings” tab, choose “List” from the Allow drop-down menu.
In the Source box, type =$A$1:$A$2 or select these cells directly. Click “OK” to apply the settings. Now, the selected cells will have a drop-down list with Yes-No.
As you can see the steps are the same all you need to do is to refer to the cells where you have values.
Use a VBA Code to Add Yes/No Drop Down in a Cell or a Range
If you are required to create a lot of yes-no drop-downs in Excel, instead of using the manual method, you can use a VBA code that will help you add a drop-down list instantly to the selected cell or the range of cells. This will help you create as many drop-down lists as you want with a single click.
Sub CreateYesNoDropDown()
    Dim ws As Worksheet
    Dim rng As Range

    ' Set the worksheet to the active sheet
    Set ws = ActiveSheet

    ' Set the range to the selected cells
    Set rng = Selection

    ' Apply data validation to the selected range
    With rng.Validation
        .Delete ' Remove any existing validation
        .Add Type:=xlValidateList, AlertStyle:=xlValidAlertStop, Operator:= _
            xlBetween, Formula1:="Yes,No"
        .IgnoreBlank = True
        .InCellDropdown = True
        .ShowInput = True
        .ShowError = True
    End With

    MsgBox "Yes-No drop-down list created successfully in the selected cells."
End Sub
Create a Cell Message Along with the Yes-No Drop Down
When you create a dropdown list with the yes and no values, you might also like to add a message on the cell to aware of the user-specified value in the cell either “Yes” or “No”.
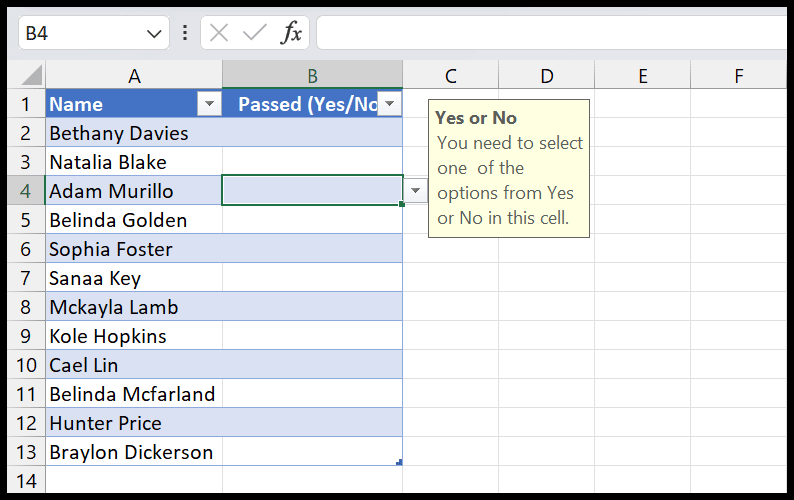
- First, open the data validation dialog box, and go to the Input Message Tab.

- Now in the title bar, enter a title for the message.

- After that, enter the main message in the “Input message:”.

- In the end, click OK to save it.
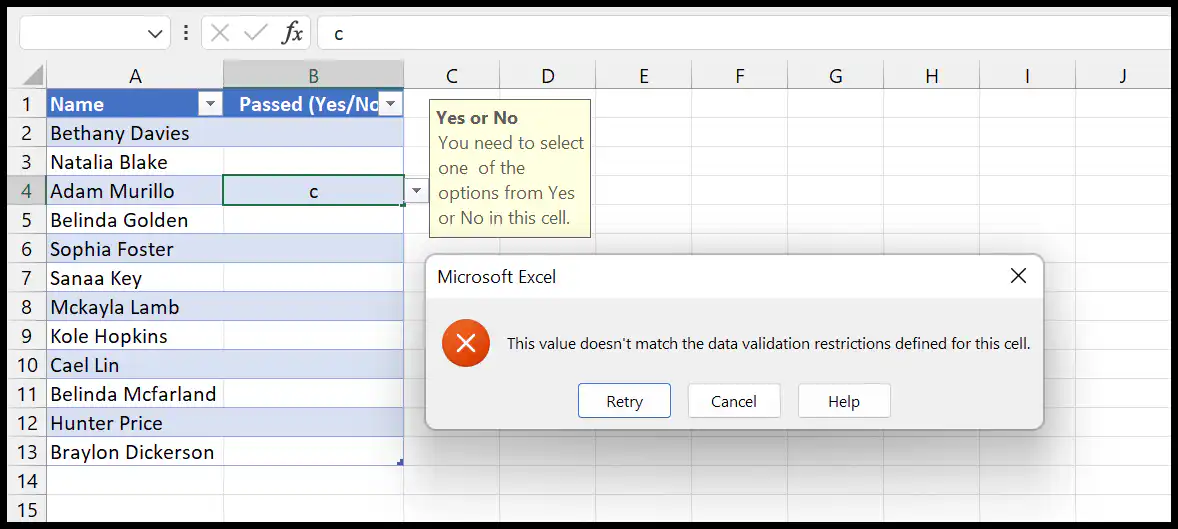
When a user tries to add a value other than “Yes” or “No”, he/she will get an error like the below:
Edit a Drop Down List
Like any other drop-down list, when you use a yes or no, you can add it and change these values whenever you want. To do this, you need to go to the data validation option, and from the source, you can change the values.
If you already know that you might need to change the values in the future, I suggest you use a cell reference that allows you to update or change the values without opening the data validation option. You can change the values in the cells, which will be reflected in the drop-down list.
Copy-Cut-Paste a Drop-Down List
One feature I like about drop-down lists is that you can move them from one cell or range to another cell or range. If you want to move a drop-down list, you just need to cut and paste it to a different cell.
If you want to copy it from one cell to another, you need to select the cell and use Control + C to copy it, and then go to the cell where you want to paste it and use the keyboard shortcut Control + V to paste it.