

Go to Insert → Shapes, pick Line and drag on the sheet. Hold Shift while you drag to keep the line perfectly horizontal, vertical or at 45 degrees, and hold Alt to snap its ends to the cell gridlines.
To style it, select the line and use Shape Format → Shape Outline for colour, Weight for thickness, Dashes for a dotted line and Arrows for arrowheads. To join two shapes, use an Elbow Connector or Straight Arrow Connector so the line stays attached when the shapes move.
For a diagonal line inside a cell, such as a split table header, don’t draw a shape. Press Ctrl + 1, open the Border tab and click one of the diagonal border buttons. The line then stays in the cell when you resize or move it.
Shapes float above the grid, so they can drift out of place when you insert rows or resize columns. For dividing lines under headings or totals, use cell borders (Home → Borders), which move, sort and print with the data.
Like other Microsoft Office applications such as Word or PowerPoint, Excel also has the feature to draw and insert a line in the worksheet. Users can draw vertical, horizontal, and diagonal lines in sheets to connect the two cells, charts, points, and shapes.
Excel has a variety of line types available, and based on the requirements, users can select and draw different types of lines and can also customize them. We have mentioned some quick and easy steps for you to draw and format the line in Excel.
Draw a Line Using Shapes
- First, go to the “Insert” tab, then click on the “Shapes” icon (in the Illustrations group), and then select the line type which you want to draw.

- Once you select the line, your mouse pointer changes to a plus (+) sign.
- After that, with the help of the mouse, go to the cell where you want to start the line.
- Now, press and hold the left mouse button and drag the mouse to a certain length or to a cell up to which you want to draw that line.

Users can click on the line and copy-paste it, or drag the line to any other location within the worksheet.
Tip: hold the Shift key while you drag, and Excel keeps the line perfectly horizontal, vertical or at 45 degrees. Hold the Alt key instead to snap the ends of the line to the cell gridlines.
Make the Line a Perfect Straight Line
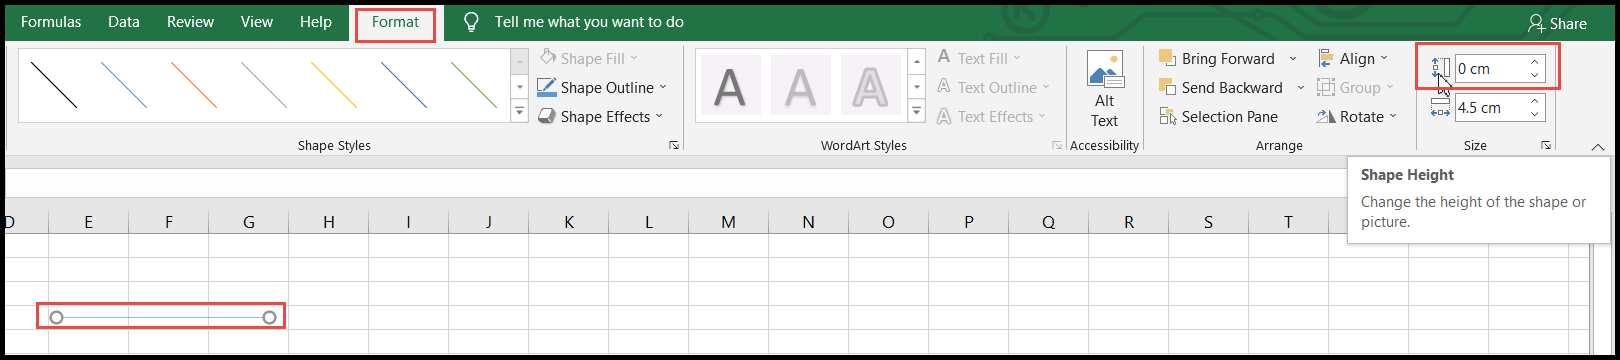
When users draw a straight line by dragging the mouse, there might be a possibility of not getting the perfect straight line. To make the line perfectly straight, users can follow these steps.
- First, click on the line, and you will see the “Shape Format” tab (called “Format” in older versions).
- Now, click on the “Shape Format” tab and set the shape height to zero (0) cm to make it a perfectly horizontal line (or the width to zero for a vertical line).
- You can also make the line diagonal by increasing the shape height with the help of the up and down arrows.
Format or Customize the Line
Excel has the option to format and customize the shape, size, color, and design of the lines.
- First, click on the line and then click on the “Shape Format” tab.
- After that, click on the drop-down arrow button within the “Shape Styles” group.

- Now, select the style for your line from the “Shape Styles” drop-down.
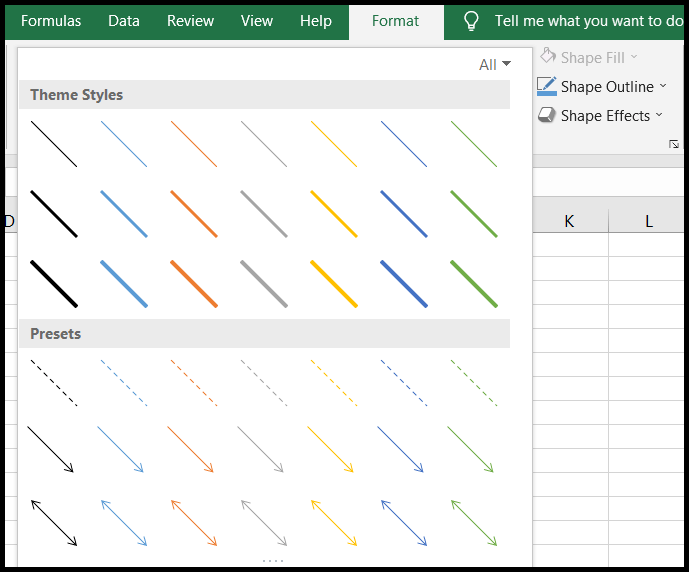
- Once you click on the required style, the line gets converted to that style.

- To change the color of the line, click on the “Shape Outline” drop-down arrow and select the color you want.

- To increase or decrease the width of the line, click on “Weight” in the Shape Outline drop-down and select the width size you want.

- To make the line a dotted line, click on “Dashes” in the Shape Outline drop-down and select the dotted line style you want.

- To add the direction arrows to the line, click on “Arrows” in the Shape Outline drop-down and select the arrow type you want.

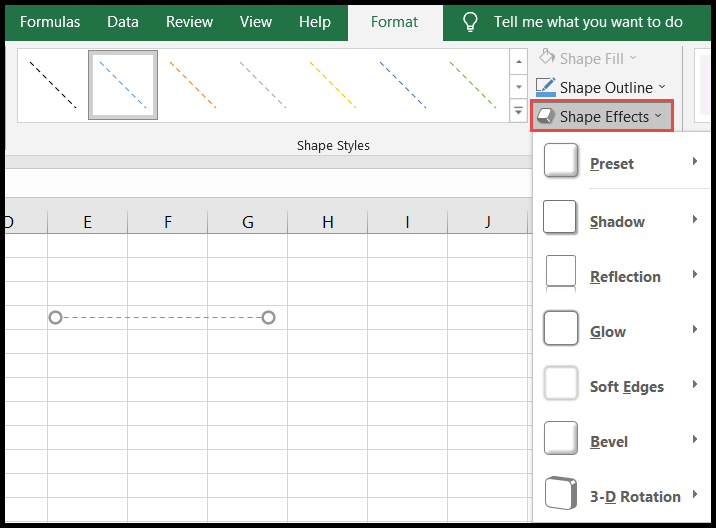
- To add effects to the line, click on the “Shape Effects” drop-down arrow and select the effect you want.
- To do more formatting to the line, right-click on the line and click on “Format Shape” from the menu, and the “Format Shape” pane opens.

Draw Several Lines in a Row
Normally, Excel lets you draw only one line and then switches back to the normal pointer. To draw several lines one after another, go to Insert ➜ Shapes, right-click the line type, and click “Lock Drawing Mode”. Press Esc when you’re done.
Connect Two Shapes with a Line
If you want a line between two shapes, start and end the line on the small dots that appear on the edges of the shapes. The line then sticks to both shapes, and when you move a shape, the line moves with it. For a line with a bend, use the Elbow Connector from the Lines section of Shapes.
Frequently Asked Questions
How do I make a line move with the cells?
Right-click the line ➜ Format Shape ➜ Size & Properties ➜ Properties, and choose “Move and size with cells”. Then the line moves when you insert rows or columns or sort the data.
How do I draw a diagonal line inside a cell?
Use a border instead of a shape: press Ctrl + 1, go to the Border tab, and click the diagonal border button. This line stays inside the cell and resizes with it.
How do I delete a line?
Click on the line to select it and press Delete. To find lines that are hard to click, use Home ➜ Find & Select ➜ Selection Pane, which lists all the shapes on the sheet.

Written by
Puneet Gogia
Microsoft MVP — Excel · Founder, Excel Champs
Twelve years of teaching Excel, and a decade before that using it as a data analyst. Every tutorial here is written from a file I actually built.